The Customer Card: Subscriptions Tab
Summary
The Subscriptions tab manages customer subscriptions and service schedules.
Users can set up recurring services to be year-round, seasonal, or with custom frequencies. The user can also specify exactly how much customers are charged for each service type and make the initial service a different rate than the recurring services. The user can also have multiple subscriptions for each customer, and the platform will always keep track of when each service is due.
The Subscription feature will prevent the user from ever missing a customer’s appointment.
Important Points:
- The user can set default preferences for the service types under Admin > Preferences > Service Related > Service Types. Setting default preferences is beneficial because the user doesn’t have to fill out the same fields every time.
Accessing the Subscriptions Tab
To access Subscriptions in the Customer Card, go to:
Customer Card > Subscription.

Adding a new Subscription
Once the user creates a customer, Subscription(s) may be added. The user can set up multiple subscriptions for each customer. Each subscription is a separate entity and has service dates independent of one another. To add a new subscription:
Customer Card > Subscription > + New Subscription.

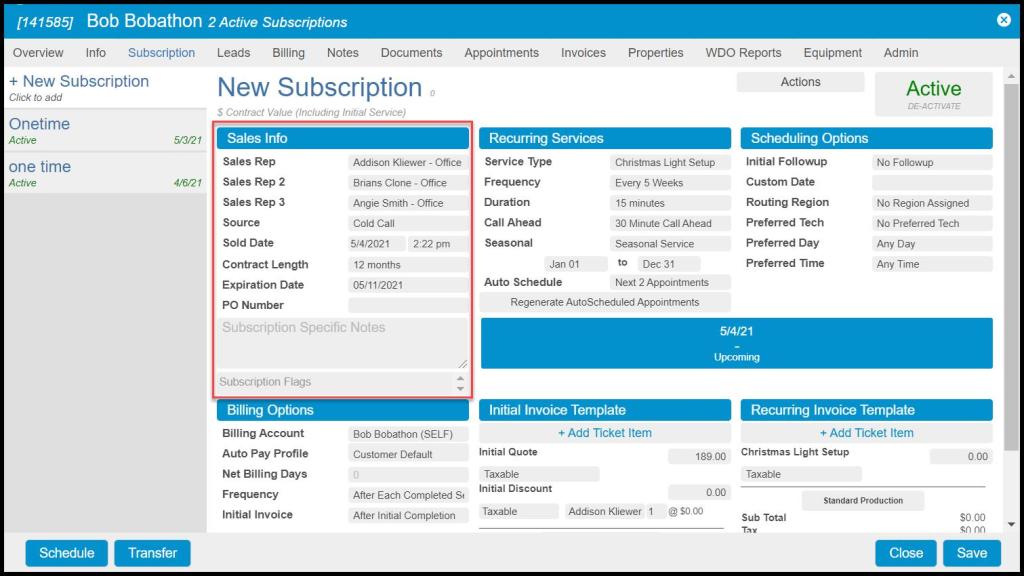
Viewing the Sales Info Column
The Sales Info column allows the user to input information about the sales representative and the contract information for this subscription.
- Sales Rep: Assign the subscription sale to a specific sales representative. To enable Sales Rep 2 and 3, navigate to Admin > Preferences > Office Settings > Preferences > Other Options.
- Source: This is a subscription-specific source. Typically, it will autofill the source that is selected under the Info tab of the Customer Card. However, the user can change it here if it is different.
- Sold Date: Date and time the sales rep sold the contract.
- Contract Length: The length of the contract.
- Expiration Date: The subscription will stop and Freeze/Deactivate after the expiration date. If the user doesn’t want to have an expiration date, the user can leave it blank, and they will stay in scheduling until the user freezes the subscription or puts in an expiration date.
- PO Number: Input the customer’s PO Number here, and it will appear on all of the customer’s invoices.
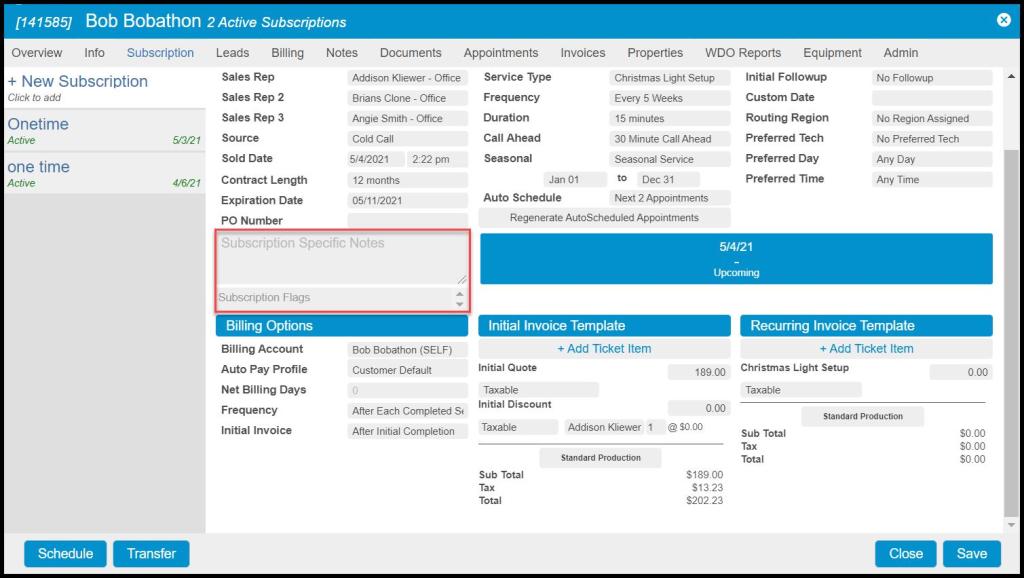
Viewing the Notes and Flags
The user can add subscription-specific notes and flags to the customer’s subscription.
- Subscription Specific Notes: These are for any important notes that a technician would need to see every time a technician serviced an appointment for this specific subscription.
- Subscription Flags: The user can assign flags to customer subscriptions. Go to Admin > Preferences > Customer Preferences > Generic Flags to create flags for use on subscriptions.
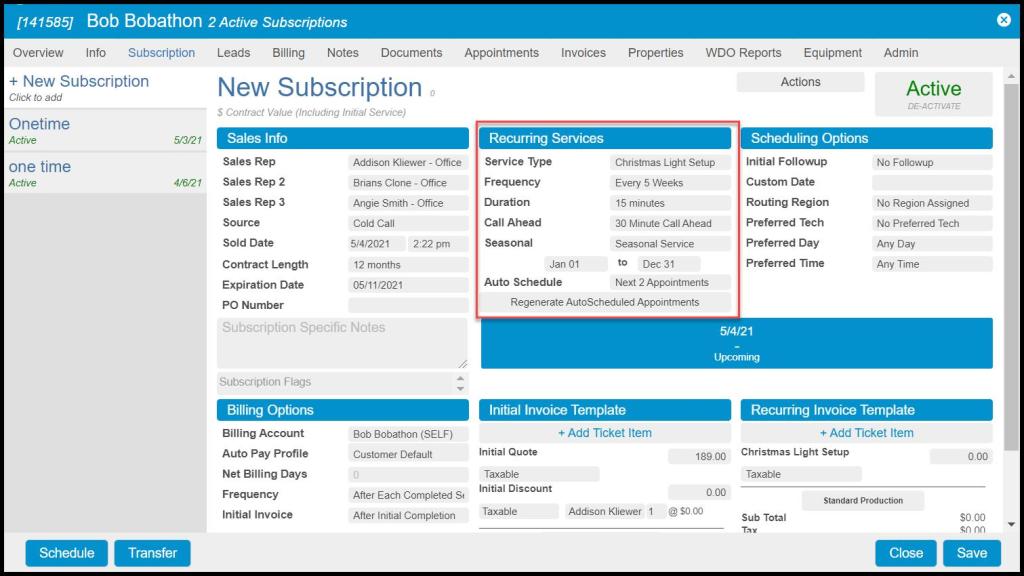
Viewing the Recurring Services Column
The Recurring Services column is where the user applies the information for the recurring services with this subscription.
- Service Type: Select the service type for the subscription, ex—Quarterly, Monthly, Termite, etc. Configure your service types under Admin > Preferences > Service Related > Service Types.
- Frequency: Decide how frequently a technician will need to perform this service, ex. 30 days, 90 days, etc.
- Duration: How long it will take the technician to complete the appointment.
- Call Ahead: For customers who want to be called 30 minutes or one hour before the appointment is performed.
- Seasonal: Determines the start and end dates for services only performed during specific periods of the year. For example, mosquito season is between March to October so for Mosquito Services, the season start would be 3/1, and the season end would be 10/31. This will make the service type only available during that period.
- Auto Schedule: Automatically schedules future appointments for that service type according to the frequency. To enable this feature, navigate to Admin > Preferences > Office Settings > Preferences. Please see our guide on Auto Schedule for more details.
The user can set defaults for each service type under Admin > Preferences > Service Types. These defaults will keep the user from having to fill out these fields every time.
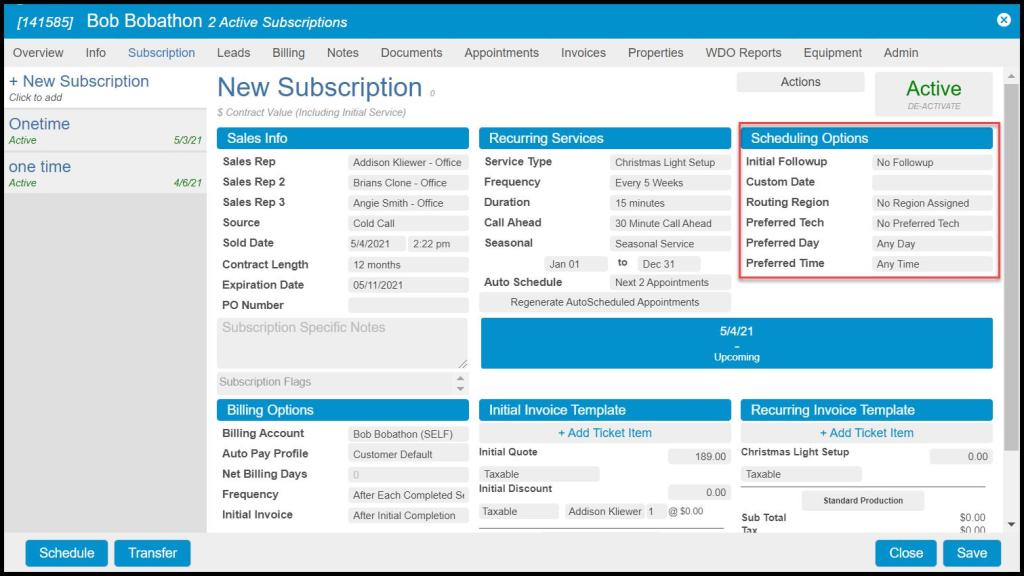
Viewing the Scheduling Options Column
The Scheduling Options section is essential for setting preferences for the customer’s scheduling needs.
- Initial Followup: The frequency for the Followup appointment after the initial (if different from the subscription). The user can set this to the same subscription frequency if the user doesn’t want a Followup.
- Custom Date: Custom Date can adjust the customer’s service schedule. Suppose a customer calls and says the next service date needs to be changed. In that case, the user can enter the new date for the next service here, and the system will automatically adjust and generate new dates for the remainder of the upcoming services.
- Routing Region: If the user would like to apply a specific region to the customer. Go to Admin > Preferences > Customer Preferences > Route Regions to make regions.
- Preferred Tech: Apply a preferred technician to a customer.
- Preferred Day: Choose a specific day if the customer has a preferred day to be scheduled.
- Preferred Time: If the customer has a preferred time window to be scheduled.
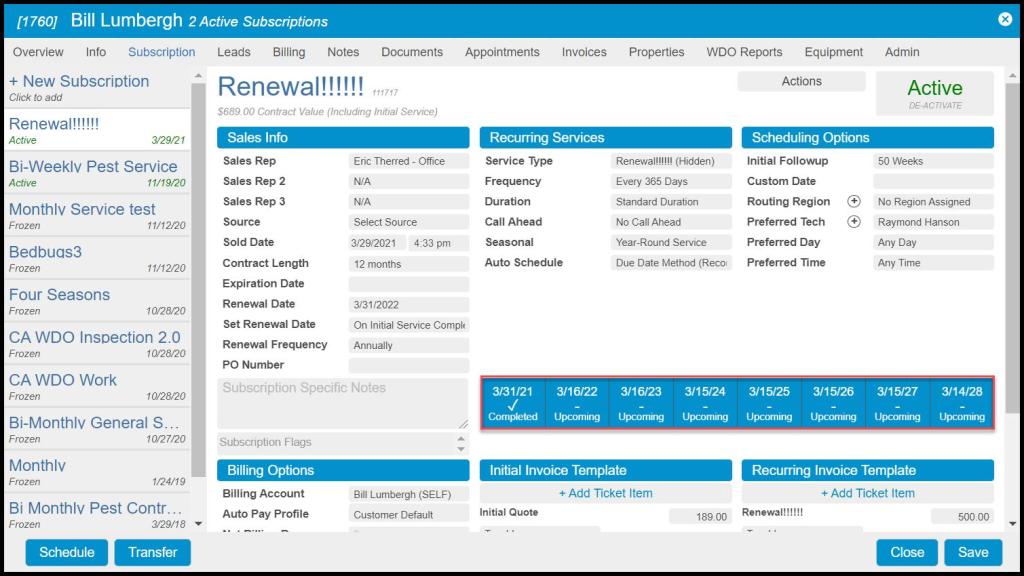
Viewing the Upcoming Appointments Box
This box displays the dates for upcoming subscription appointments based on frequency.
- Completed: The customer previously had an appointment scheduled, and a technician has since completed it.
- Scheduled: The customer currently has a pending appointment.
- Upcoming: Indicates the next time the customer will be due for service.
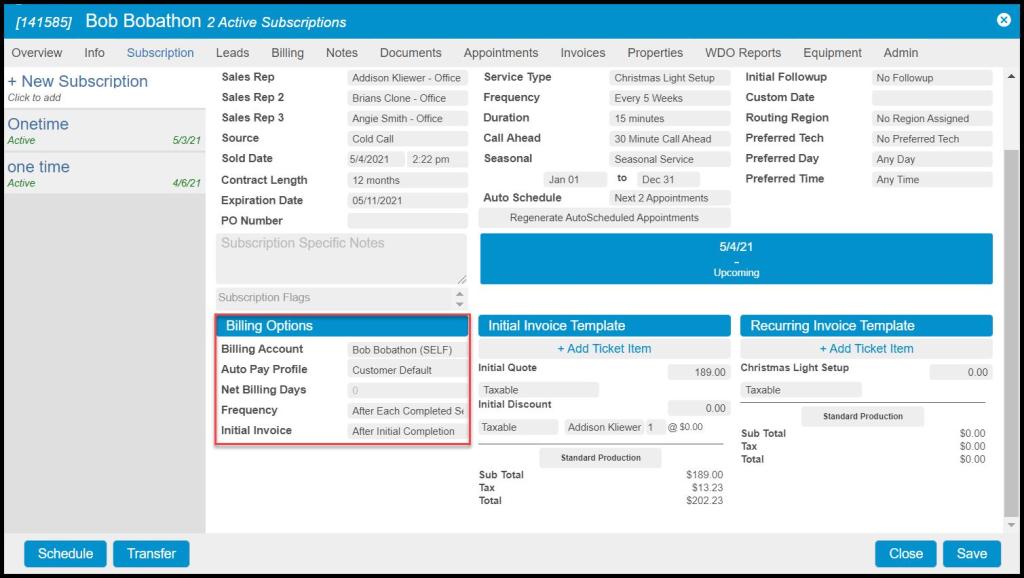
Viewing the Billing Options Column
The Billing Options column allows the user to set customers up to be billed on a different schedule than they are serviced on.
- Billing Account: This will allow the user to select the billing account if it is different than the customer.
- Net Billing Days: This will allow the user to determine how many days an invoice can go unpaid before it is past due.
- Frequency: This will allow the user to determine the customer’s billing frequency. By default, it is set to After Each Completed Service, which means that an invoice will be generated once a service is completed. However, the user can tailor the billing frequency relative to when the customer wants to pay for their service, regardless of when the service is completed.
- Customers also have the option of defining when the Initial Invoice will be generated.
- After Initial Completion: Once the initial service appointment is completed for the subscription, an invoice will generate for the amount set in the Initial Invoice Template.
- After Agreement Signed: Once the customer signs the agreement for the subscription, an invoice will be generated for the amount set in the Initial Invoice Template.
- On Initial Billing Date: When this option is selected, a new field for “Initial Billing Date” will appear so the user can manually choose the date that the invoice will be generated. The Subscription tab will generate an invoice for the amount set in the Initial Invoice Template.
- Custom Schedule: The Subscription tab will generate an invoice for the amount set in the Initial Invoice Template on the scheduled dates within the Custom Schedule. Custom Schedule is recommended for companies that want to bill monthly in arrears for the initial amount.
Please view the guide on how to set up Recurring Billing for more information on this feature.
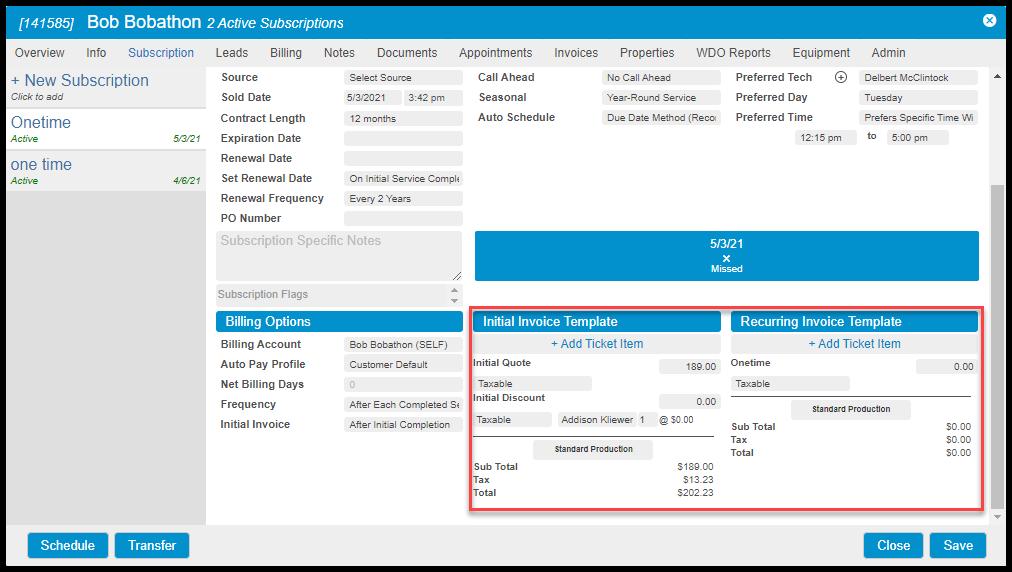
Viewing the Ticket Templates
The Initial Ticket Template is where the invoice for the initial service of the subscription is set up.
- + Add Ticket Item: Add initial Add On items to this ticket.
- Initial Quote: Set a custom quote for the initial service.
- Initial Discount: If the user wants to have the initial service at a different rate than the recurring service with a discount, the user can input that here.
- Taxable or Non-Taxable: Set whether the ticket will be subject to being taxed.
- Standard/Custom Production: If the recurring service is discounted or the customer is on a recurring billing plan, then changing the standard production to a custom production allows the user to enter the service’s standard price, which the technician’s commission rates is based on.
The Recurring Ticket Template will generate a ticket every time a recurring service is completed for this subscription. The user can also include any recurring Add Ons necessary.
- + Add Ticket Item: Add recurring Add On items to this ticket.
- Taxable or Non-Taxable: Set whether the ticket will be subject to being taxed.
- Standard/Custom Production: If the recurring service is discounted or the customer is on a recurring billing plan, then changing the standard production to a custom production allows the user to enter the service’s standard price, which the technician’s commission rates will be based on.
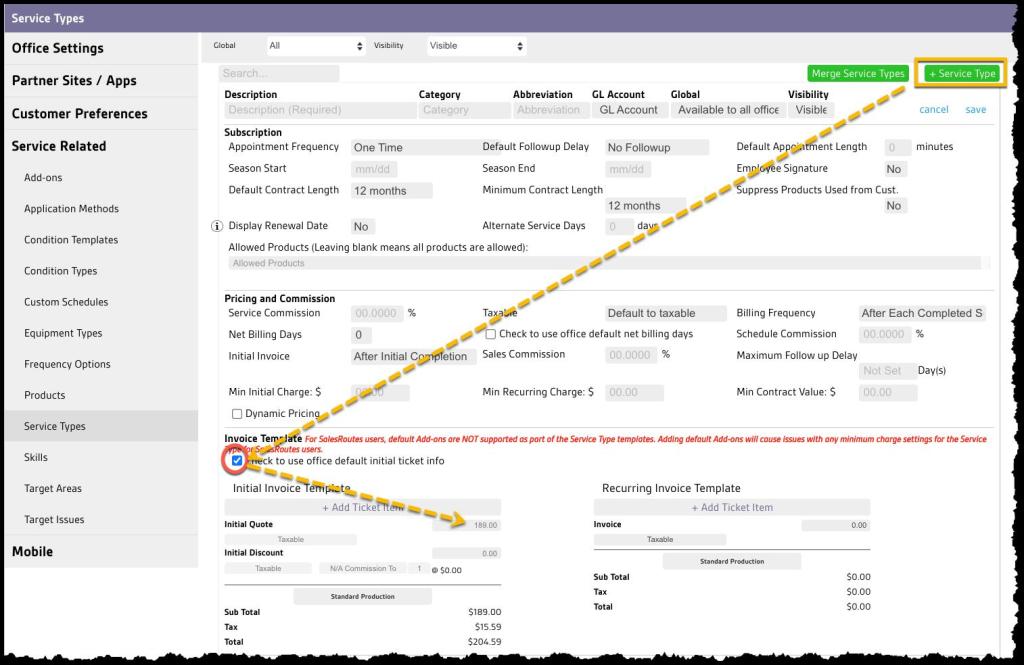
Default Add-ons on Ticket Templates
Note that a Subscription’s Invoice Templates, both Initial and Recurring, may also pre-populate with specific default Add-ons. These default Add-ons save time and prevent manual-entry mistakes with commonly used combinations. To use these default Add–ons, edit or create a Service Type in:
Admin > Preferences > Service Related > Service Types > select a Service Type.
In the new or existing Service Type, uncheck Check to use office default initial ticket info, then select +Add Ticket Item in the Invoice Templates section for either the Initial or Recurring Invoice Template. This process works the same as the Add-ons for individual Customer Subscription invoices above. Still, all Add-ons included in the Service Type Invoice Template will pre-populate on each new Subscription for the Service Type for every customer.