The Customer Card: Appointments Tab
Summary
The Appointments Tab displays a record of the customer’s service notifications, history, and a Service Notification Report.
Important Points:
- Changing the supervisor on the service in the appointment tab will change the supervisor on the service notification.
Accessing the Appointments Tab
To access the Appointments Tab, go to:
Customer Card > Appointments Tab.
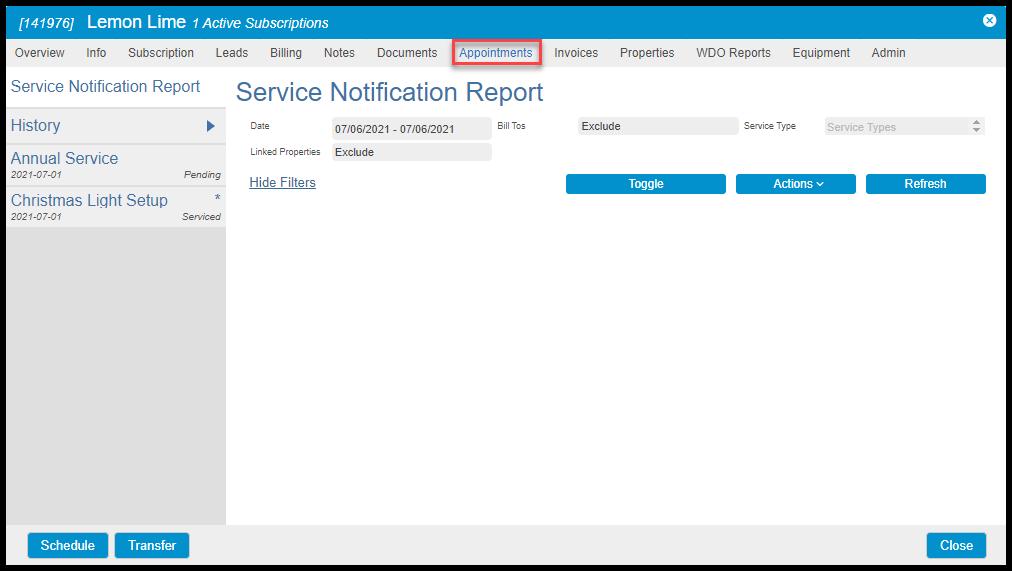
Using the Service Notifications Report’s Filters
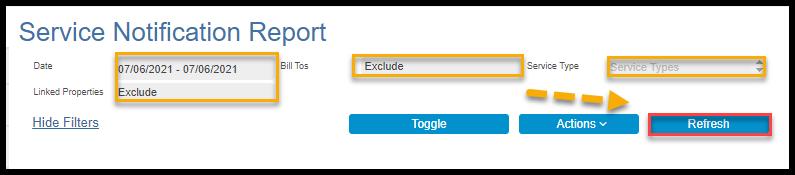
To filter the Service Notifications Report in the Appointments Tab, toggle these filters.
- Date: Limit results between specific dates in the Appointments Tab.
- Bill Tos: Include results with Bill Tos or not.
- Service Types: Limit results to certain service types.
- Linked Properties: Include results with Linked Properties or not.
Select Refresh to run the report.
Viewing the Service Notifications Report’s Data Columns
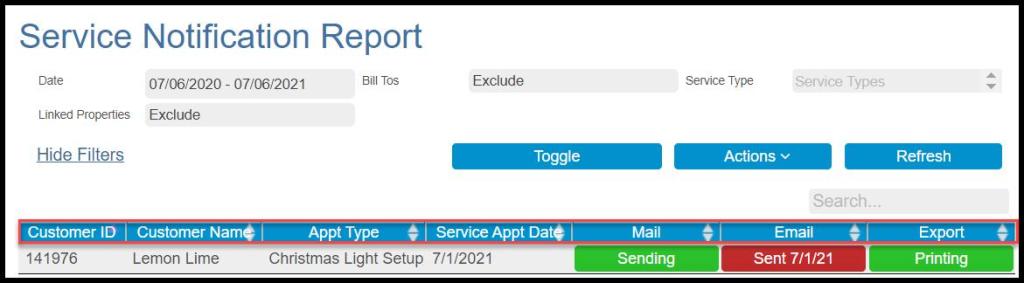
The Service Notifications Report can display a few data columns.
- Customer ID: Show the unique identification number for the customer.
- Customer Name: Show the full name of the customer.
- Appt Type: Displays the appointment type for the appointment.
- Service Appt Date: Displays the service appointment date for the appointment.
- Mail: We use a third-party company that will print and mail the report to the user’s customers. See more details below.
- Email: This will email the Report to all customers in the report.
- Export: This will create a file of the Report in a PDF format.
Using the Action Buttons in the Service Notifications Report
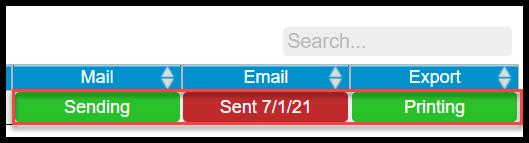
When viewing the Service Notifications report, notice how each customer has an action button for each type of communication. This action button will determine if the customer will receive the notification or not when sending out communications.
- Sending: If the action button is green and says Sending, it means that the customer will receive the notification when the user sends out the account service notification.
- Sent on a Specific Date: If the action button is red and says Sent for a specific date, it means the report has already been sent to the customer on that particular date. When the user sends out the report, the customer will not receive the report until the hold date is over.
- Don’t Send*: If the action button is red and says Don’t Send* it means that the customer will not receive the report when the user sends it.
The user can click on individual action buttons to toggle them on or off. If the user selects the Toggle button to the upper right of the report, the user can toggle all communications on or off for every customer in the report.
Executing Actions in Service Notifications Report
To send the Report to customers, select the “Actions” button at the top of the report.
- Export to PDF: This will create a file of the Report in a PDF format.
- Send Mail: A third-party company will print and mail the report to the user’s customers.
- Email Report: This will email the report to all customers in the report.

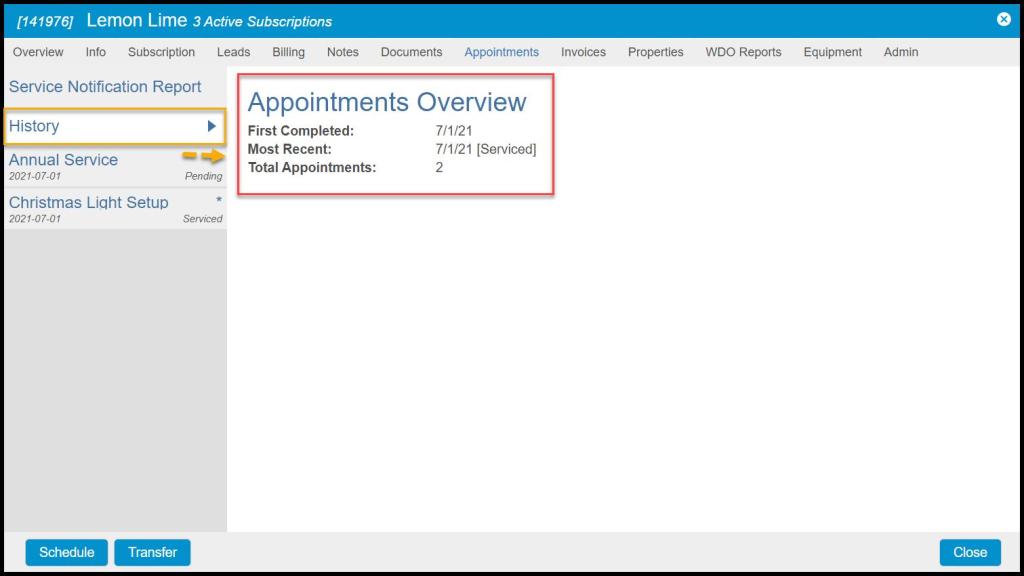
Viewing the History Tab in the Appointments Tab
Appointments Overview: Displays an overview of the appointments.
- First Completed: Shows the date when the first appointment was completed.
- Most Recent: Shows the date when the most recent appointment was completed.
- Total Appointments: Shows the total number of appointments completed.
Viewing the Service Tab in the Appointments Tab
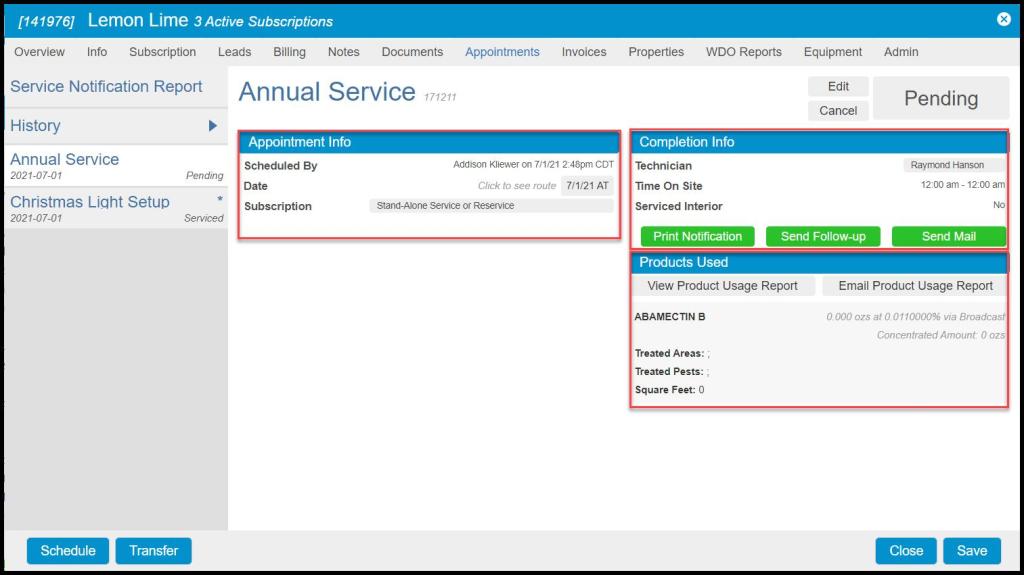
- Appointment Info: This section shows information about the appointment scheduling.
- Scheduled By: Shows which user scheduled the appointment.
- Date: Shows the date of the appointment and the time window, if applicable.
- Subscription: Shows whether the service was a stand-alone or reservice, or a part of an existing subscription.
- Completion Info: This section shows information about the appointment completion.
- Technician: Shows the technician who completed the service.
- Supervisor: Shows the supervisor of the technician who completed the service, if applicable. Changing the supervisor on the service in appointment tab will change the supervisor on the service notification.
- Time on Site: Shows the record time on site for the technician who completed the service
- Serviced Interior: Shows the technician serviced the interior while at the appointment.
- Print Notification: Prints the notification.
- Send Follow-up: Sends a follow-up email.
- Send mail: A third-party company will print and mail the report to the user’s customers.
- Products Used: This section shows information about any products used during the appointment, if applicable.
- View Product Usage Report: Displays the product usage report as a PDF.
- Email Product Usage Report: Emails the product usage report to the customer.