
Prepayment Discounts: Overview
Summary
This article will explain how to create Prepayment Discounts and Upsells using the Prepayments feature. FieldRoutes Prepayments, also called the Prepayments Tool, was created so that companies can offer their customers a discount and/ or upsell in exchange for paying for future Service Plan costs upfront.
Prepayment Discounts and Letter Templates
At a minimum, both a Prepayment Discount and a Prepayment Letter Template must exist to use thePrepayments Tool.
Prepayments Tool
To access the Prepayments tool, go to Customers > Prepayments.
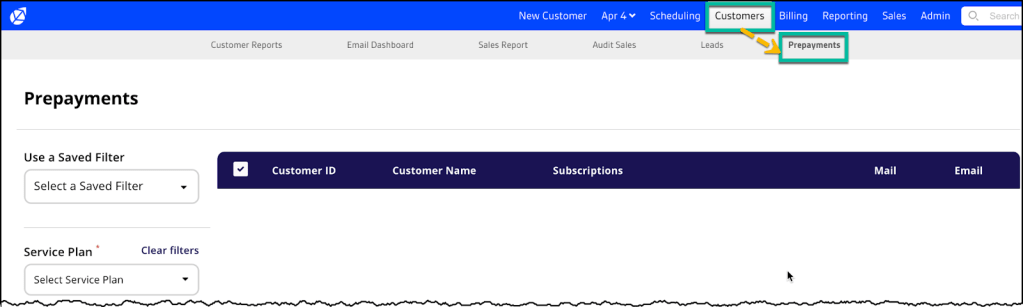
This is where Prepayment Discounts (and Upsell) offerings can be set up for a specific customer(s). The steps to do so are outlined in this section. A search can be performed to return a specific combination of Service Plans and Property Types while including or excluding customers based on their account standing.ThePrepayments Tool has two separate components but can be used together when creating content for the proposed letter being created. The top section is for discounts, and the bottom is where additional upsells can be added.
Step 1 – Generate Letters from Search Criteria
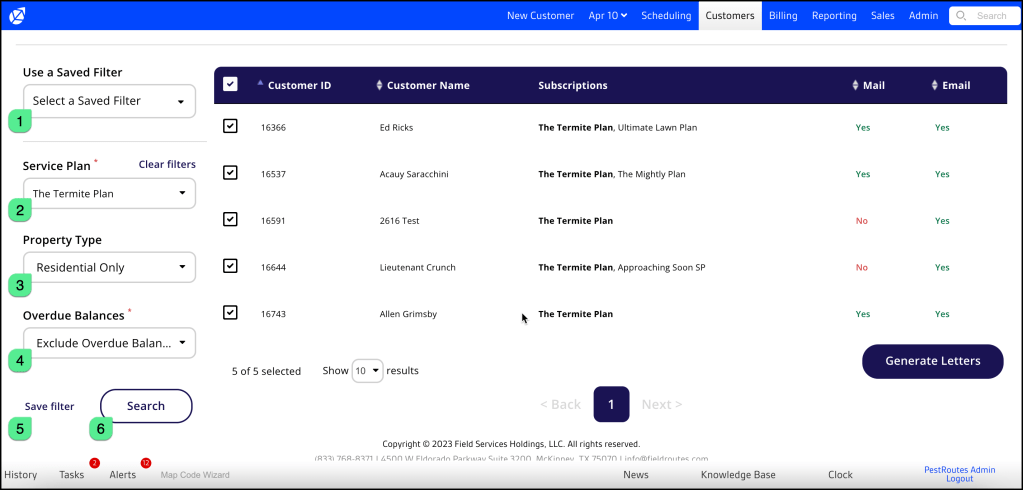
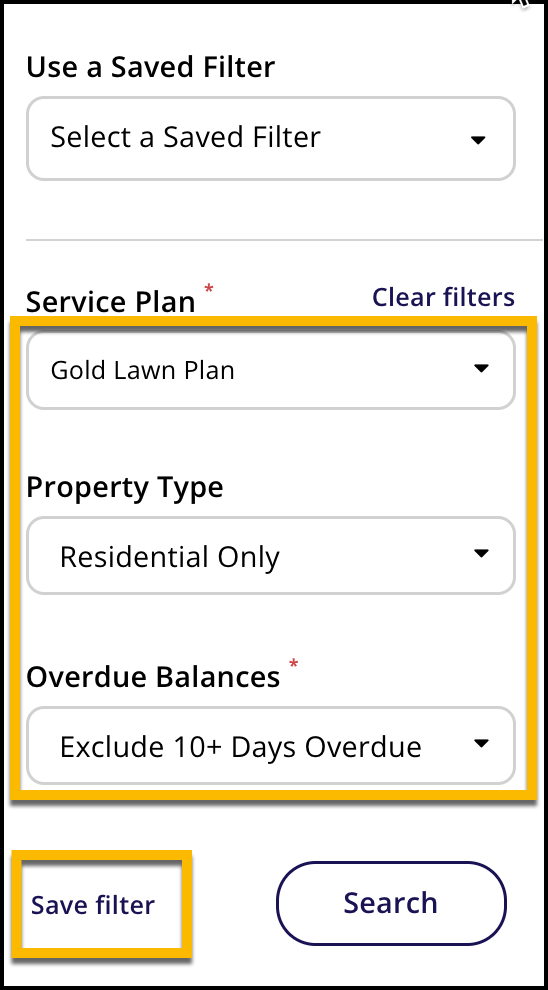
- Use a Saved Filter – A Saved Filter can be set up to utilize the same search parameters in the future without having to recreate it continuously. The next section, How to Create a Saved Filter, includes set-up instructions.
- Service Plan – The first step to generate letters would be to select a service plan from the Service Plan drop-down. Multiple plans can be selected, but remember that it will only return customers with the exact combination of Service Plans selected. For example, if The Termite Plan and Gold Lawn Plan are both selected, no results will return unless a customer(s) have that exact combination of services.
- Property Type – Next, select the type of property to include when searching for customers. All Properties, Residential Only and Commercial Only, are the options to choose from.
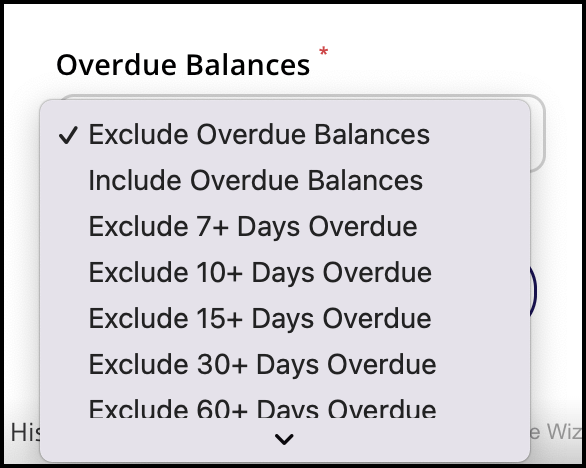
- Overdue balances – This dropdown serves as a filter for including/ excluding clients based on their financial standing. The default is Exclude Overdue Balances, but it offers customization based on date ranges that can be selected in the event someone wants to see customers with overdue balances over a certain number of days.
An example of the Overdue Balances dropdown.
5. Save Filter – Save filter parameters entered in the fields. To complete this process, see the next section, How to Create a Saved Filter.
6. Search – The Search button will return results from the criteria entered in the above-mentioned fields

7. Customer ID – This is the customer’s account number.
8. Customer Name – Lists the customers who meet the search filter criteria used.
9. Subscriptions – This shows each client’s subscriptions, with those matching the search criteria listed in bold.
10. Mail and Email columns – Customers can receive offers via that communication type when marked Yes.
11. Show (#) results – This is where a user can set the number of results they would like to see on one page, up to 100.
12. Page number displayed – this is an indicator of which page results are being displayed. The page that is shown will always be the one highlighted in purple. In this particular case, there is only one page since there are only 4 results returned.
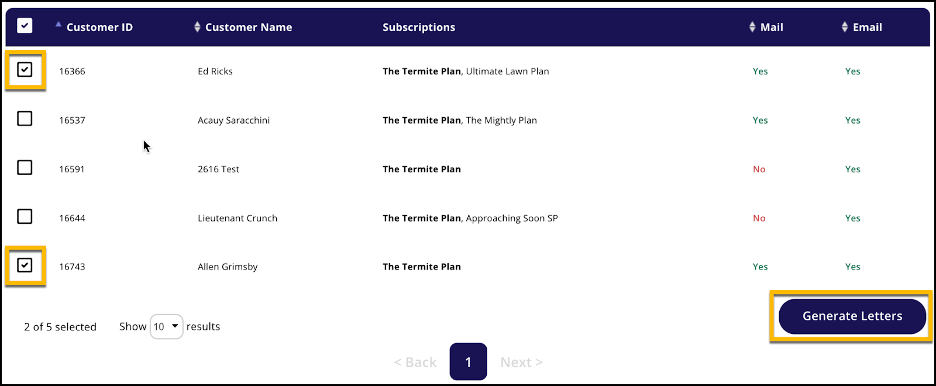
13. Generate Letters – Clicking this button will open the next window of the tool so that discounts and upsells can be applied to the customers whose checkboxes are selected.
In the below image example, a template would only be created for Ed Hicks and Allen Grimsby since they are the only customers with the corresponding checkboxes selected. To open up the Prepay Wizard where a user would create the discounts and upsells for the letters click the Generate Letters button.
Step 2 – Add a Discount
A Discount created using thePrepayments Tool is done with the intent that a user will see value in purchasing a service at a discounted rate in advance. This saves the customer money and helps the user create some added financial stability.
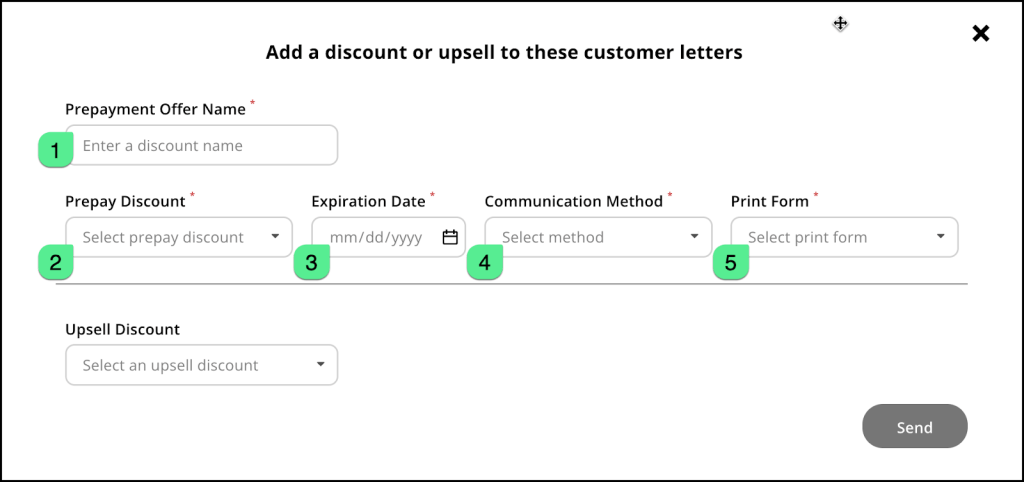
- Prepayment Offer Name – This is where a user adds a discount name that will display on the letter.
- Prepay Discount – Select a Prepay discount. This list pulls from the list of Discounts created previously in Customer Preferences. More info available in the Prepayment Discount Setup guide.
- Expiration Date – this is the date when the offer that is being created/sent will expire.
- Communication Method – Email, Snail Mail, and Email and Snail Mail are the 3 options for how the letters will be sent to the customers previously selected.
- Print Form – this is where a user will choose the Letter Template that the discount/ upsell will be applied to and sent on.
If a user doesn’t plan to add an upsell offer they can click send to send the offer, assuming all required (asterisk *) fields are filledout.
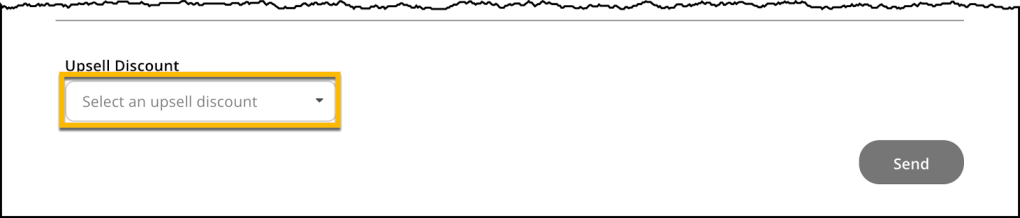
Step 3 – Add an Upsell Discount
An Upsell discount is when a user proposes additional service(s) at a discounted rate to entice customers to pay in advance for those service(s) being added to their existing Service Plan. An upsell discount is NOT required to be included along with a Prepay Discount, and the user has the ability to decide if they want to include upsell discounts regardless of if the service type already exists for customers or not by use of the Duplicate toggle.
Select an Upsell Discount from the dropdown menu to add it to the offer.
Once selected, additional fields are opened up to build the added Upsell.
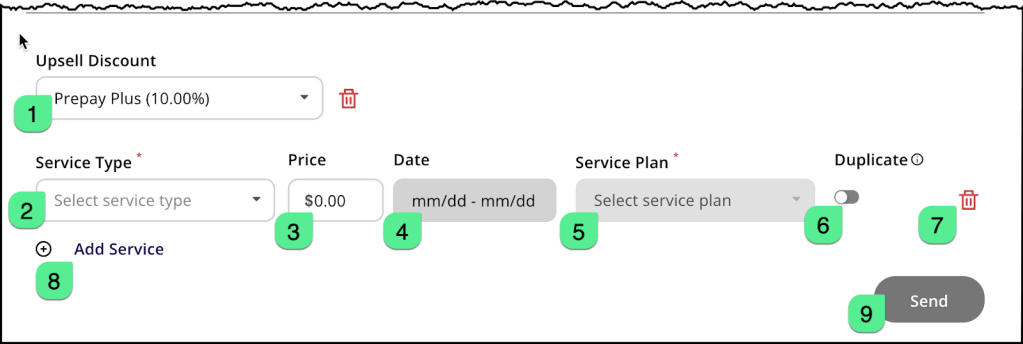
- Upsell Discount – Select an existing discount to apply to the service upsell being created. The trash can will remove the Upsell Discount altogether, and close out all of the open fields erasing what was entered.
- Service Type – Select a service type to add as an upsell offering. The selection here will determine which parent Service Plans will be selectable in the upcoming Service Plan dropdown.
- Price – the existing price for the selected Service Plan will display but it is editable.
- Date – This is the date range of the existing service type and cannot be changed.
- Service Plan – Here is where a user would select a Service Plan that they would like the service type chosen to be injected. If there is only one Service Plan available, it will be selected by default. If there is more than one, the user can choose which to add.
- Duplicate– The duplicate button is a mechanism that allows the user to send personalized offers to customers, based on their existing subscriptions.
- Toggled Off – (Default) Means that customers will not be offered upsell service types for a plan that they already have.
- Toggled On – Means that the system will not concern itself with the fact that a customer(s) already has that particular service type and will include it in all letters sent to customers.
- Trash Can – Similar to the trash can next to Upsell Discount, clicking this removes the accompanying Service Type line entirely.
- Add Service – Clicking add service will add another line to offer an additional upsell service.
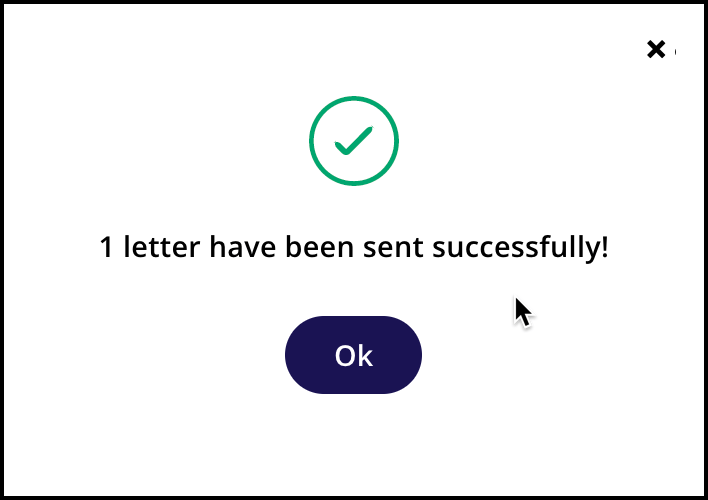
- Send – The send button will send all letters generated.
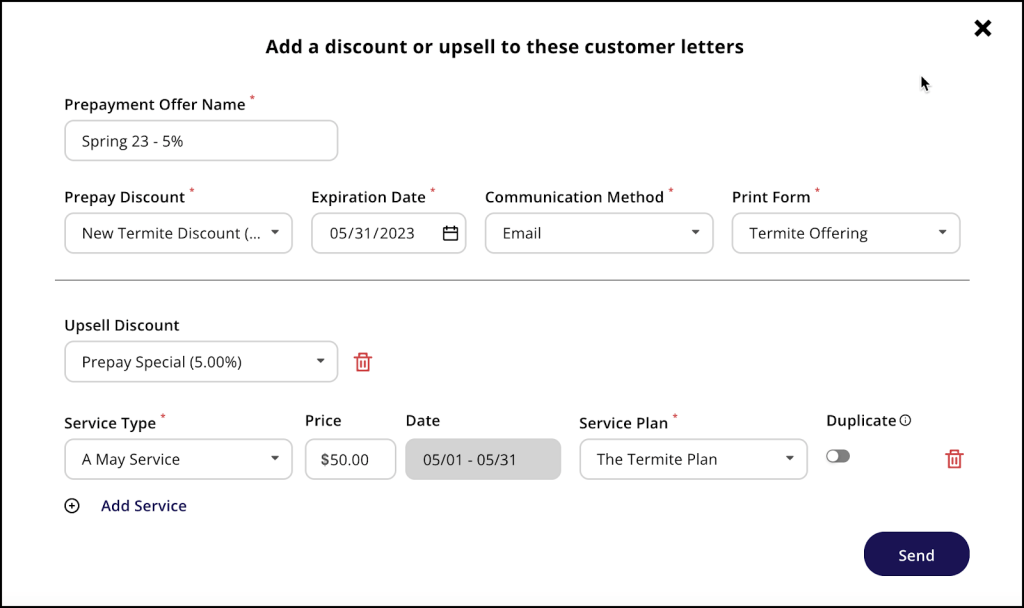
The below example will produce a discount and an additional upsell for the customer to review. Clicking the Send button will display a count of customers that letters were sent to.
Step 4 – Saved Filters (optional)
Creating a Saved Filter is as simple as selecting an option from each dropdown and clicking the Save Filter button.
A window will open so the filter can be named and saved for later use. Enter a name and click the Save button.

As soon as the filter is saved, the system will return results.

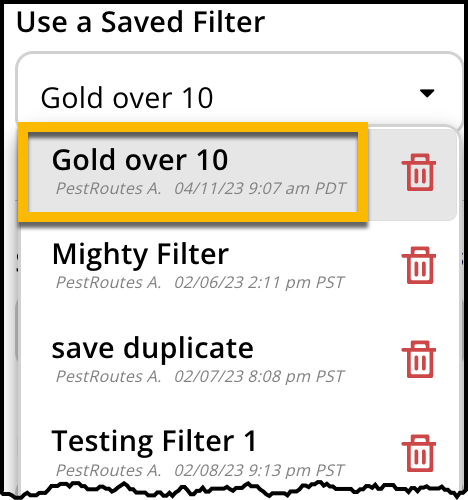
To use a saved filter select it from the Use a Saved Filter dropdown.
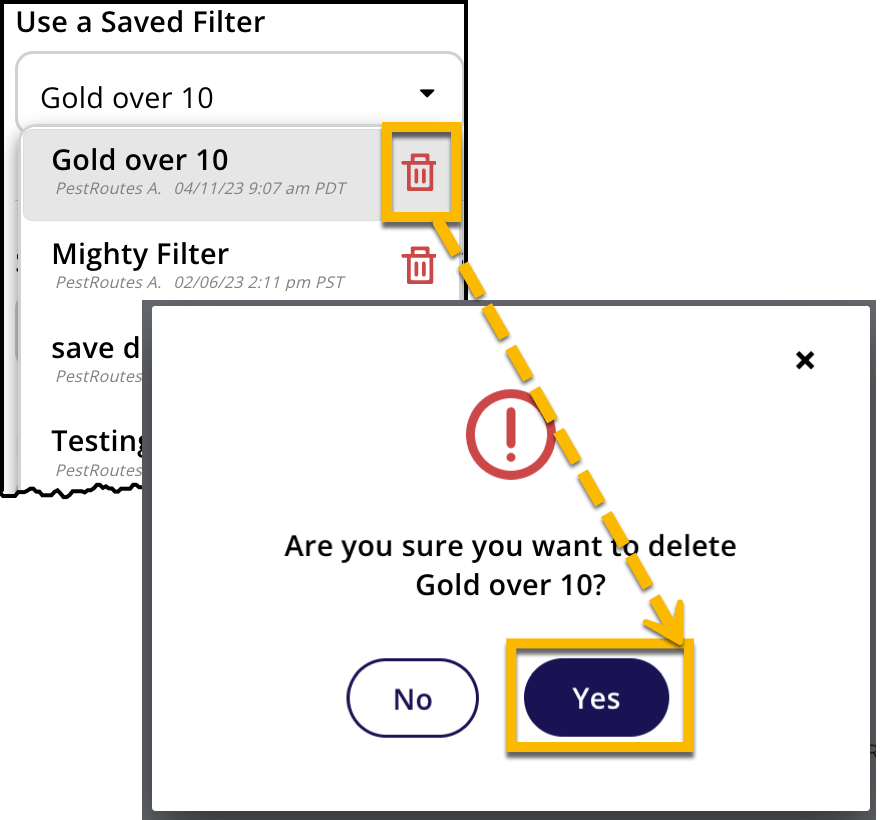
To remove a previously saved filter, click the trash can icon and then click the Yes button in the next window to confirm.
Reviewing Discounts and Upsells Offered
There are a few different places to review offers once sent. An Ops Suite user can review them on a customer card as long as the offering has yet to expire. Customers can also review the offering in their email or, if mailed, on a physical copy.
At the top of a customer card there will be a banner identifying that there is an offer to be reviewed.
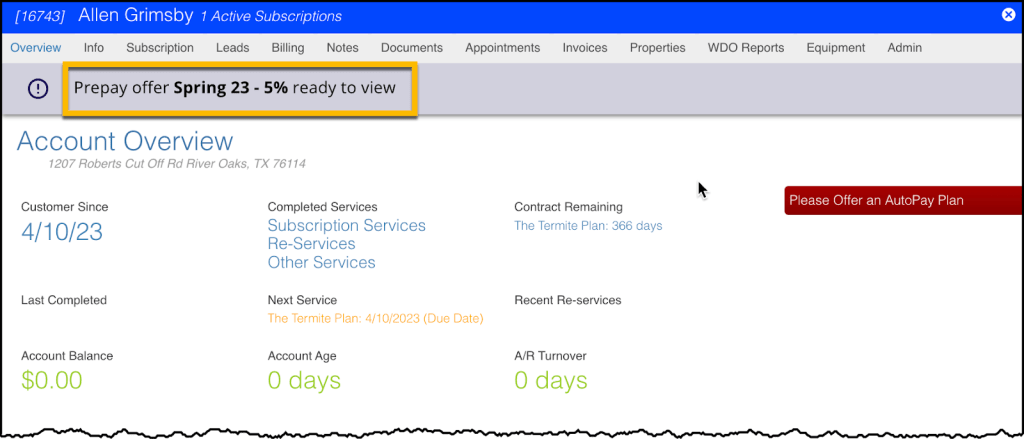
The label on that banner is a clickable hyperlink that will open up the offer in a new window.

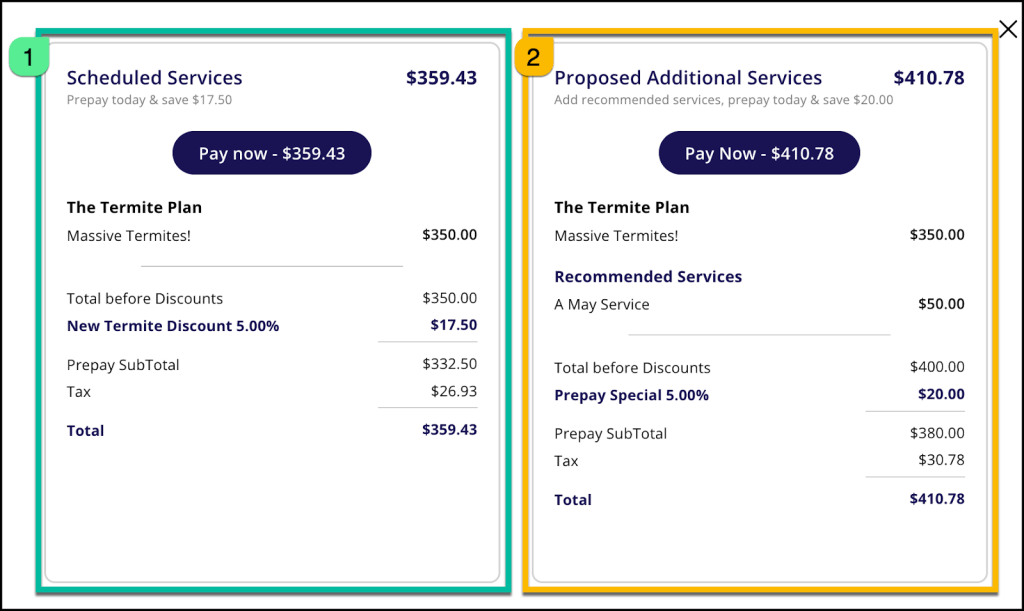
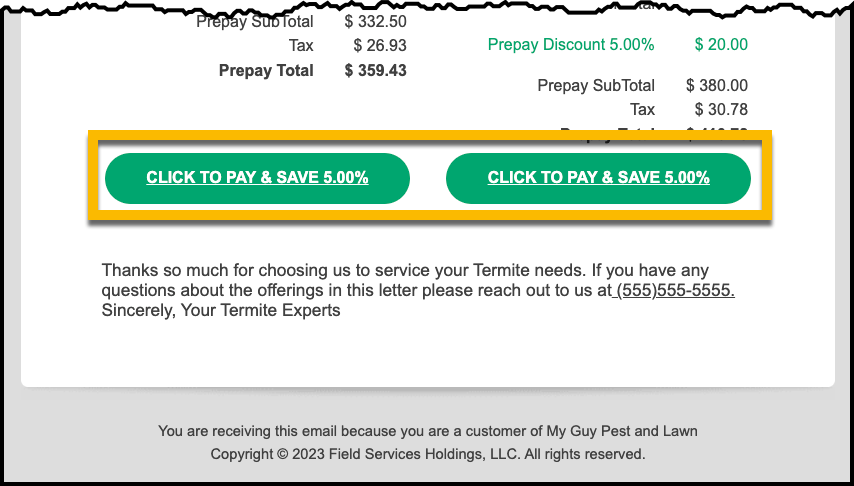
The following is an example of what an email sent to a customer would look like. Clicking either of the Click to Pay buttons will open the Customer Portal so that the offer can be chosen and paid for. Other details of this offer will be reviewed later in the Offer Details section.

Offer Details
There are multiple ways for a customer/user to view an offer’s details (email, snail mail, Ops Suite), and when done electronically, it includes theability to make a payment. A snail mail letter typically includes instructions informing a customer how to reach the office for further details on how to proceed.
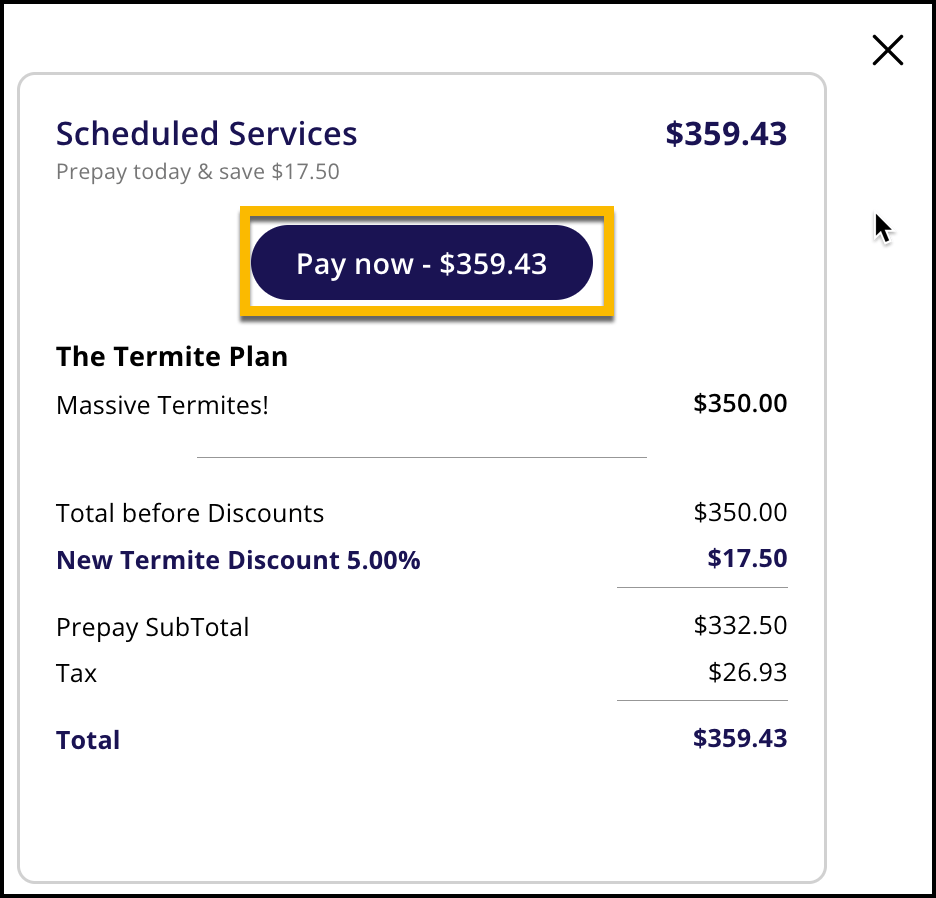
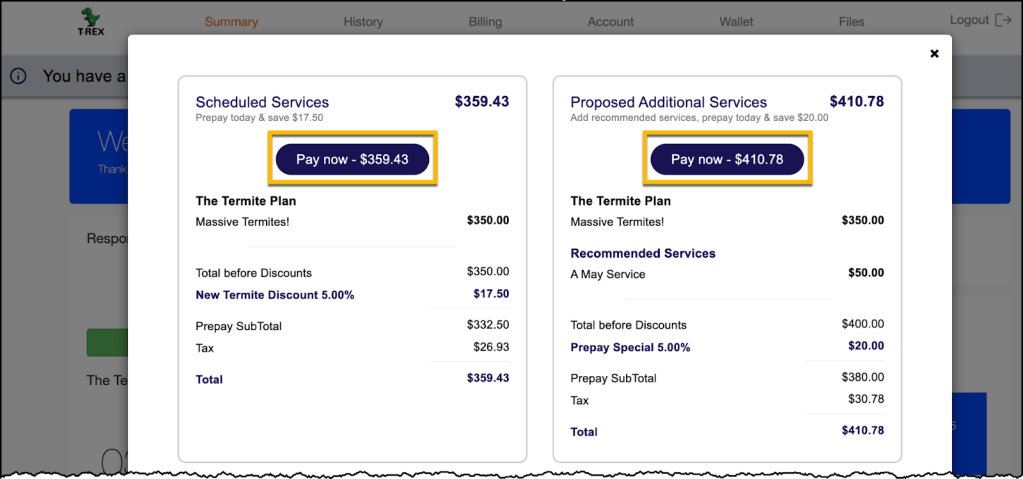
When multiple offers are available, they are listed side by side so that the customer can easily compare them and make an educated decision. The first (1) is Scheduled Service (already existing) plus a discount. The second (2) shows Proposed Additional Services plus any Recommended Services (additional upsells).
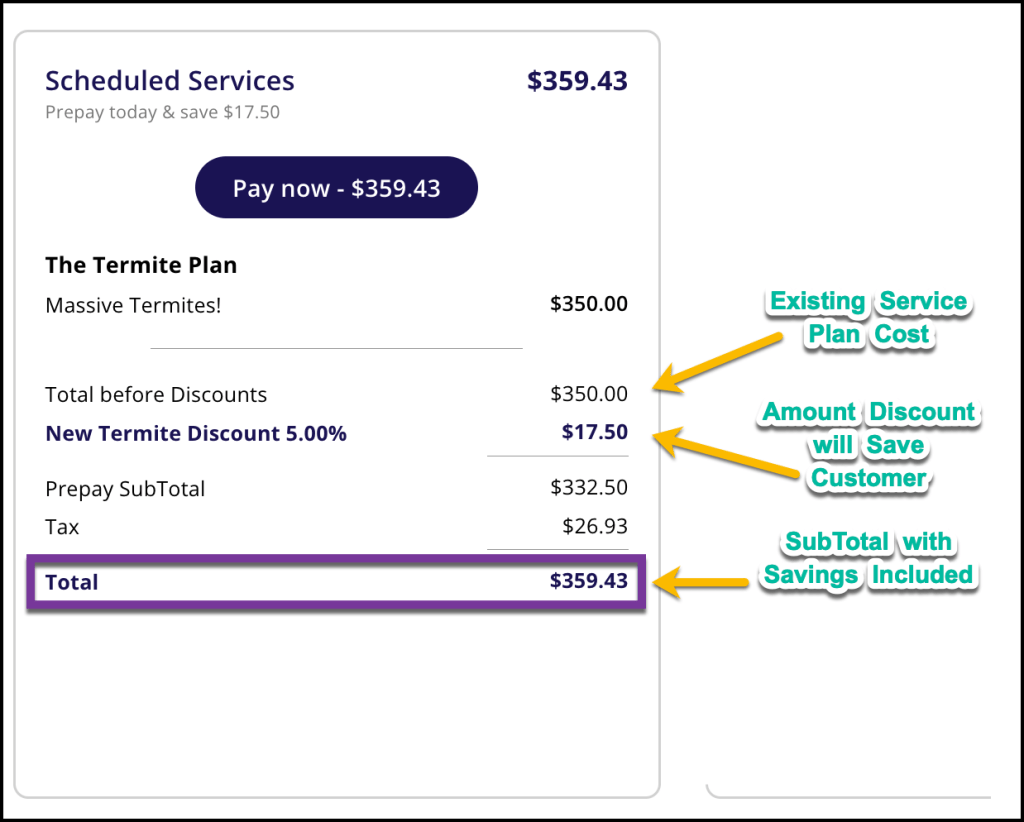
Breakdown of Scheduled Services
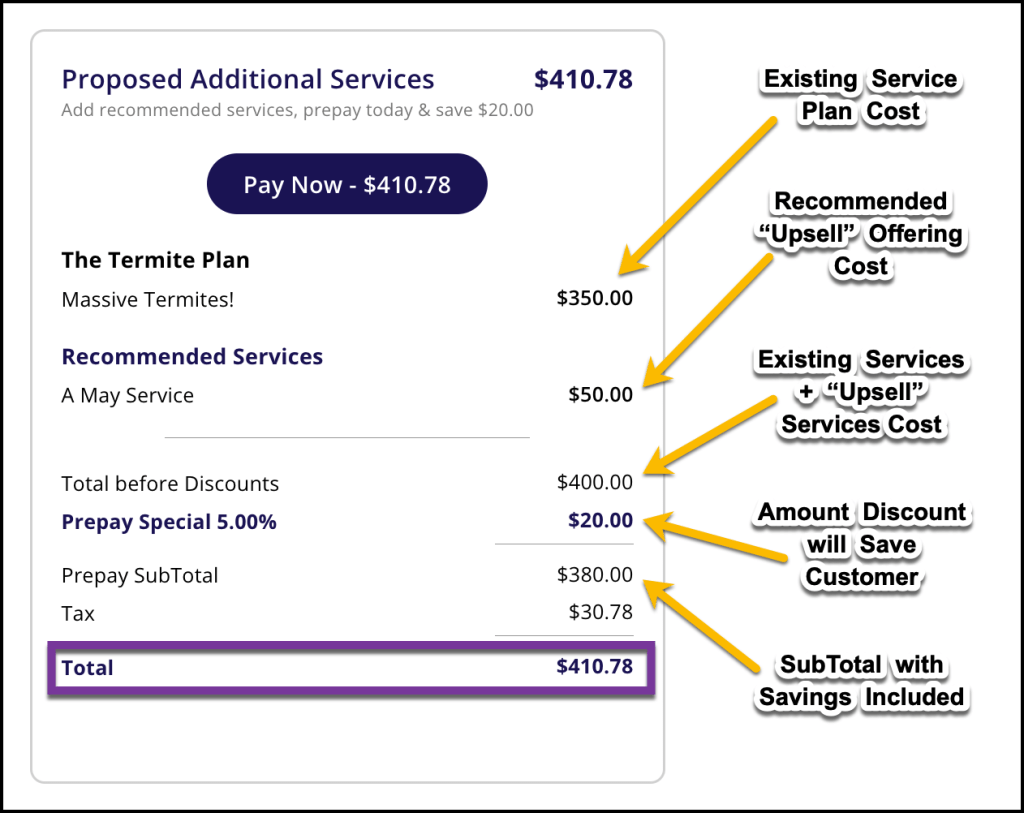
Breakdown of Proposed Additional Services
Select an Offer and Make a Payment
Making a Payment in Ops Suite
To make a payment in the FieldRoutes Ops Suite open a customer card of whom is prepaying. By default the overview tab will display showing the offer on the banner. Select the banner hyperlink to review the offer.

Once the hyperlink is clicked, the user will see the offer’s details in a popup. There was no upsell in this example, so there are not two columns. Only the existing service with a discount to prepay is shown. Click the pay now button.
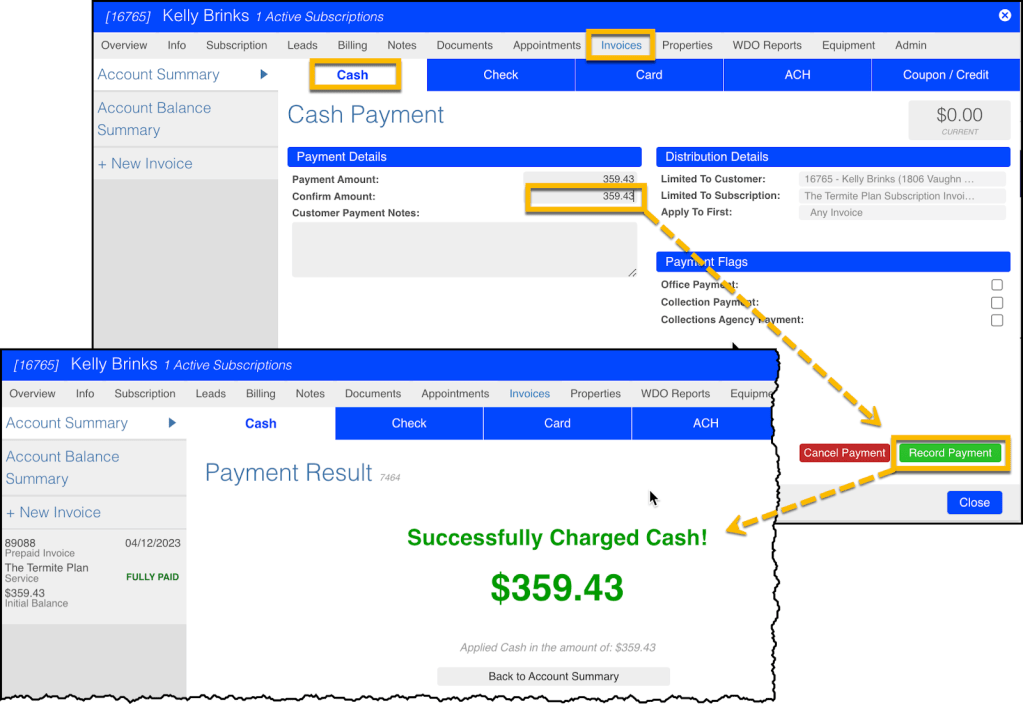
Once the Pay now button is clicked, the user is brought to the Invoice tab on the customer card, where they can choose how they want to pay. It defaults them to the cash tab, which is how the customer pays in this example. Enter the amount being paid in the Confirm Amount box, then click the Record Payment button. If a payment method other than cash is being used, click the corresponding payment type tab and apply that payment the same way before clicking Record Payment to complete.
Making a Payment via Email
For customers who receive an offer via email they have the ability to confirm and make a payment using the Customer Portal. To do so click on the green button at the bottom of whichever deal is chosen.
Regardless of which was chosen the user will be taken to the customer portal where they can then select either option. Another popup window will open with the same details displayed in the email. Click whichever of the two Pay Now buttons is desired.
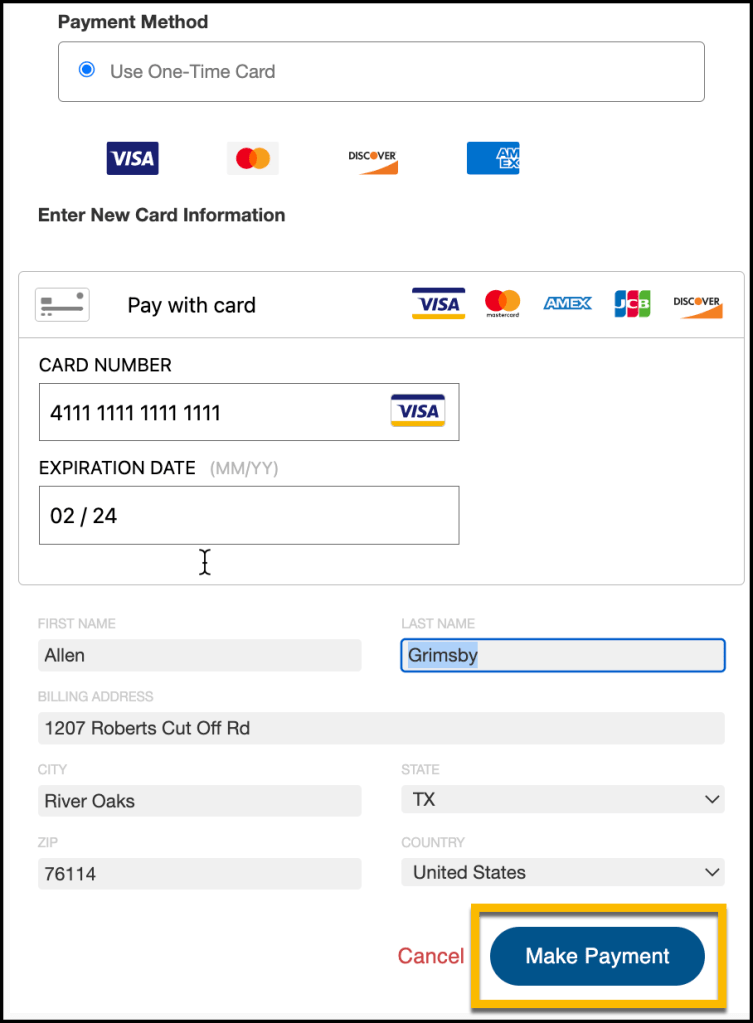
Customers can pay using their credit card. Once all fields are filled, click the Make Payment button to make a one-time payment. To cancel, click the Cancel button.
If canceling, a popup will display asking if the customer is sure that they want to cancel.

If yes, clicking the Yes Cancel button which will bring the customer back to their customer portal home screen. Instead, clicking the Back button, will return to the previous window with the two offerings side by side once again.
If the Make Payment button was selected instead, then the customer will see a green check mark next to the last four digits of the card used to process payment, and that will be followed up by a popup from FieldRoutes confirming success of payment.


Clicking ok on the popup will bring the customer back to their Customer Portal, where they will see that the Upcoming Service was paid in full. The upsell service round(s) will now display in the blue square matrix.

A customer can always view a copy of the offer in the customer portal regardless of whether it had been accepted and/ or paid. It is located under the Documents / Images section.

The billing tab of the customer portal will also display the invoice and payment details.

The same details will be displayed on the Invoices tab of the customer card in the OPs Suite, including a memo of Fully Paid.

When looking at the subscription, you will see the upsell listed and labeled as UPSL## followed by the Service Type name. In the image below, notice that the upsell is listed in red. This only indicates that the prepaid upsell will not be applied to the current service plan (whose start date has passed) but instead the next one that occurs in the future.

Prepayment Refunds
Please take a look at the Prepayment Refunds guide for specific examples of performing this task.
