
PestRoutes Tech: Inside an Appointment
Summary
Users will find PestRoutes Tech very intuitive and even those who are accustomed to its predecessor will find the adjustment period a smooth transition.
Important Points:
- It is recommended to only press Yes when the technician is on location.
Check In
When a technician opens an appointment, a prompt pops up asking whether the technician would like to check-in.
It is recommended to only press Yes when the technician is on location.

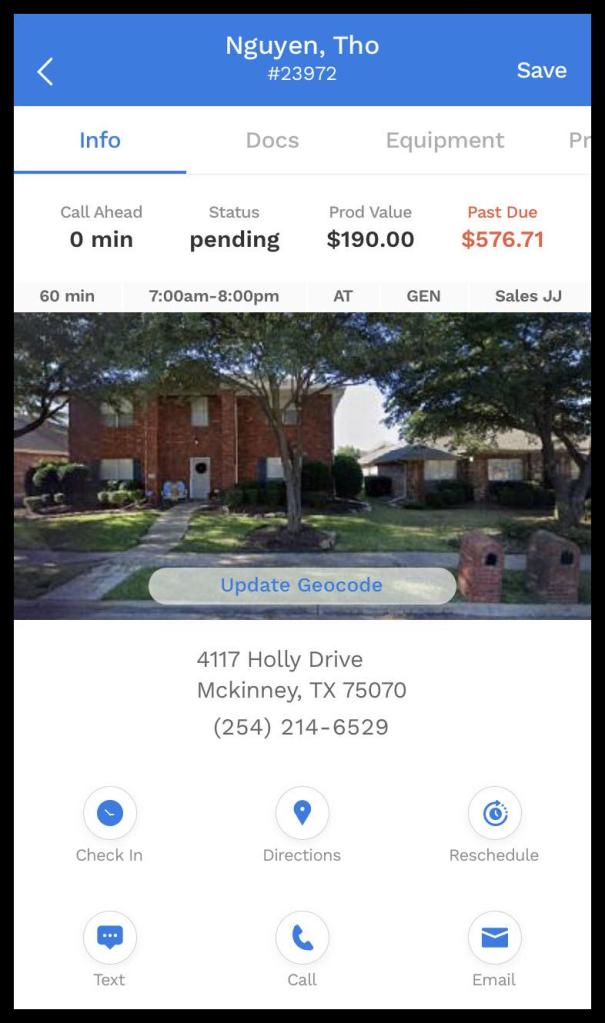
Info Tab
Immediately below the Info tab selection, you will find:
- Call Ahead: Indicates to the technician whether the customer prefers to be contacted before their scheduled service. This can be set on the Subscription tab of the customer card for all future appointments or individually by opening up the appointment card.
- Status: Tells the technician whether the appointment is pending, a no-show, or already completed.
- Past Due: When the customer has a past due balance, it will be present in this section. If the customer is current on their balance, then only the above two options will display.
Right above the image provided by Google Maps:
- Appointment Duration: Specifies the length of the appointment. The default is based on the service type preferences but the duration can be edited from the appointment card in the desktop software.
- Arrival Time / Window: Timed windows will show the exact range entered into the appointment card. Any time appointments display 8 am to 8 PM along with AT. Morning appointments put the time range of 8 am to 1 pm and display AM. Afternoon appointments have a range of 1 pm to 8 pm and display PM.
- Service Type Abbreviation: This shows the service type abbreviation as given in the service type preferences.
- Salesperson Initials: This displays the initials of the salesperson credited as the Sales Rep on the customer’s subscription. The initials will be based on what is entered in that user’s employee card.
Inside the property image, there is an important option as far as the customer’s location is concerned.
- Update Geocode: Pressing this option displays a map with the customer’s current location pin. The pin can be manually moved by clicking on a new spot to provide a more accurate reflection of their location. This can be especially helpful when the tech requests driving directions based on the geocode.
Underneath the customer’s address and phone number:
- Check In/Out: Logs the technician’s time of arrival and departure.
- Directions: A prompt asks whether to base the directions on the customer’s address or by their latitude and longitude (geocode). When a selection is made, the default map app will open. To change your default map app, click on More at the bottom of the route view, choose Application Settings, and press Choose Default Map App.
- Reschedule: Gives the technician the ability to place the appointment on another day’s route. The technician must have the correct Access Controls in order for this option to be available. See our guide on Access Controls to learn more about which configuration will allow for rescheduling.
- Text / Call / Email: Allows the technician to communicate with the customer. The contact information must be entered into the Info tab of the customer card.
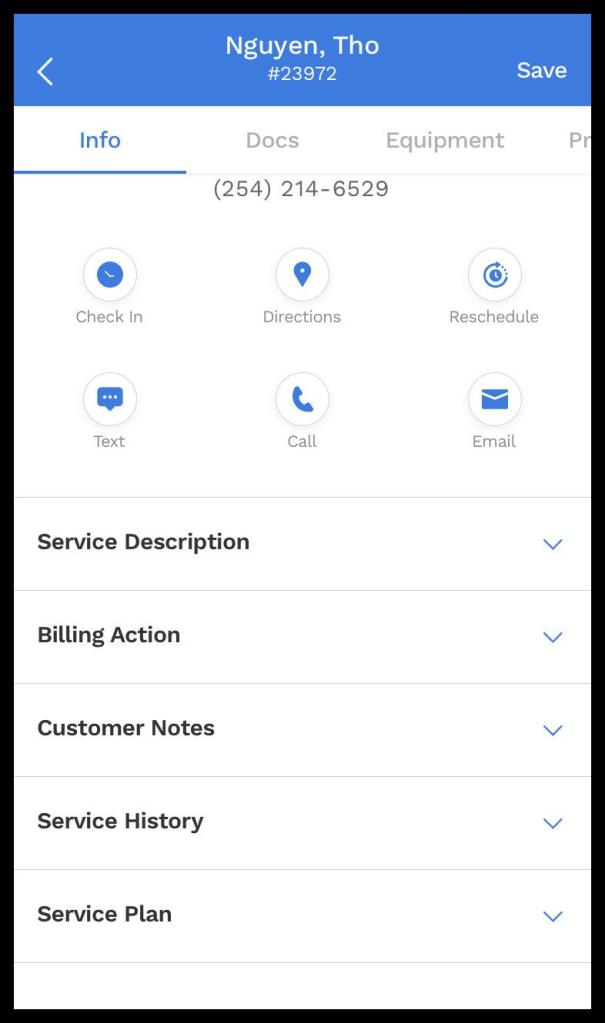
Info Tab- Continued
Following the icons for checking in, getting directions, rescheduling, and customer communication is more details concerning the customer’s service.
- Service Description: This section contains details on the service type being performed. Additionally, it will show if and when the customer was sent any appointment reminders.
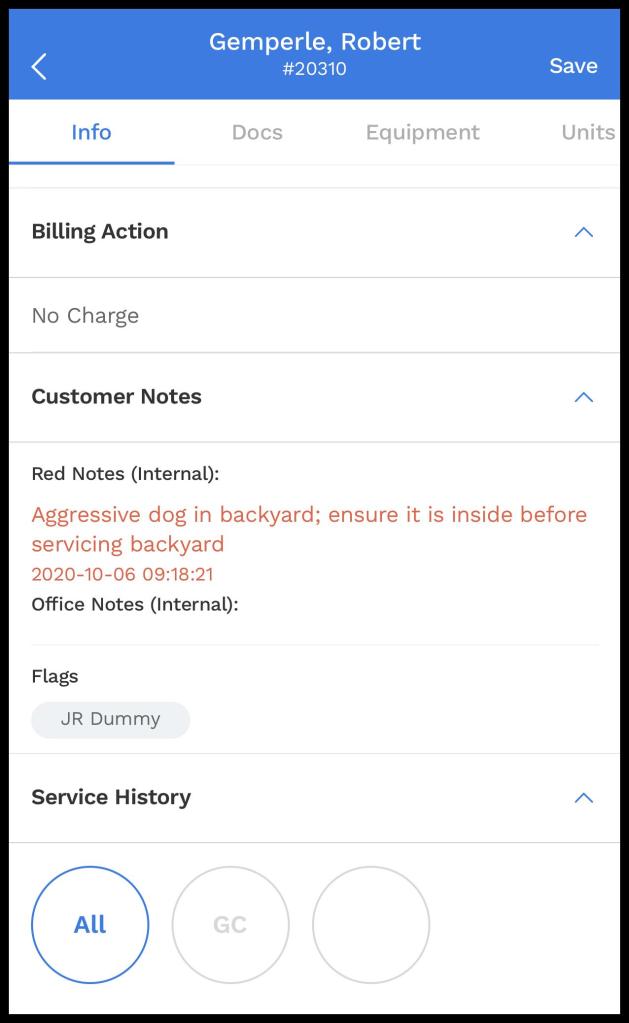
- Billing Action: This portion tells the technician whether there is no charge or if they need to collect payment.
- Customer Notes: Any customer flags or notes visible to the technician display here.
- Service History: This section contains a brief summary of the customer’s previous appointments.
- Service Plan: A more in-depth look at the subscription being serviced is provided here. It will list the length of agreement, the frequency, how the billing works, when the next service is, and any notes or flags specific to the subscription.
Info Tab – Customer Notes
Opening the Customer Notes section reveals information the Technician may need in performing the service. This information is not visible to the customer, but only within the system.
- Red Notes (Internal): These communicate high-priority information from office staff. Text is highlighted in red.
- Office Notes (Internal): Less urgent information can be stored here, such as a gate code.
- Flags: Office flags such as Locked Gate or Aggressive Dog appear here
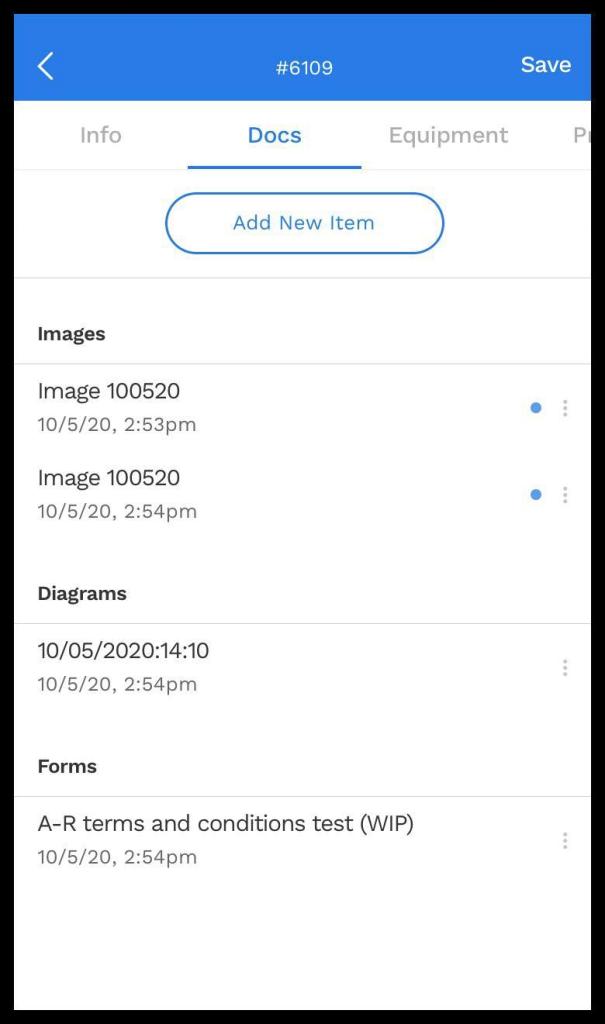
Docs Tab
Instead of a long list of all the customer’s documents, there is an added degree of organization by breaking them up into different categories.
- Images
- Diagrams
- Forms
- Contracts
- Other
These Category headers only appear when documents exist for that Category. Otherwise, they are hidden to facilitate easier navigation of the Docs tab.
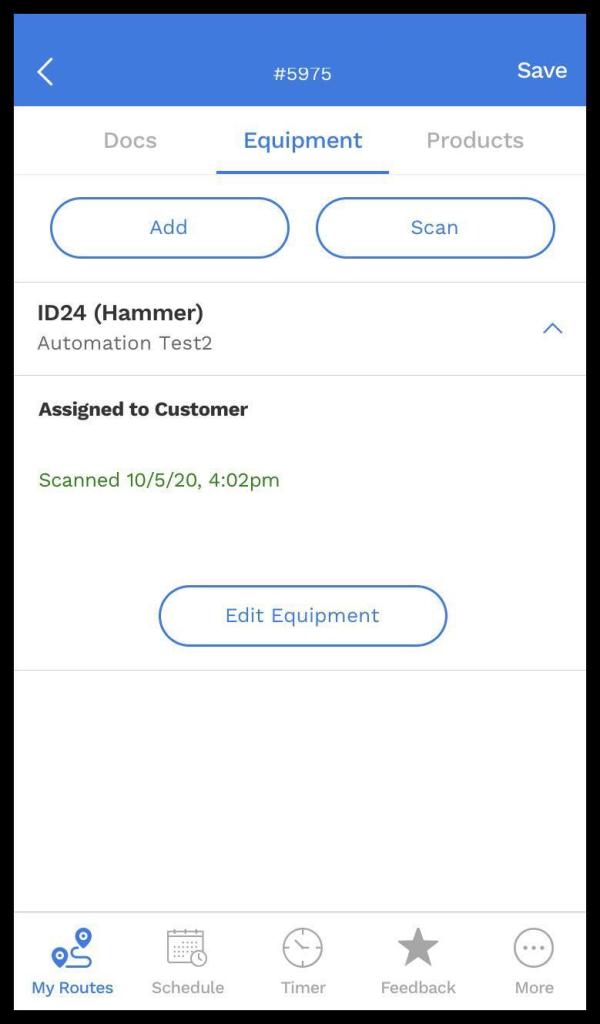
Equipment Tab
The Equipment tab allows you to either scan or manually enter equipment used at appointments. To add equipment, tap on the Add Equipment button at the top of the tab. If this is the first time that equipment is being added, the two options available will be to Enter Manually and Add New.
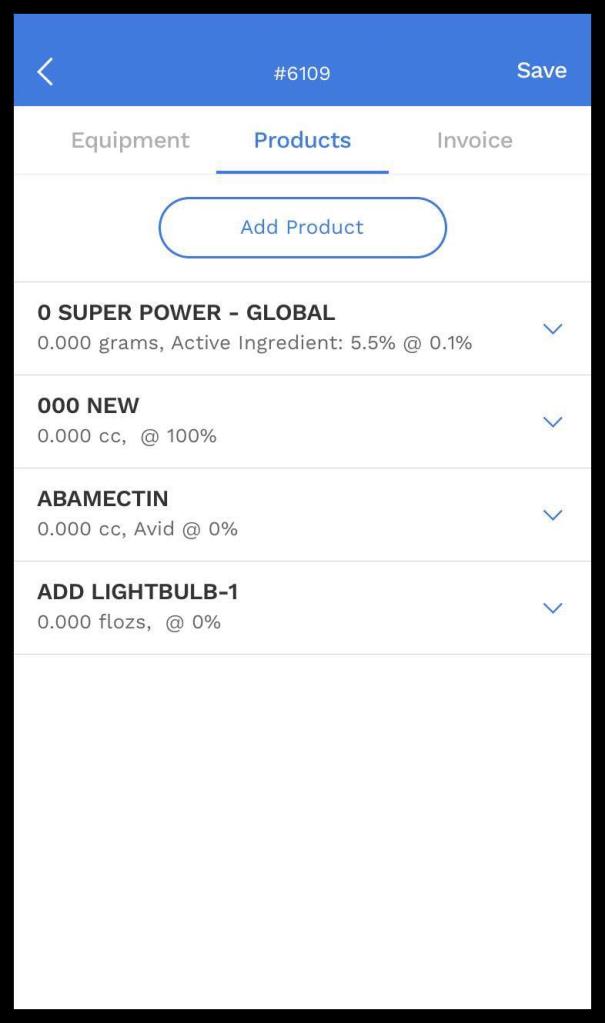
Products Tab
The Products tab serves to attach chemicals, bait, and other materials to the appointment.
For more information on adding and editing the user’s list of Products, see our guide for Products.
Invoice Tab
The Invoice Tab provides a review of the customer’s Invoice before completing the Appointment. The following information is provided:
- Billing Action: Shows the itemized charges on the current invoice
- Today’s Total: Provides the balance to be charged for the current appointment
- Service Invoice: Summary of previous charges and payments
- Previous Balances: Existing unpaid charges applied to this invoice
- Previous Payments: Confirmation of prior payments received
- Notes: Comments entered here appear on the customer invoice under Notes.
- Add Preset: Preset responses such as Thank you for your business! can also be used by pressing the Add Preset option. See Admin > Preferences > Mobile > Preset Notes to create these notes.
- Payment: Along with the amount due, it gives the technician the ability to enter in a customer’s payment.
- Cash/Check: To enter a cash or check payment, tap on the green Collect Cash or Check button. The details required will be the amount collected, whether it is cash or check, and check numbers when applicable. Once that information has been input, tap on the green Collect Cash/Check button.
- Credit Card/ACH: Both payment account types will reflect if either is on file. The option to update the payment account will be in blue. The option to charge the payment account displays in green.
NOTE:
If the current property has been linked to a different Customer who has payment responsibility (such as the owner of a rental house), then the payment options will be grayed out, and the party responsible for payment will be indicated to prevent double charges on the appointment.

Complete tab
The Complete tab lets the technician put the finishing touches on the appointment’s information
- Appointment Status
- Onsite Timer: Lets the technician check in and out.
- In At: Displays the time of check-in.
- Out At: Displays the time of check-out.
- Status: Shows whether the appointment is pending, a no-show, or completed.
- Interior Serviced: In the Route Summary Report, a column reports whether this toggle was turned on or not.
- Email: Displays the customer’s email address on file.
- Notes: See details on Notes below.
- Additional Details
- Rig Used: Choose what spray rig is being utilized. To create and edit the spray rigs, navigate to Admin > Preferences > Mobile > Spray Rigs within the desktop software.
- Square Feet: Enter the square footage of the property being serviced.
- Wind Speed / Wind Direction / Temperature:Allows the technician to manually enter the weather information.
- Apply Current Weather: Uses Dark Sky to pull the weather information based on the customer’s latitude or longitude.
- Signatures
- Technician / Customer Signature: Both technician and customer have a field to input their signature. This can be done with a finger or stylus.
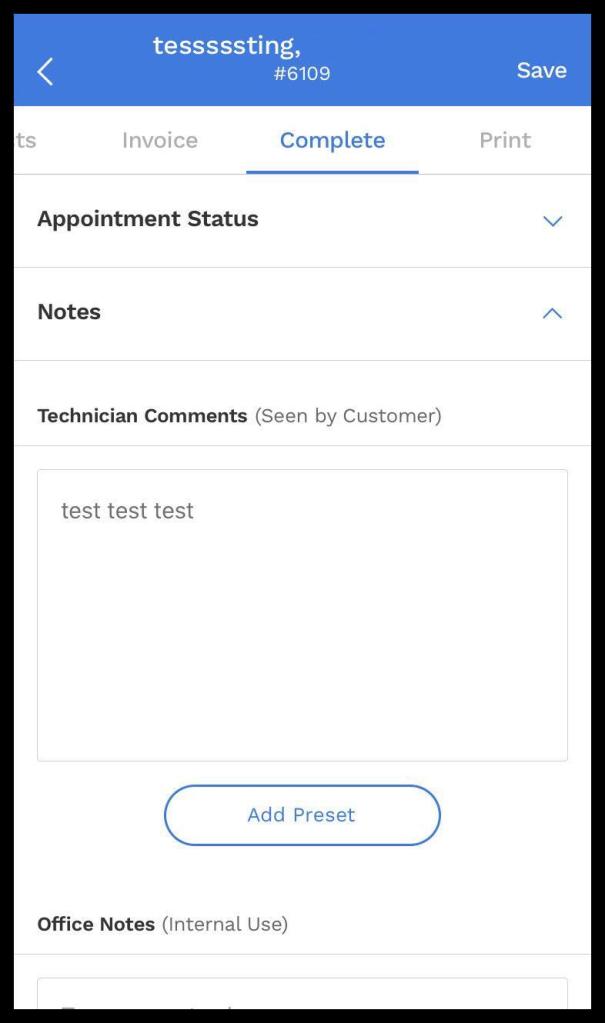
Complete Tab- Notes
Opening the Notes section allows a number of different Note types to be added:
- Technician Comments (Seen by Customer): Notes entered in this field will display on the customer’s service notification.
- Add Preset: Preset messages can be created to increase the Technician’s efficiency in the field. See below for how to set up Preset Notes.
- Office Notes (Internal Use): Notes intended for internal use only should be entered in this field.
- Add Preset: To help the technician quickly and easily enter in commonly used notes, you can create and edit Preset Notes in the system by clicking on Admin > Preferences > Mobile > Preset Notes.
- Flag Note: This toggle takes the Office Notes and creates an Alert for the office.

Print Tab
The Print tab displays the service notification with a green Print button located at the bottom of the screen. The options presented by tapping the Print button depend on the device.
- Android
- System Printer
- Star Micronics: Recommended model WSP-i350
- Note: To use a Brother printer, you will also need to install the Brother printer plug-in from the Google Play Store.
- iOS
- AirPrint
- Brother: Recommended models PJ-773 and PJ – 763
- Star Micronics: Recommended model WSP-i350

