PestRoutes Tech: Equipment Tab
Summary
The Equipment tab stores equipment scanned or entered manually by technicians in the mobile apps. The tab is beneficial to view details on what equipment was scanned, any applicable details the technician wants to add, and see detailed activity regarding the equipment for the customer.
Important Points:
- Hold the scanner 2-3 inches away from the barcode.
- Aim the scan beam straight across the entire barcode.
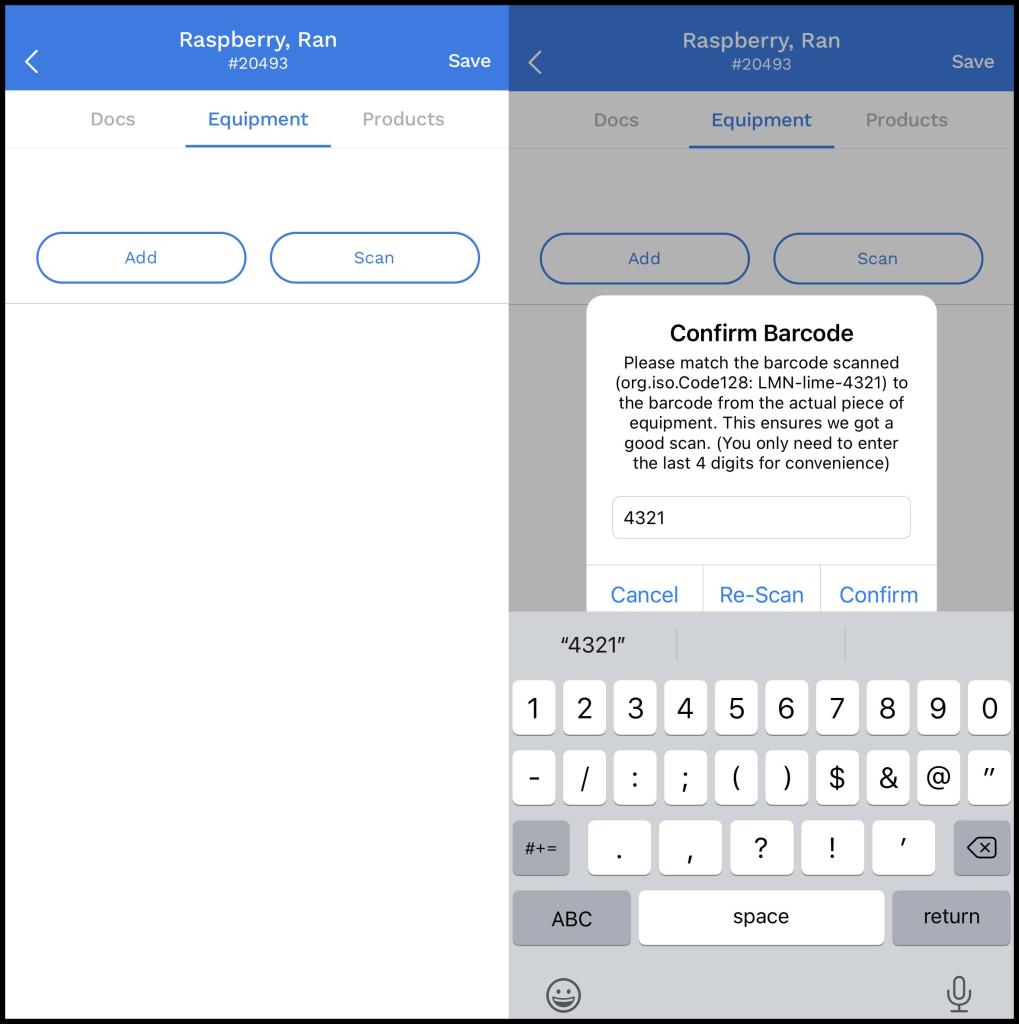
- When the user scans a new barcode, a prompt will ask the user to reenter the last four digits of the barcode. This step is to ensure the barcode scanning tool gets a good scan of the barcode
- Aim the scan beam straight across the entire barcode.
- The Equipment Tab’s Barcode Scanner is compatible with SocketScan S800 Series.
Accessing the Equipment Tab
To access the Equipment tab in PestRoutes Tech:
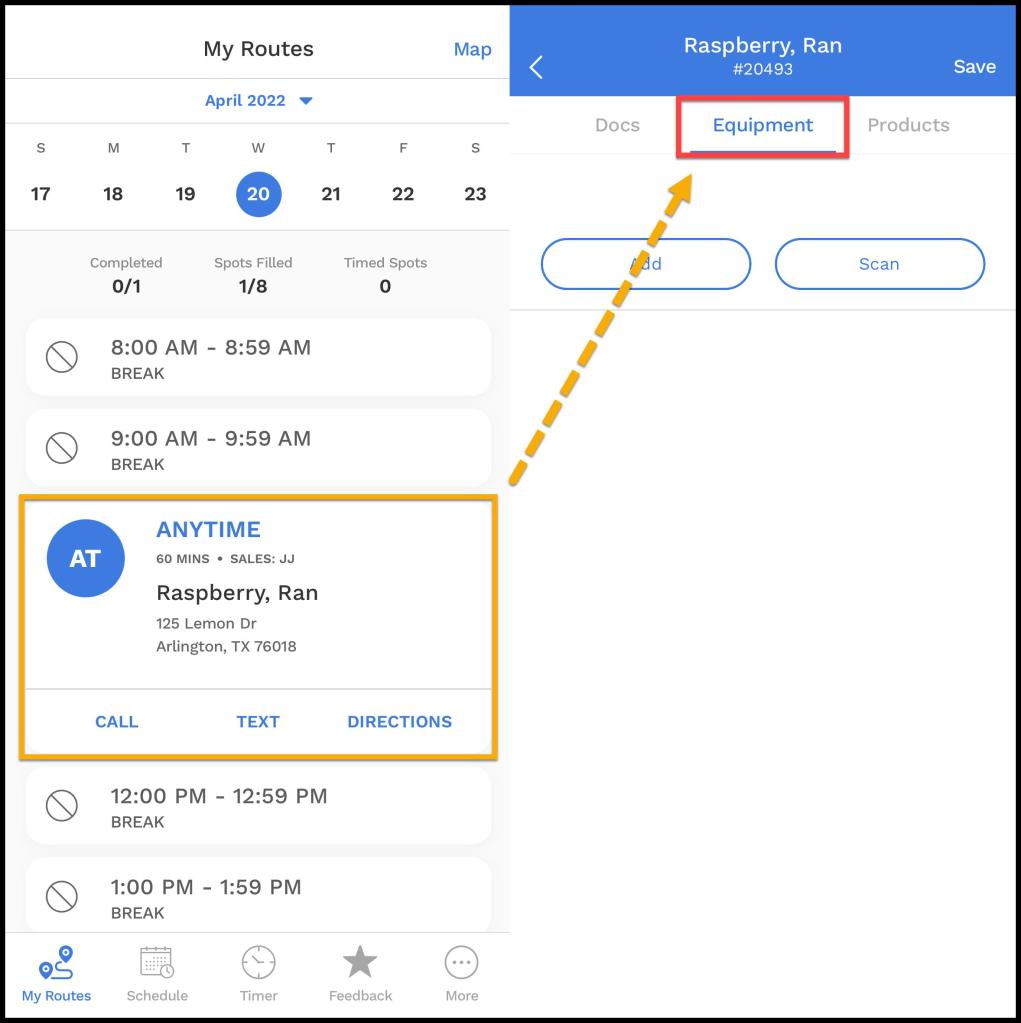
Open PestRoutes Tech > open the Appointment > go to the Equipment tab.
Viewing the Equipment Screen
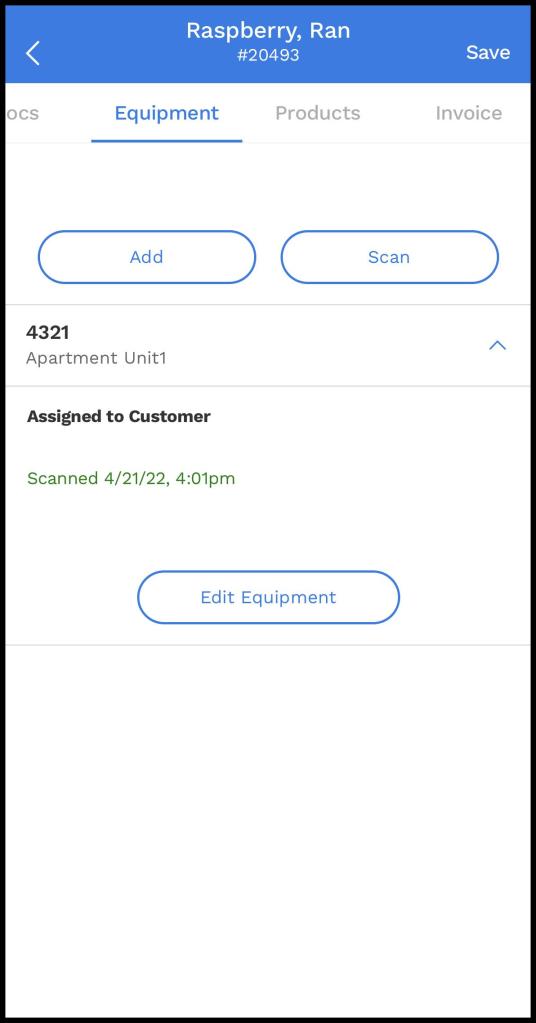
Below these options will be a list of any existing barcodes the customer may have on file with their account.
- The bold text will display the barcode description.
- The italic text in parenthesis will display the equipment type the barcode is attached to. Configure equipment types in the desktop app under Admin > Preferences > Equipment Types.
- The green text indicates the time and date a user first scanned the barcode to the customer’s account.
- If it says Assigned to Customer to the right, the barcode is attached to the customer’s account and available for all technicians to see and scan no matter which service type is being performed. If the barcode says Specific to Current Service Plan, only technicians servicing appointments on the specific subscription will have access to viewing and scanning the barcode in Mobile Apps.
- The mobile app will display a location description of the equipment as well.
Technicians can select an existing barcode on this list to view and edit information about the barcode.
Adding Or Scanning New Equipment
When selecting the Scans tab in the mobile app, there are options to Scan Existing, Enter Manually and Add New. Select Scan Existing if the equipment is already displayed in the list below, and the barcode needs to be scanned again. Select Add New if the technician is adding a new barcode to the customer’s account.
- Please note: If using the Socket Mobile Scanner, these options don’t need to be selected.
To scan a new piece of equipment
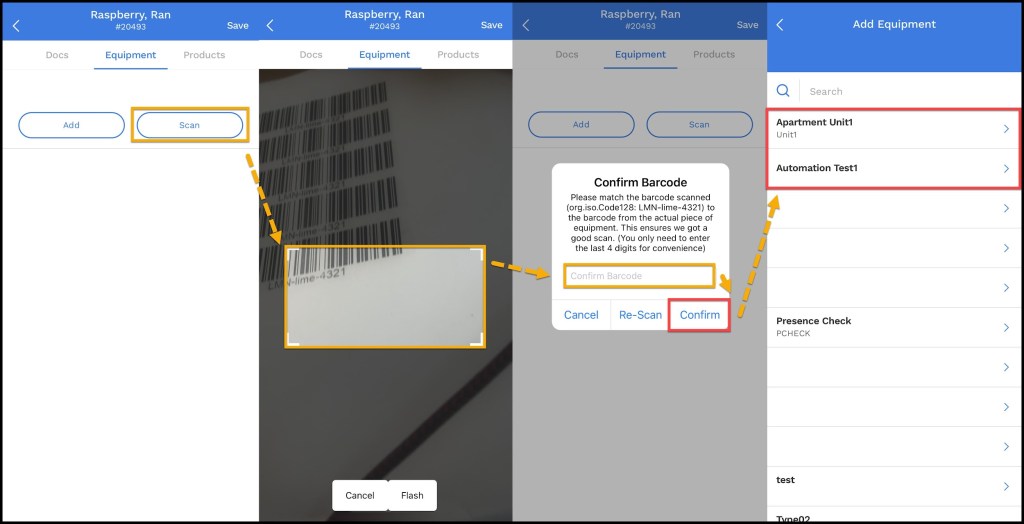
- Select Scan
- Line the barcode up within the rectangle, the camera will register the barcode automatically.
- Verify the last four digits of the barcode to match the equipment with the barcode.
- Select the Equipment Type.
This will lead to the Item tab.
Using the Item Tab
Once the user chooses the equipment type, the item tab will open.
- Description: The description or label the technician added to the Equipment in the mobile apps. Put the correct name of the Equipment into the field. This will be shown under the Scans tab in the mobile app.
- Device ID: Shows the unique ID number for the equipment.
- Barcode: Shows the scanned or entered barcode number for the equipment.
- Type: This is where the user can select the equipment type for the barcode. To configure equipment types, go to Admin > Preferences > Equipment Types in the web application. The user must verify an equipment type before saving the barcode. For more information on Equipment Types, see the Equipment Types guide.
- Assigned To: The technician can choose if the barcode is attached to the customer’s account, or specific to the customer’s subscription. If a barcode is attached to the customer’s account, every technician that performs a service (no matter what the service type is) will be able to see and scan the barcode under the Scans tab in the mobile tab. If the barcode is attached to the subscription, only technicians servicing appointments pertaining to that specific subscription will have access to scanning the barcode in the mobile app.
- Application Method: The Application Method field describes how the technician will apply the tool at the worksite. Select a type of application method from the menu, or choose not specified.
- Target Area: The Target Areas field shows the technician what kind of area (like a playground, lawn, or barn) they would use the equipment on to address the target issues. Select a target area from the field.
- Location Description: Utilize this field to attach a description of the barcode’s location on the property.
- Target Issues: The Target Issues field shows the technician what issues the technician would address with the Equipment used. These are the issues the technician input under the Activity Found field in the mobile apps. Select an issue from the field or enter a new one.
- Flags: Used to highlight any important information or issues the technician should be aware of when visiting the site, like if the equipment is broken. Go to Admin > Preferences > Generic Flags to configure the equipment flags the user can use here.
- Device Exception: In cases where scans are required to complete service but the equipment is missing, the technician can designate it as Replaced, Removed, or Skipped and make a note as to why. With it marked accordingly, the technician can complete the appointment.
- Remove Equipment: This will remove the equipment from the customer’s account.
Select Save Equipment in the upper right to save the new barcode, or the user can Select the Scan, Products, or History tab to view and input more information regarding the barcode.

Using the Scan Tab
Select the Scan tab to input more information about the activity found for the barcode.
- Scan Date: This is the date a user scanned the barcode. It cannot be changed.
- Scan Time: This is the time a user scanned the barcode. It can be changed by selecting this field.
- Activity Level: The user can choose the activity level here.
- Activity Found: This field will allow the user to specify the target issues found.
- Scan Notes: The technician can leave any preset notes about the equipment scanned here.
Select Save Equipment to save any changes made in this tab.

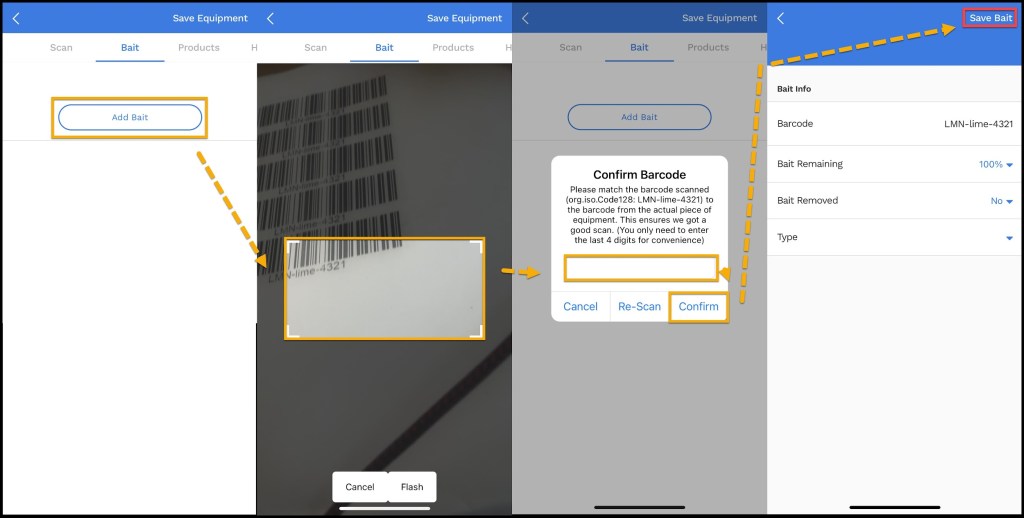
Using the Bait Tab
The Bait tab will allow technicians to scan or enter Bait barcodes. To use the Bait Tab, go to:
Bait > Add New > Scan or enter the barcode > confirm the barcode. The Bait screen will have a few options.
- Bait Info
- Barcode: Shows the scanned or entered barcode number for the bait.
- Bait Remaining: Shows how much bait is remaining.
- Bait Removed: Shows if the bait was removed or not.
- Type: Shows the bait type.
Select Save Bait when finished.
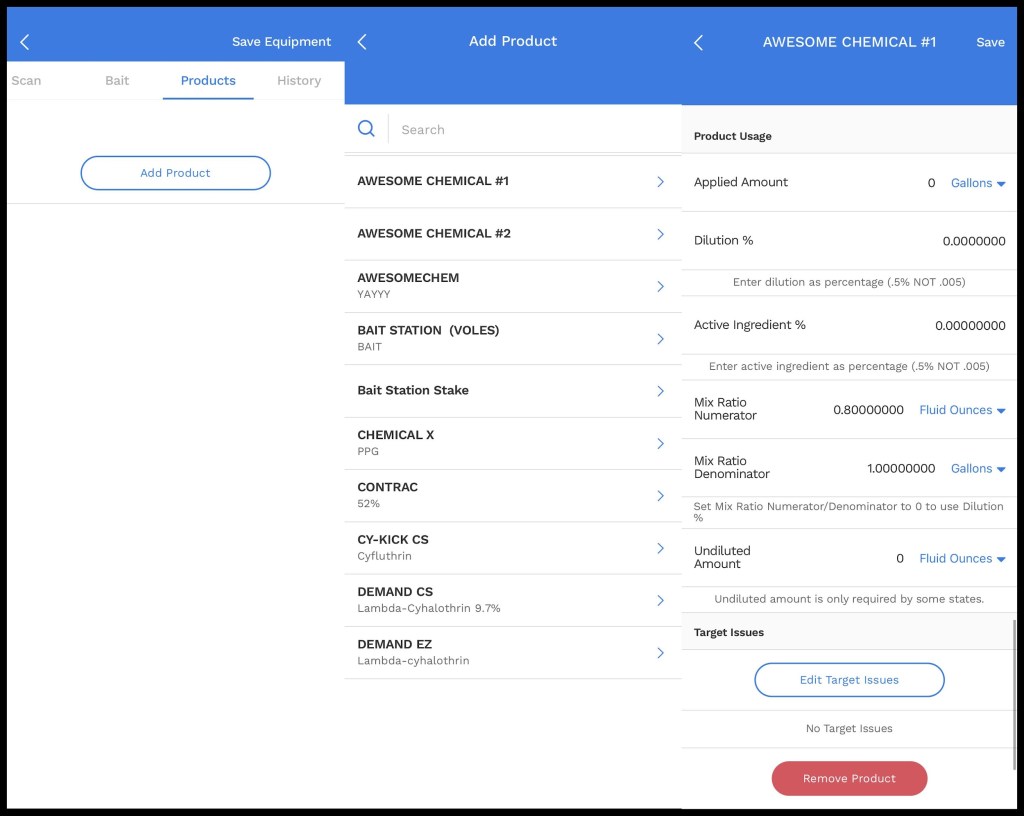
Using the Products Tab
The Products tab will allow the user to record the products used for equipment scanned. This functions in the same way that adding products to an appointment in the mobile app works.
Select Add Product to view a list of all the available products that will appear. Configure this list in Admin > Preferences > Chemicals.
Once the desired chemical is selected, it will bring a new window that will allow the user to specify more information about the applied chemical. The user can set each of these preferences to defaults for specific chemicals by using the Chemical Template. Please see our guide on Service Types for more information.
Select Save to save any changes made in this tab.
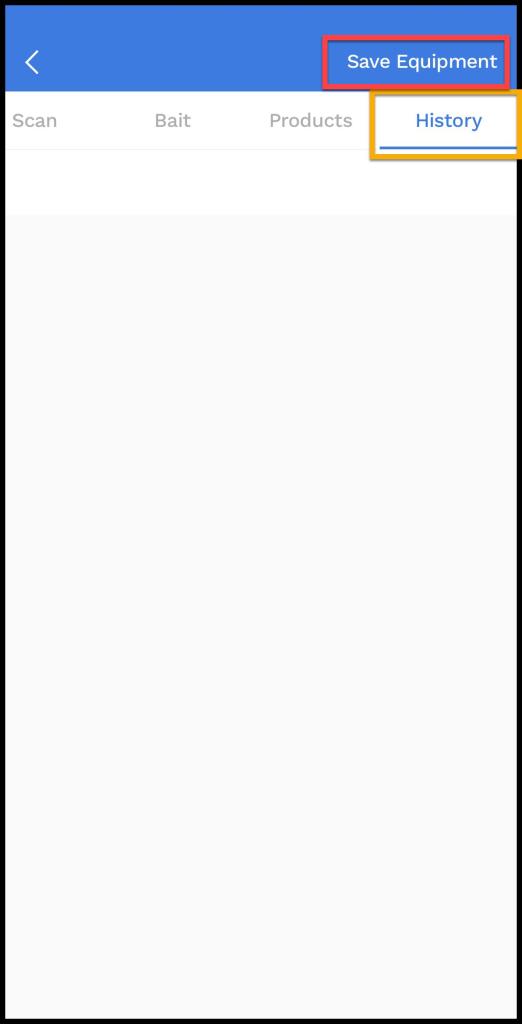
Using the History Tab
The History tab will display the history of the barcode that was scanned.
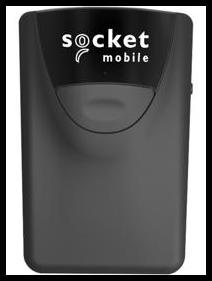
What is the Socket Mobile Scanner?
The SocketScan Mobile Scanner 800 is a data capturing tool for mobile platforms that the user can connect to the user’s device and it will allow the user to scan barcodes via the PestRoutes Tech app.
Use the following connection process if it’s the first time pairing the scanner with the user’s mobile device, or the user needs to reconnect after the scanner was paired with another device. Turning the connected phone or scanner off and on will not require a reconnection.
Connecting Socket Mobile Scanner to iOS Device
To connect the Socket Mobile Scanner to the user’s iOS device:
- Make sure the scanner is turned on and not paired with any other devices.
- Scan the Factory Reset barcode. The user should hear a beeping pattern if the factory reset is successful. If the scanner beeps only once when hitting the Factory Reset barcode, the scanner is already paired with another device in range (approx. 30 feet).
- To fix this, locate the paired device and turn it off. The user can also go to Bluetooth settings and find Socket CHS. Select “Forget this device”. If the device it’s already paired with is out of range, the user will be able to pair it without an issue.
- Ensure the user’s mobile device has Bluetooth turned on.
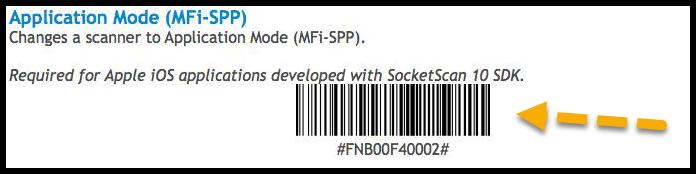
- Scan the barcode below to put the user’s scanner in iOS mode. The scanner will beep three times if the connection is successful. The barcode in the manual that comes with the scanner is incorrect. Please use the barcode below.
- On the user’s device, go to the user’s Bluetooth settings, and find Socket CHS in the list of devices. Tap on it, and the user’s scanner should beep to confirm (there might be a short delay).
Once the scanner is connected, the user can use it in the mobile app.
Connecting Socket Mobile Scanner to Android Device
To connect the Socket Mobile Scanner to an Android device:
- Make sure the scanner is turned on and not paired with any other devices.
- Scan the Factory Reset barcode. Please note: If the scanner beeps once when hitting the Factory Reset barcode, this means the scanner is already paired with another device in range (approx. 30 feet). To fix this, locate the paired device and turn it off. The user can also go to Bluetooth settings and find Socket CHS. Select Forget this Device. If the device it’s already paired with is out of range, the user will be able to pair it without an issue.
- Install the Socket Keyboard Wedge App from the Google Play Store.
- Ensure the mobile device has Bluetooth turned on.
- Turn on the SocketScan 10 Keyboard. Go to Settings > Language and Input, and select SocketScan 10 as the default keyboard. This selection is only temporary, and the user can switch back after the pairing process is complete. If SocketScan 10 is not an option, select Add Keyboards. Check SocketScan 10, press the back button, and choose it as the default keyboard.
- If the connection was successful, a notification should appear at the top of the screen saying “SocketScan 10 Service Started”. This message disappears quickly, but the user should be able to see it on the download screen.
- Launch the Socket Scanner App and check the box to turn on the scanner.
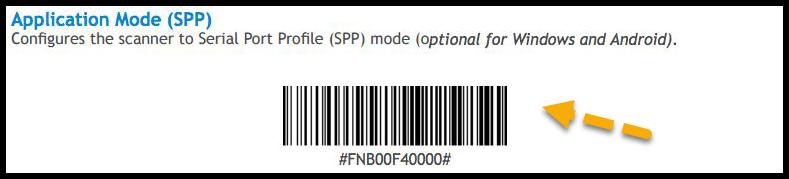
- Put the scanner into SPP mode by scanning the barcode below. The scanner should beep three times after scanning.
- If this is the first time paring the scanner, tap the On-Screen button. Otherwise, the user may tap the Bluetooth Button.
- On Screen: Select “1D Scanner”, and then scan the barcode that appears on the phone/tablet’s screen. The user may have to increase the size of the barcode for the socket scanner to pick it up. Sometimes a screenshot will work, then try increasing the size of the photo. Please note: This is device-specific, so we cannot reproduce it here. The scanner will beep three times after a successful scan, and a couple of seconds later, a pairing request should appear on the phone/tablet. If it asks for a pin, enter “000” and accept the pairing request. If successful, the scanner should beep once. This beeping may also be intermittent. Wait a few seconds and if there is no pop-up requesting a pin code, move on to the next step.
- Go to Settings > Bluetooth, and the scanner should appear on the list in the middle of the screen. Select it, wait a couple of seconds, and if the pairing was successful, the scanner should beep once.
The scanner is now paired with the device. The user may now close the SocketScan 10 app and re-select the normal keyboard. The scanner will beep during this process, which is normal. If the user sees a message pop-up stating the SocketScan service has stopped, go back to the Bluetooth settings and ensure it’s still paired.
Using the Socket Mobile Scanner in the Mobile Application
When the user opens the mobile app, the scanner should beep once to confirm it’s connected.
From there, the user can select a customer’s appointment, and go to the Scans tab. Whether the user is scanning an existing barcode or adding a new barcode, the user can scan the barcode with the scanner (without selecting the Scan Existing or Add New options). It will register the barcode for the user.
If the user is scanning an existing barcode, it will take the user to a screen to edit the equipment information for the barcode.
Scanning a new barcode will prompt the user to verify the last four digits of the barcode, then bring up a screen to add the equipment information for the barcode.