
PestRoutes Sales: Maps Tab
Summary
The maps tab in PestRoutes Sales is used to track knocks. It is a digital knocking record.
The Maps tab in PestRoutes Sales helps sales representatives to view customers on a map, keep track of areas knocked, and create door pins.
This Maps tool helps sales users that knock door to door. It will help them keep track of houses that have already been knocked, allow them to view current and canceled customers, and makes it easy to convert a door pin into an active customer.
Important Points:
- The 50 closest customers will be based on the center of the map area shown on the screen, not on the current location of the technician.
- Loading too many pins may decrease the map’s performance.
- Ensure the map has captured the precise current location by tapping the compass in the lower right corner of the map.
- If the user taps “Get Address” to have the address autofill based on the current location, ensure the house number is correct as it may not capture the house number accurately.
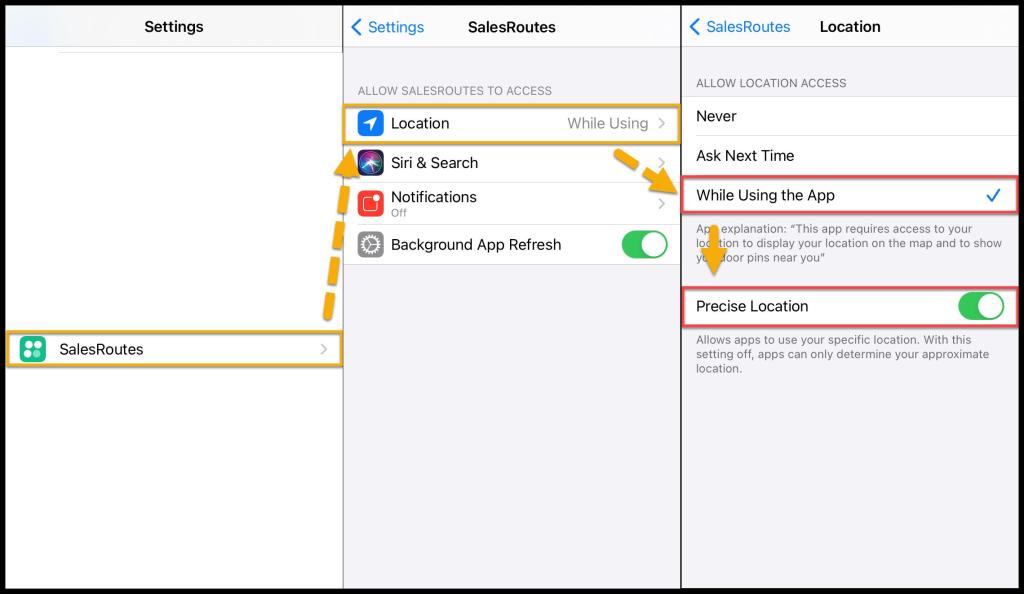
Enabling GPS for the maps feature in PestRoutes Sales
To enable the Maps tab in PestRoutes Sales, go to:
For Apple/iOs
Settings > PestRoutes Sales > Location > Allow while using.
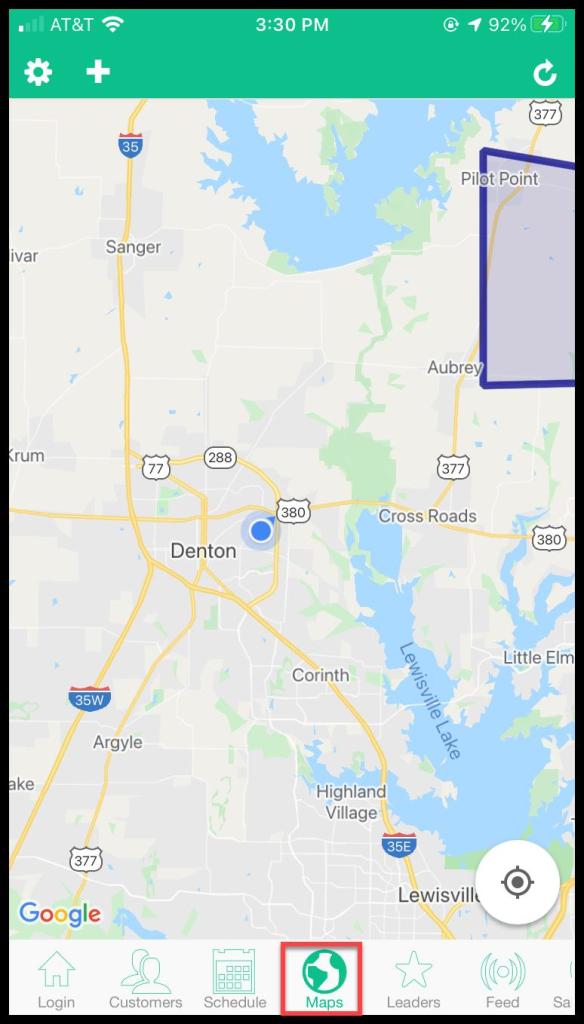
Accessing the Maps feature
Open the PestRoutes Sales App > Maps.
Make sure to refresh the screen by pressing the refresh icon at the top of the screen. The maps feature will populate the map with the 50 nearest customers based on the center of the screen.
What do the icons mean?
Several icons can show up on the screen when the map is refreshed.
- Grey Star: Represents one of the 50 closest active customers who are inactive, frozen, never fully signed up, or canceled services with the company.
- Green Star: Represents one of the 50 closest active customers that have not left a review.
- Gold Star: Represents one of the 50 closest active customers that left a review.
- Grey Door Pin: Represents a customer who is not home.
- Yellow Door Pin: Represents a callback.
- Green Door Pin: Represents a customer who purchased a service from the Sales Rep, and the Sales Rep made a Sale.
- Red Door Pins: Represents a customer who is not interested.
- Blue Door Pins: Represents a customer who received a pitch from the Sales Rep.
- Black Door Pins: Represents a customer who is never interested.

Adding or Editing a pin on the Map
Press down on the location on the map to place a pin.
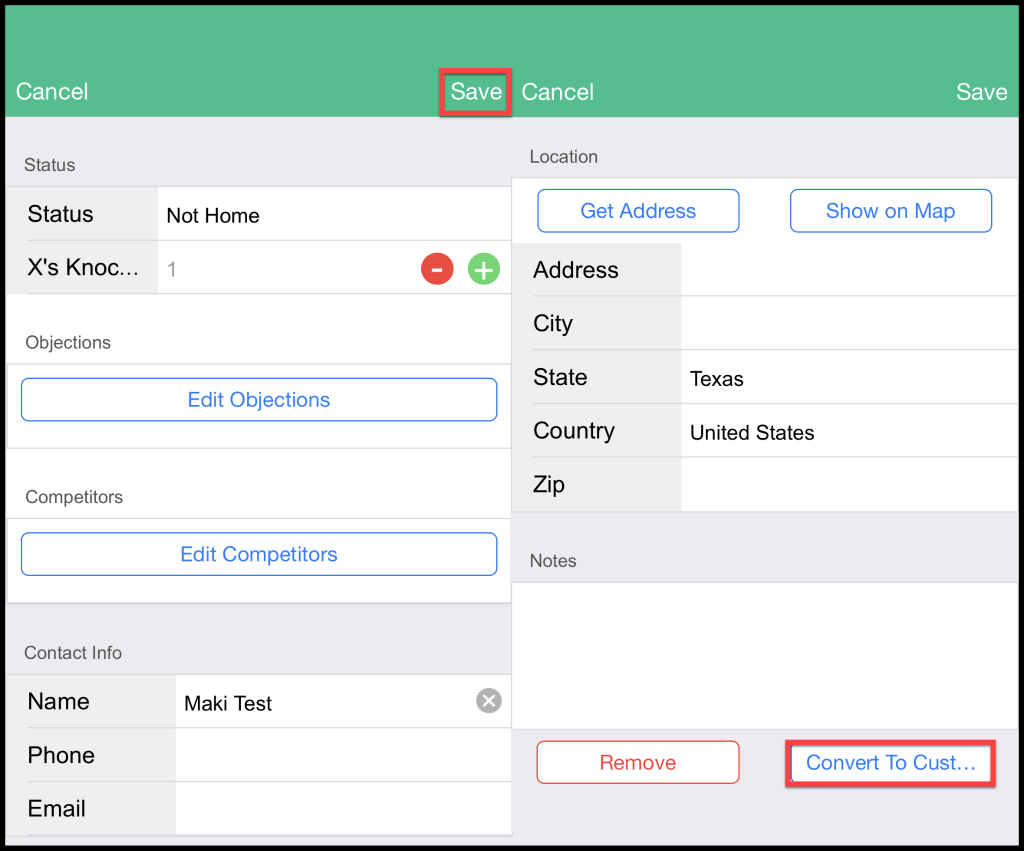
Tapping one of the door pins will open a lead for the customer.
- Status: shows the status of the lead, and how many times they were visited.
- Objections: Record any objections the customer has to receiving services. Objections can be edited in the web app > Admin > Preferences.
- Competitors: Choose any competitors the customer may be using or considering.
- Contact Info: Records the lead’s name, phone, and email.
- Location: Get the address from the map location, show it on the map, and enter the location details manually.
- Notes: Add notes on the lead.
Press Save to save the lead, or press convert to the customer to turn the lead into a customer.
To add more details to the new customer, please see the PestRoutes Sales Customer Tab guide.
Using the Map settings
- Door Pins: Toggle Door Pins on or off.
- Show Pins
- Closest to Map Center: Show the pins closest to the center of the map.
- Today: Show customers from today.
- Yesterday: Show customers from yesterday.
- Last 3 Days: Show customers from the last 3 days.
- Custom: Show customers from a certain date range.
- Other markers
- Active Customers: Show active customers. This option helps prevent sales users from signing up current customers again, show potential customers, where all the active customers are with the company.
- Cxld Customers: Show customers who were canceled. This option is beneficial to prevent sales users from signing up customers that have canceled services with the company.
- Area Boundaries: If area boundaries are assigned to sales representatives, they can view the boundaries with this toggle on. These are the area boundaries established under Sales > Area Management in Fieldroutes Web. Please see the guide on “Area Management” for more information.
- Map Type
- Street: Show the street view of the map.
- Satellite: Show the satellite view of the map.
- Hybrid: Show a hybrid street/satellite view of the map.
Admin Settings
Users that have either the Administrator access or the Rep Spy access control turned on in their user card can log into PestRoutes Sales and view a few more options than regular sales users have in the map settings.
In the FieldRoutes Web app, go to Admin > Users and open the user card to ensure the Administrator or Rep Spy access control is activated to use these features.
- Rep Locations: Show the locations of each rep. PestRoutes Sales will periodically ping the sales user’s location, and that data can be viewed by toggling this option. This feature will only show the user’s tracked positions over the last three days. When this is toggled on, the map will display a purple pin for each location the sales user has been in the past 3 days. Tap the pin to view the date and time the user was located there.
- Rep Spy: Turn the rep spy on or off. This feature is useful for sales managers who may want to “spy” on rep activity without being noticed or displaying rep activity to the whole team. When Rep Spy is turned on, it will give users the ability to see the door pins other sales reps have added. A “Spy On” field will appear and allow users to choose the specific sales representative to spy on.
NOTE:
The Admin Settings can also be set in FieldRoutes Web by going to Admin > Users > choose the desired user > access controls > users > SalesRoutes Rep Spy.
Press Save Map Settings to save any changes made to the settings.

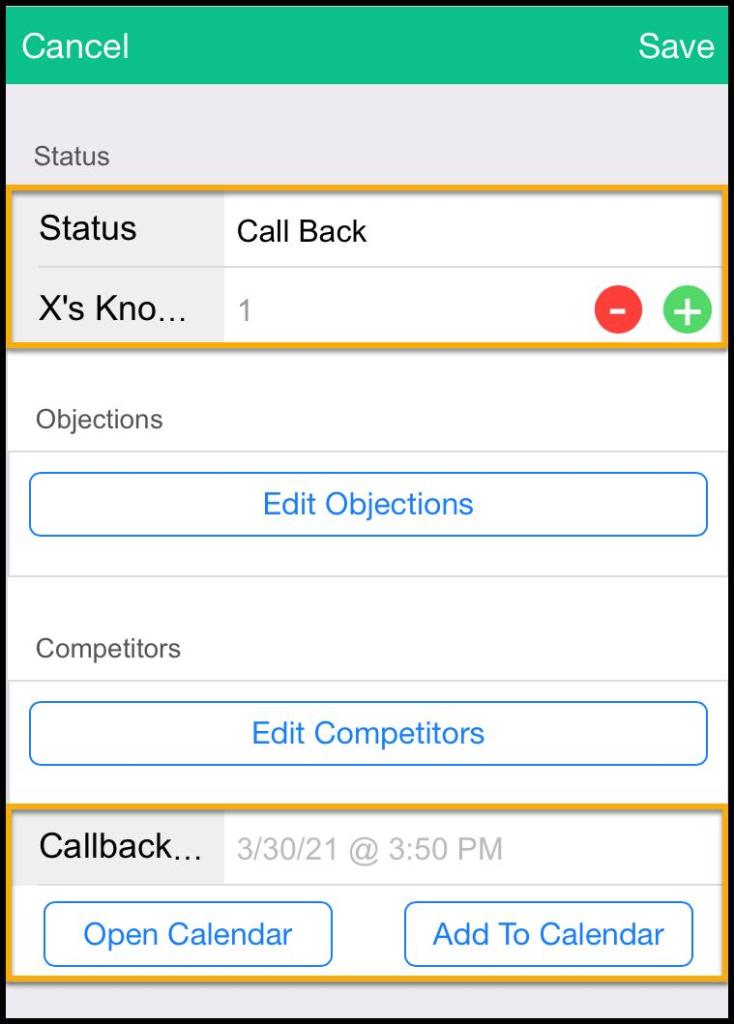
Creating Door Pins on Map: Call Backs
When the user sets the status of a door pin to “Call Back”, a new field will be displayed that will allow the user to set up a specific call back date and time, and even add the event to the device’s calendar. Use this feature to track callbacks.
- Callback Time: This field allows a time to be set up to call the customer back. Tap this field to change the date and time. Press “Done” when finished.
- Open Calendar: Tapping this will open the default calendar app on the device.
- Add To Calendar: This will save the callback date and time as an event on the default calendar app on the device. A confirmation message will be sent to the user that the event has been added to the calendar.
If the yellow callback pin is tapped on the PestRoutes Sales map, the information box will also display the callback date and time.
Using the Knocking Report
To view a report of all the door pins that have been created by sales users, go to Sales > Knocking Reports in the web app.
