PestRoutes Sales: Creating a New Customer
Summary
The PestRoutes Sales mobile application is an excellent tool for door-to-door sales representatives to sign new customers up.
PestRoutes Sales allows sales users to sign new customers up for a subscription, sign the agreement digitally onsite, or email the agreement to the customer. They can also schedule the initial appointment.
This guide will cover signing a new customer up in PestRoutes Sales.
Important Points:
- The customer will appear in the web application once their account is saved in the mobile app.
Adding a New Customer
There are two ways in PestRoutes Sales to add a new customer:
- Through the Maps tab
- Through the Customers tab
Please see below for a detailed guide on adding new customers via PestRoutes Sales.

Adding a New Customer via Maps Tab
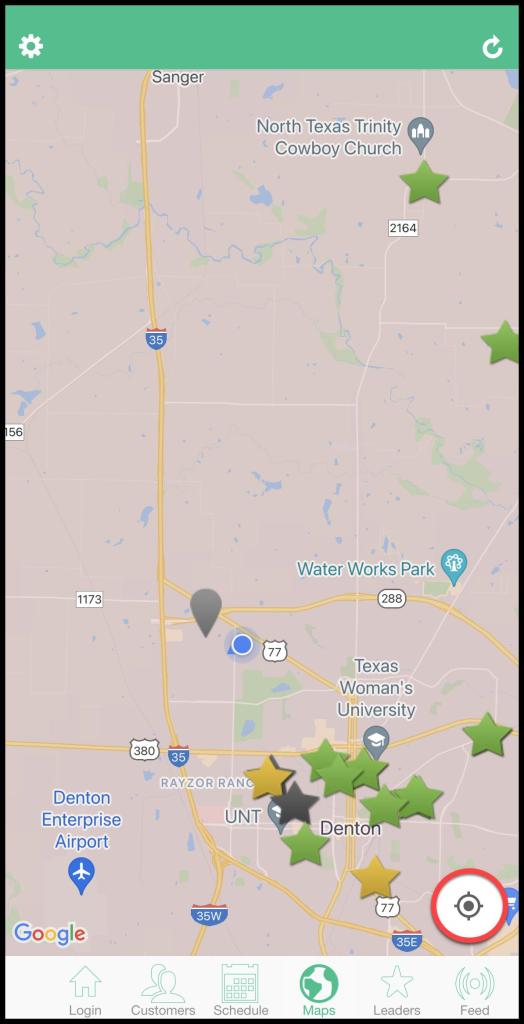
To add a new customer via the Maps tab, press the Maps tab at the bottom of the page. To ensure the map has captured the user’s current location, press the compass in the lower right corner of the screen. This method will ensure the customer’s address is accurate and create a pin for the Knocking Report.
Once the user presses the compass in the lower right of the screen, the user should see a blue pin where the user is currently located. The map can be scrolled around and pinch-zoomed in and out.
Locate the customer’s property on the map, and press and hold on the property that the user will add as a new customer address.
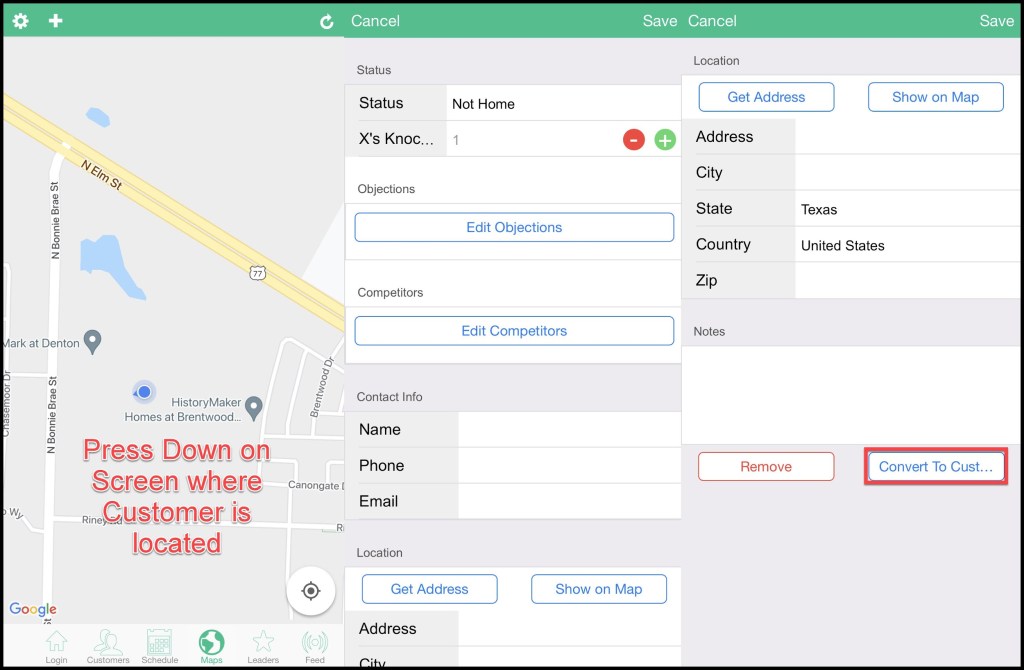
Dropping a New Customer Pin
Once the user long-presses on the customer’s property on the map, a new window will display, allowing the user to enter information to create a pin for the customer on the map.
By default, this page does not allow the user to create a new, active customer in PestRoutes Sales. This section is where the user can create a pin that will appear on the Maps tab in PestRoutes Sales and the Knocking Report in the web application. Please see our guide on PestRoutes Sales Maps for more information.
Fill out all the information to create the door pin for the customer, and at the bottom of the page, there is an option to Convert to Customer.
After pressing Convert to Customer, the Info tab for the new customer will appear, allowing the user to enter more information about the customer. Please see below for more details.
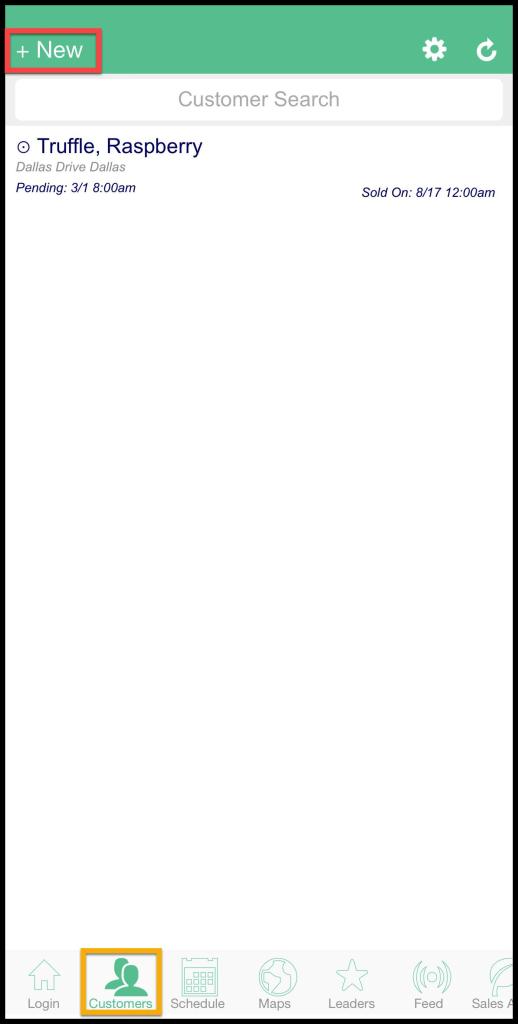
Adding a New Customer via the Customers Tab
To add a new customer in the Customers tab, press the Customers tab at the bottom of the page and then press + New in the upper left corner.
Using the Info Tab
No matter the method of creating a new customer used in PestRoutes Sales, the user will end up at the Info tab. This tab will allow the user to enter basic information about the customer, similar to the Info tab of the customer card in the desktop app.
- First Name: Add The customer’s first name. This field may be auto-filled for the user if they created the customer via the Maps tab.
- Last Name: Add The customer’s last name.
- Spouse: Enter the customer’s spouse/alternate contact here, if applicable.
- Phone 1: This is the phone number that will receive appointment reminders.
- Phone 2: This field is for an alternate phone number. This number does not receive any appointment reminders.
- Email: The customer’s email. This is the email to that the digital agreement that will be sent. The user must enter an email to generate a digital agreement in PestRoutes Sales.
- Service Address: The Service Address section provides a few different ways to input the customer’s address. The user may manually enter the customer’s address by tapping each address field and inputting the information there. Press “Verify Location” to verify the user’s current location. This will display a map that functions similarly to the Maps tab. The user can press the compass icon to capture the user’s current location and press the customer’s property on the map to place the green pin on the correct address. Once the address has been verified, press “Auto Address” to autofill the customer’s address in the address fields based on the location of the pin.
- Permanent Customer Notes: This field is for sales users that need to input important notes that will appear on the customer card and on the customer’s agreement.
Please see below for continued details on the Info tab in PestRoutes Sales.

The remaining sections under the Info tab are detailed below.
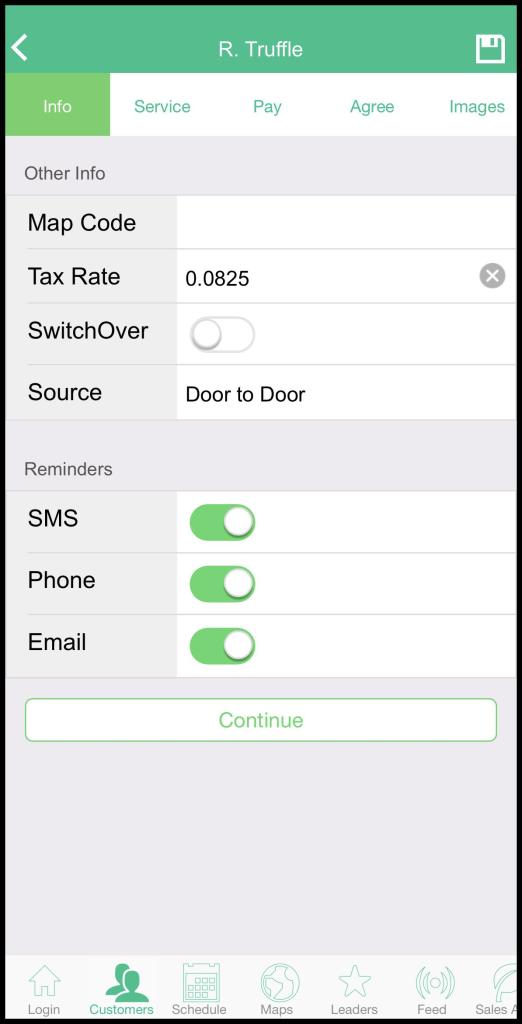
- Other Info: This is where the sales user can enter in other details about the customer’s account.
- Map Code: Companies that use this system may enter the correct code in which the property stands for tracking addresses by the user’s company. The sales user can verify the tax rate with the”
- Tax Rate: The default sales tax rate for this locality can be manually entered here or assigned by the ZipTax feature when enabled in Admin > Preferences > Preferences > Billing Options. WARNING: If ZipTax is enabled, and the Preferences > Contract Defaults > Tax Rate = 0%, then this will be interpreted by PestRoutes Sales as a tax-exempt organization and override the local ZipTax rate; to prevent this and allow ZipTax to set the rate, be sure to set the Contract Default > Tax Rate to a value greater than 0%.
- SwitchOver: Set to the left (No) by default; toggle to the right to indicate this customer is switching from a competing service provider.
- Source: The sales user can confirm the customer source as well. It should default to say “Door to Door” for PestRoutes Sales customers.
- Reminders: This is where the sales user can toggle the different types of reminders on or off for the customer to indicate their preferred method of communication. If the customer prefers not to receive a specific reminder type, toggle it off here. They will be toggled on by default unless the user has them turned off under Admin > Preferences > Customer Communication.
- SMS
- Phone
Once all the information is input, press Continue at the bottom of the page and continue to the Service tab.
Using the Service Tab
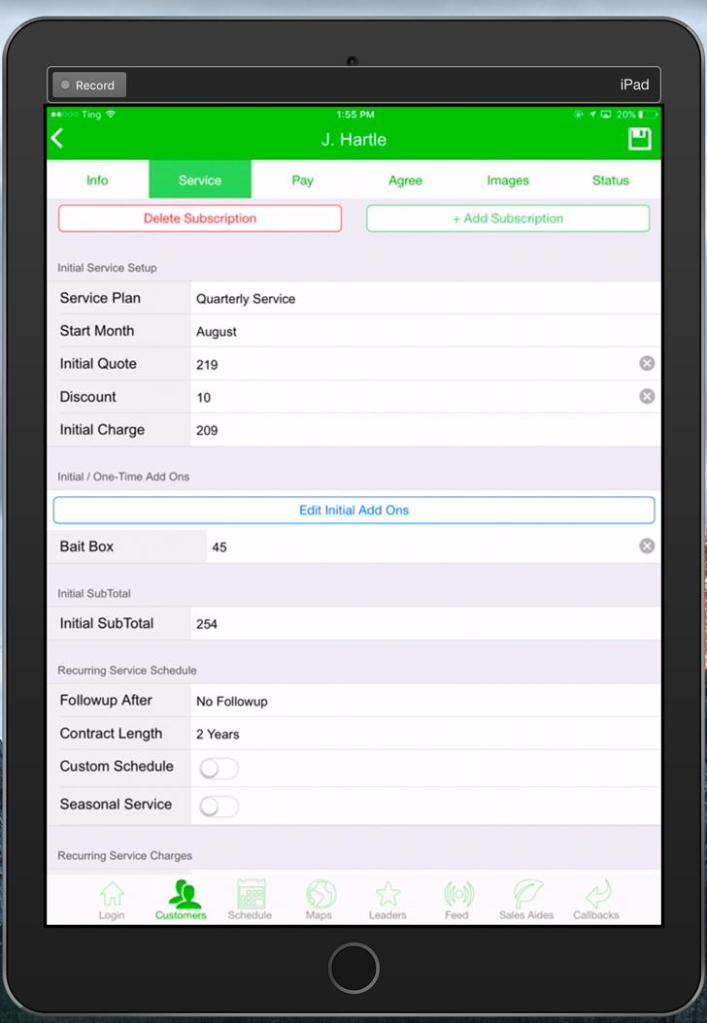
The Service tab is directly about the customer’s subscription. The service type chosen in PestRoutes Sales will use the same defaults as the service type in the web app. To change these preferences, go to Admin > Preferences > Service Related > Service Types.
- Delete Subscription: Use this to delete specific subscriptions.
- + Add Subscription: Add more than one subscription for a customer.
- Service Plan: This is the subscription the customer will be signed up with. Once the user chooses the service type here, the remaining fields should default to the information in the service type preferences. However, the user can edit this information on a customer basis if needed.
- Start Month: Start the customer’s subscription during a certain month. Defaults to the current month.
- Initial Quote: Set the price for the customer’s initial service on their subscription. Defaults to the information under Admin > Preferences > Preferences. It can be changed manually if needed.
- Discount: Set the discount on the customer’s initial service. Defaults to the information under Admin > Preferences > Preferences. It can be changed manually if needed.
- Initial Charge: Displays the total charge for the customer’s initial service based after the initial discount has been applied. Edit either the “Initial Quote” or “Initial Discount” to change this number.
- Initial / One-Time Add Ons: Add additional products to the customer’s initial service, and press “Edit Initial Add Ons”. These add ons will only be applied to the first service performed for the customer’s subscription. Configure add ons under Admin > Preferences > Add Ons.
- Initial Sub Total: Displays the total charge for the customer’s initial service with the initial add ons. Without add ons, this number will be the same as the “Initial Charge”.
- Followup After: Displays the frequency for the initial follow-up service. The initial follow-up is the service after the initial service. Default to the information in the service type preferences.
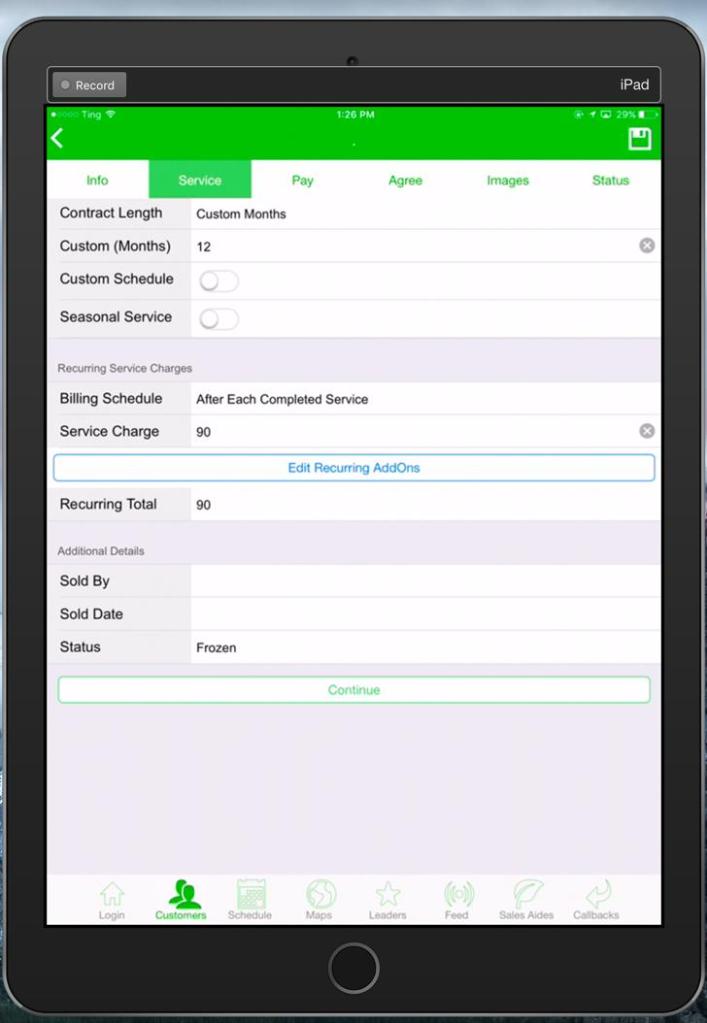
- Contract Length: This is the length of the contract for the service type. Defaults to 2 years.
- Custom (Months): For a contract length less than 2 years, tap Contract Length > Custom Months > enter the number of months for the contract.
- Custom Schedule: To create a custom schedule for the service type, toggle the Custom Schedule option on. Once this is toggled on, a “Edit Custom Schedule” button will appear. Press that button, and a list of months will display. Tap the months for regular recurring services. The initial service will be scheduled manually and should not be included in the custom schedule.
- Seasonal Service: To define a seasonal service for the customer’s subscription, toggle the Seasonal Service on, and the sales user can choose the season start and end months.
Please see below for continued details on the Service tab in PestRoutes Sales.
The remaining sections under the Service tab are detailed below.
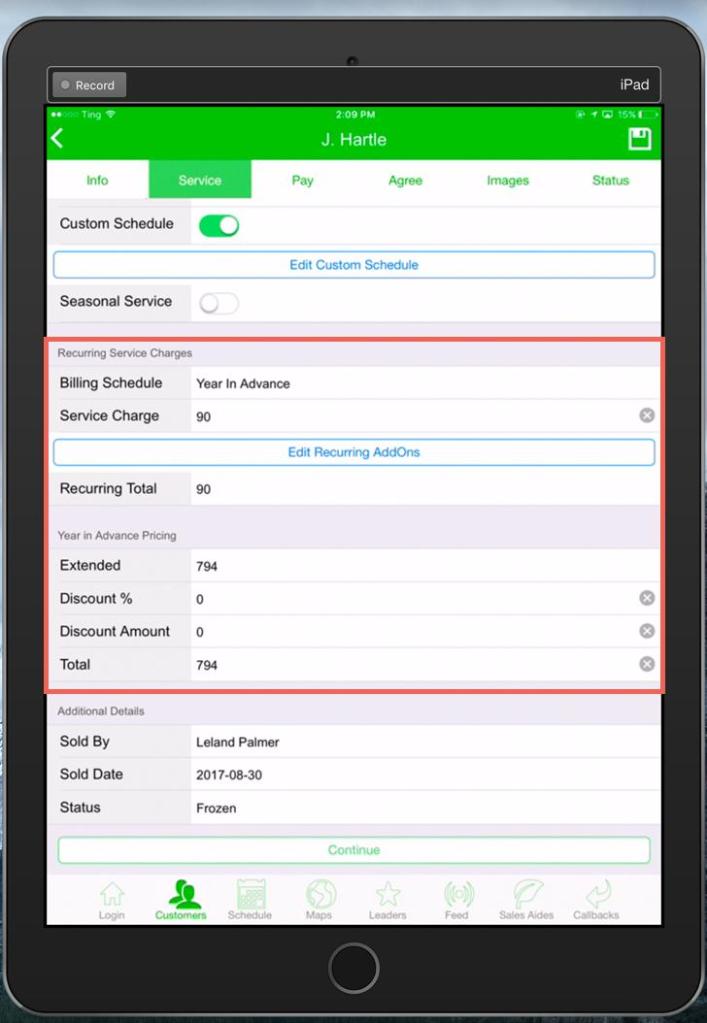
- Billing Schedule: Customize the billing schedule for customers that want to pay for their services on a different frequency than when they receive their services. By default, it will be set to “After Each Completed Service”, choose this option to make changes. Press Year In Advance for customers who will be paying for their subscription a year in advance, or press Monthly Subscription Plan for customers that would like to make payments on a monthly basis. Please see below for details on configuring these types of billing schedules below.
- Service Charge: Displays the recurring service price the customer will be charged after each service is completed. Defaults to the information in the service type preferences.
- Edit Recurring Add Ons: Apply recurring additional services to the customer’s subscription. These add ons will be present on all of the customer’s recurring services.
- Recurring Total: Displays the total price the customer will be charged after each recurring service is completed, including any recurring add ons.
- Sold By: Displays the name of the user that sold the service to the customer. This will default to the sales user that is currently logged into the mobile app and cannot be changed in the mobile app. It must be changed in the web application.
- Sold Date: Displays the date the customer was sold the service.
- Status: Shows the customer status. If the customer has not signed the agreement, it will say Frozen. When the agreement is signed, it will be active.
Once all the information is input, press Continue at the bottom of the page and continue to the Pay tab.
Billing Schedule: Year In Advance
If a customer would like to pay for their services a year in advance, press Year In Advance in the “Billing Schedule” field, and several new fields will appear.
- Service Charge: Shows the price of the customer’s subscription services. Defaults to the information in the service type preferences. Don’t change this field because it will affect the total yearly amount calculation.
- Edit Recurring Add Ons: Apply recurring additional services to the customer’s subscription. These add ons will be present on all of the customer’s recurring services.
- Recurring Total: Displays the total price each service is worth on the customer’s subscription, including any recurring add-ons that have been added to the subscription. Don’t change this field because it will affect the total yearly amount calculation.
- Year In Advance Pricing: Use this as a helpful calculator to determine how much the customer should be charged for paying for their subscription a year in advance. The “Extended” field will display how much one year of the subscription is worth based on the numbers above (Service Charge or Recurring Total). Input a discount (if applicable) for the customer based on a percentage or a fixed amount. Once the discount has been input, the total charges with the discount will be displayed in the “Total” field.
Use the Year Payment Discount as a calculator-type feature to help in the negotiation process. It does not share its data with FieldRoutes. After calculating the customer’s annual amount, input that amount under the “Pay” tab in PestRoutes Sales.
Next, press Continue at the bottom of the page and continue to the Pay tab.
Billing Schedule: Monthly Subscription Plan
For customers that would like to pay for their services on a monthly plan, choose “Monthly Subscription Plan” for the “Billing Schedule” field.
- Monthly Charge: Displays the price the customer will be paying on a monthly basis for their subscription.
- Edit Recurring Add Ons: Apply recurring additional services to the customer’s subscription. These add ons will be present on all of the customer’s recurring services.
- Recurring Total: Shows the total price each service is worth on the customer’s subscription, including any recurring add ons that have been added to the subscription. Do not make any changes to this field as the total yearly amount will be calculated below based on this number.
Once all the information is input, press “Continue” at the bottom of the page and continue to the Pay tab.

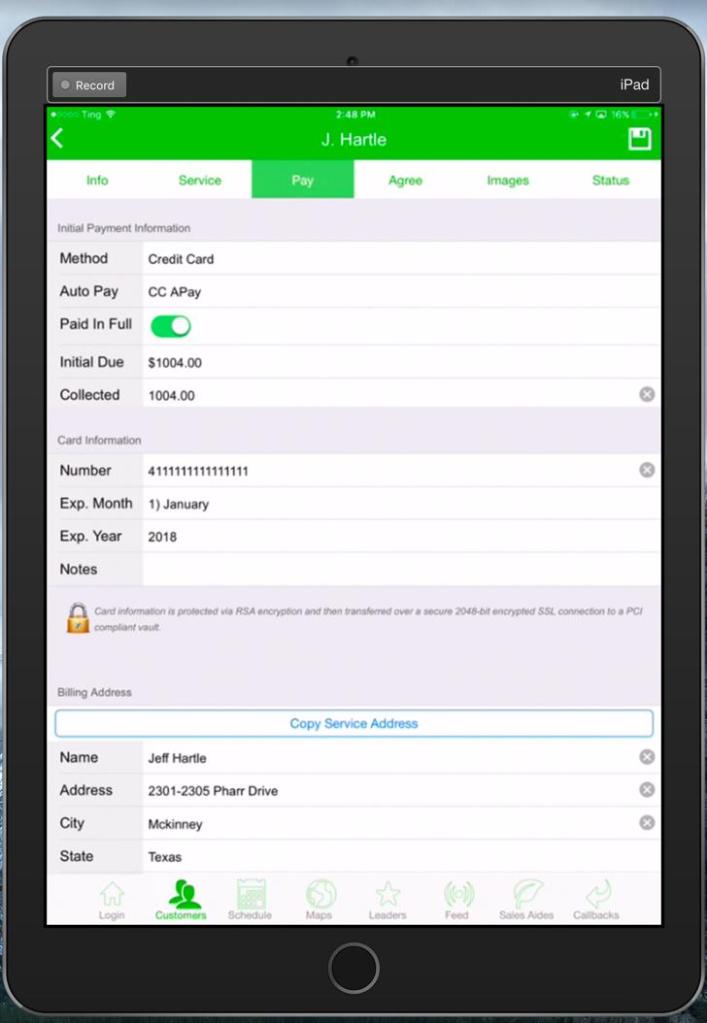
Using the Pay Tab
The Pay tab is where the user can input the customer’s billing information. Credit card information is highly secure.
- Method: Displays the customer’s payment method. By default, “Credit Card” is chosen, but the user can also choose from “ACH / eCheck”, “Check”, “Cash”, and “Collect Payment”.
- Auto Pay: Putting a customer on AutoPay allows the customer balance to be automatically charged from the AutoPay Balances report. The user can choose “CC APay” for customers on AutoPay with a credit card, “ACH APay” for customers on AutoPay with ACH information, and “No” for customers who do not wish to be on AutoPay. If the user puts the customer on AutoPay, there will be an additional box the customer has to initial on the agreement to agree to AutoPay charges.
- Paid In Full: Customers flagged as “Paid In Full” have paid for their contract a year in advance. Toggle this on to flag the customer as Paid in Full in the desktop app.
- Initial Due: This is the initial amount due for the customer based on the billing schedule configured in the previous tab.
- Collected: Displays the amount collected from the customer by the sales user. The payments collected via the mobile app do not automatically apply to the customer’s account. Use the web app’s Sales Collection Report to process the payment.
- Card Information: This section will display different options depending on the payment method selected above. If the customer is using a credit card, the user can enter the credit card information here. If “ACH / eCheck” was selected, the user can input the routing number, account number, and bank name. For check payments, enter in the check number. Cash will not require the user to enter additional information.
- Billing Address: Input the customer’s billing address. If the billing address is the same as the service address, just press “Copy Service Address”. If it is different, manually input the information here.
Once all the information is input, press Continue at the bottom of the page and continue to the Agree tab.
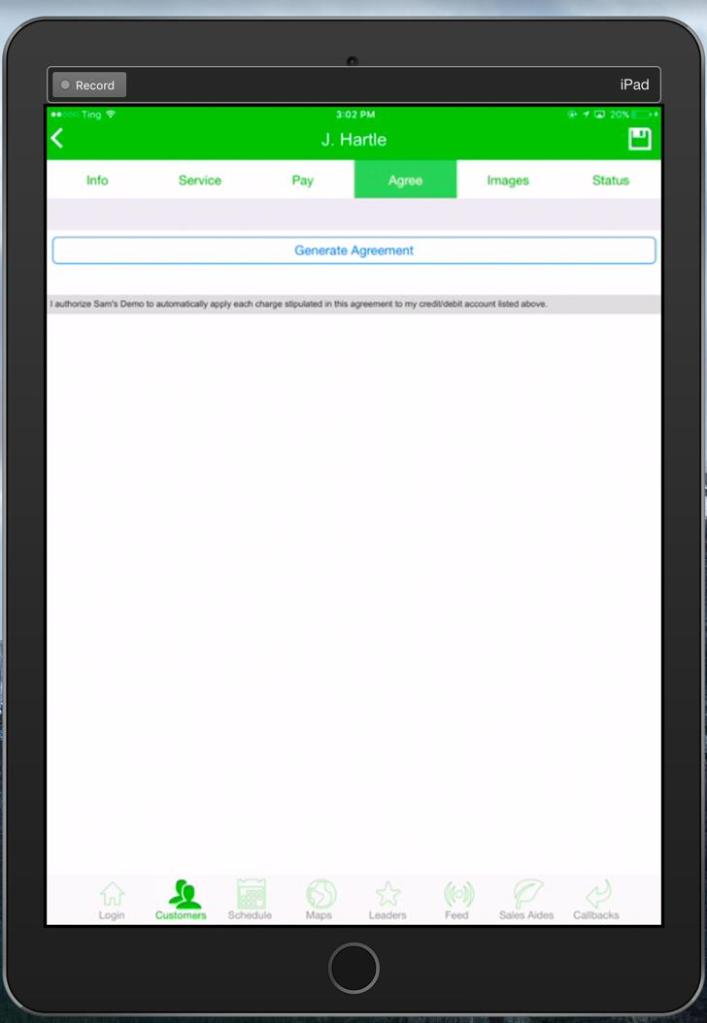
Agree Tab
Use the Agree tab to generate the digital agreement and have the customer sign it on-site, or email it to the customer as an unsigned quote.
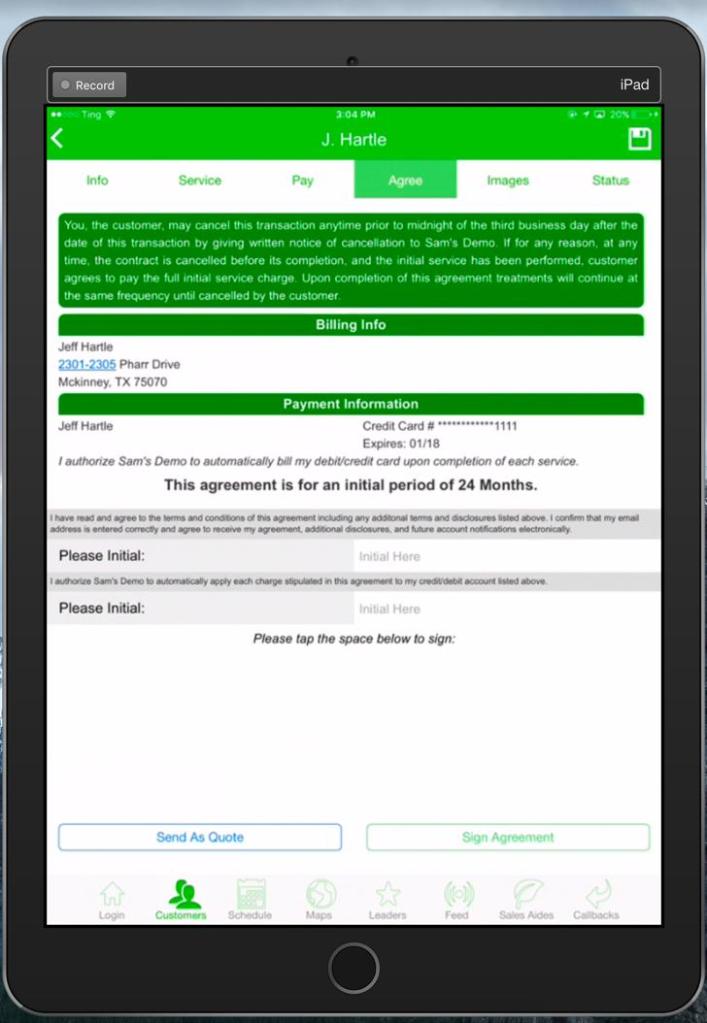
Press Generate Agreement to generate an agreement with all of the customer’s information. If a customer has multiple agreements, the user can toggle between them with a Subscription field that will display at the top.
Once the agreement is generated, the customer can initial and sign it. Just tap on the fields for the initial and signature to sign the agreement.
If the customer would like to sign the agreement later, use the Send As Quote to send the agreement to a customer as an unsigned quote.
Once the agreement is signed, the customer will be active with an active subscription in PestRoutes Web and Mobile application. They will also receive a copy of their signed agreement via email.
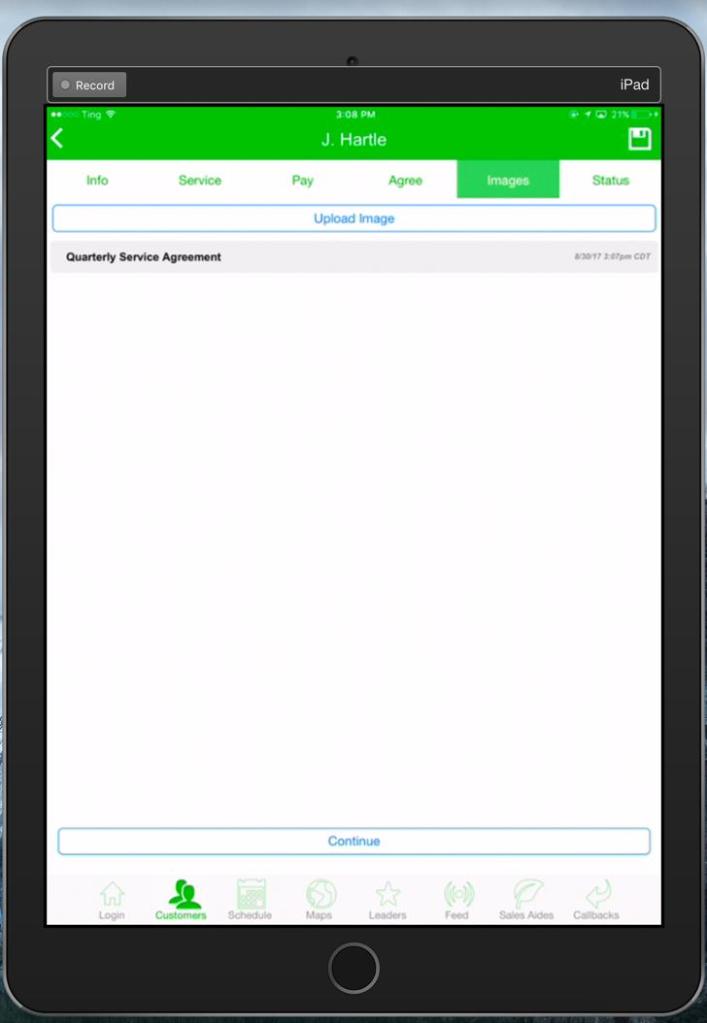
Images Tab
The signed agreement will be moved to the Images tab as a PDF for easy viewing.
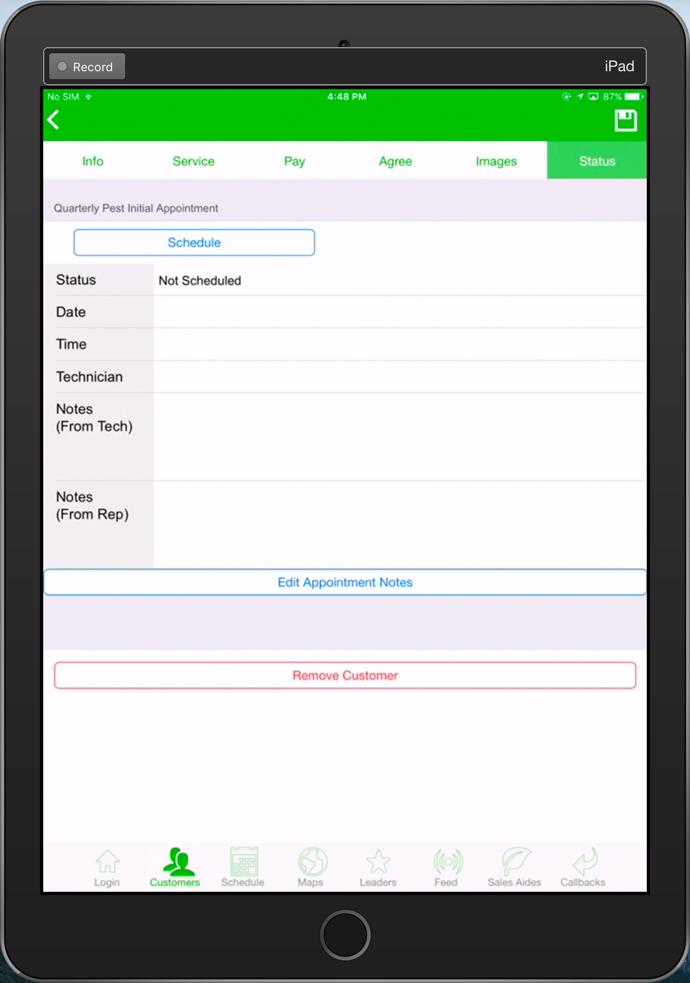
Status Tab
The Status tab will allow sales representatives to schedule new customers via PestRoutes Sales easily.
Please see our guide on Scheduling in PestRoutes Sales for more information.