Office Info
Summary
The Office Info preference allows the user to upload the company logo, input office contact information, and choose the correct time zone.
This feature is important because the office information must be configured in the web application to communicate with customers (such as sending emails and appointment reminders).
Important Points:
- The Office preferences will show up on customer emails, account statements, and other forms of communication in the web and mobile applications.
Accessing the Office Info Preference
To access the Office Information, go to:
Admin > Preferences > Office Settings > Office Info.

Contact Info
Input all office contact information here. It is important to note that this information will appear on customer emails, account statements, and other forms of communication in the web and mobile applications. Select Edit to make changes to certain fields.
- Office Name: Edit the name of the company.
- Phone Number: Edit the office phone number used for contact information, available to customers in the software.
- SMS/Voice Number (Permanent): Used as the office number from which SMS and voice appointment reminders are sent and cannot be changed.
- Email: Edit the office email address, and will be shown as the sender for emails sent to customers via our software.
- IMPORTANT: It is best to use an email with the company’s own subdomain (i.e., office@
- Website: Displays the company’s website URL. This must be entered for the Facebook Link to appear on the Customer Portal.
- License Number: This holds the office license number. It can be seen on agreements the customer signs.
- Office IP Address: Displays the office IP address. For more information, please see our “Prevent Users From Logging In From Outside the Office” guide.
- Time Zone: Determine the time zone the office is located in.
Select Save to keep any changes.

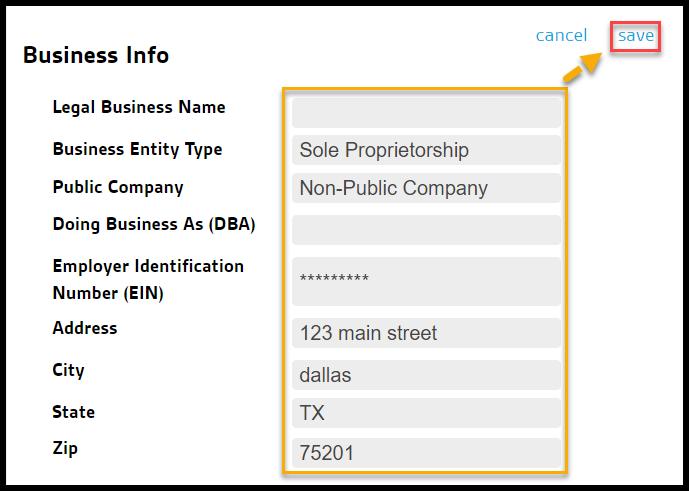
Business Info
Input all business information here. This helps your company comply with regulations protecting customers from receiving unwanted messages.
- Legal Business Name: Edit the legal business name of the company.
- Business Entity Type: Edit the Business Entity Type of the company.
- Sole Proprietorship
- Corporation
- Limited Liability Corporation
- Partnership
- Co-Operative
- Non-Profit Organization
- Public Company: Choose whether the company is public or non-public.
- Doing Business As (DBA): A trade name, trading name, or business name is a pseudonym used by companies that do not operate under their registered company name.
- Employer Identification Number (EIN): Edit the company’s Employer Identification Number.
- Address: Edit the business address of the company.
- City: Edit the city of the company’s business address.
- State: Edit the state of the company’s business address.
- Zip: Edit the zip code of the company’s business address.
Office Logo
An office logo can be uploaded to appear in customer correspondence. It is intended for the user’s office, department, or other subdivisions of the franchise. The logo must be a .png file and have a transparent background.
Select Choose File and pick a logo version that is a .png file with a transparent background, and using a version that is 250px wide is highly recommended.
Select Save Image to save the new logo.

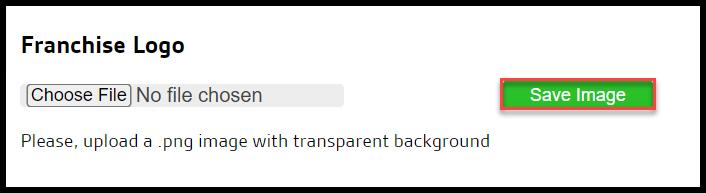
Franchise Logo
A franchise logo can be uploaded to appear on the top right corner of the web application. It is intended for the user’s franchise. The logo must be a .png file and have a transparent background.
Select Choose File and pick a logo version that is a .png file with a transparent background, and using a version that is 250px wide is highly recommended.
Select Save Image to save the new logo.
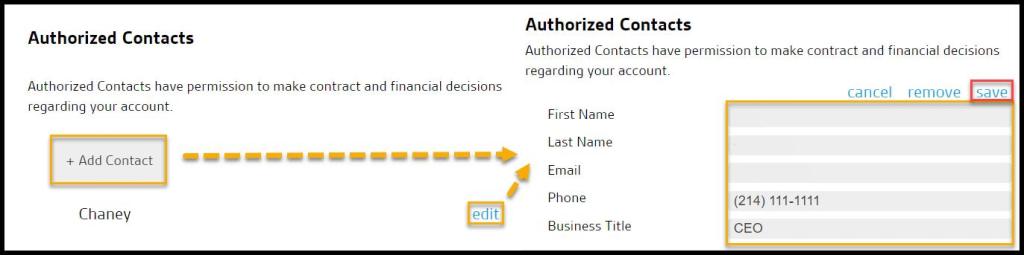
Authorized Contacts
Authorized Contacts have permission to make the contract and financial decisions regarding your account. To edit the Authorized Contacts, select edit near the Authorized Contacts or + Add Contact to add a New Contact. There is a maximum of two Authorized Contacts.
- First and Last Name: Put the name of the authorized contact.
- Email: Put the email address of the authorized contact.
- Phone: Put the phone number of the authorized contact.
- Business Title: Put the business title of the authorized contact.
Select Save when finished.
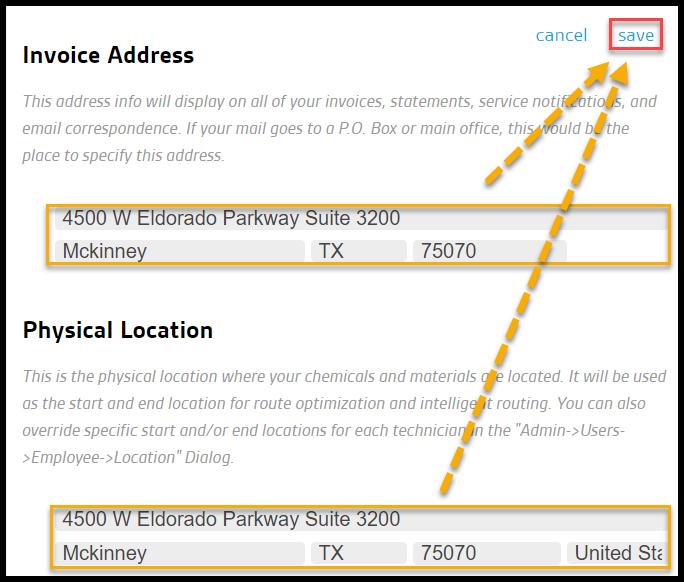
Invoice Address and Physical Location
To edit the Invoice address or the Physical Location, select edit near the Invoice Address.
- Invoice Address: The invoice address will be displayed on all customer invoices, statements, service notifications, and email correspondence. Please specify if the office’s mail goes to a P.O. Box or another office here.
- Physical Location: The physical location where office’s chemicals and materials are located. It will be used as the start and end location for route optimization and Intelligent Routing. Each technician’s specific start and/or end locations can be overridden under Admin > Users.
Select Save to keep any changes.
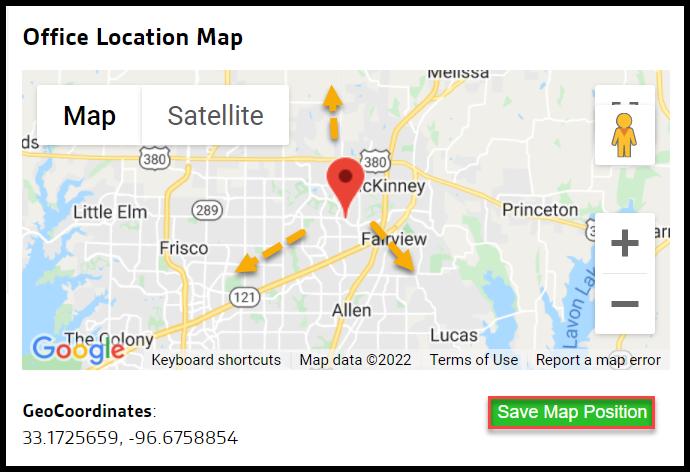
Office Location Map
If the Office Map does not show the correct location, then Intelligent Routing cannot provide accurate results.
The pin can be manually moved and dropped to the correct location in the Office Location Map. If the location is corrected, select “Save Map Position“.
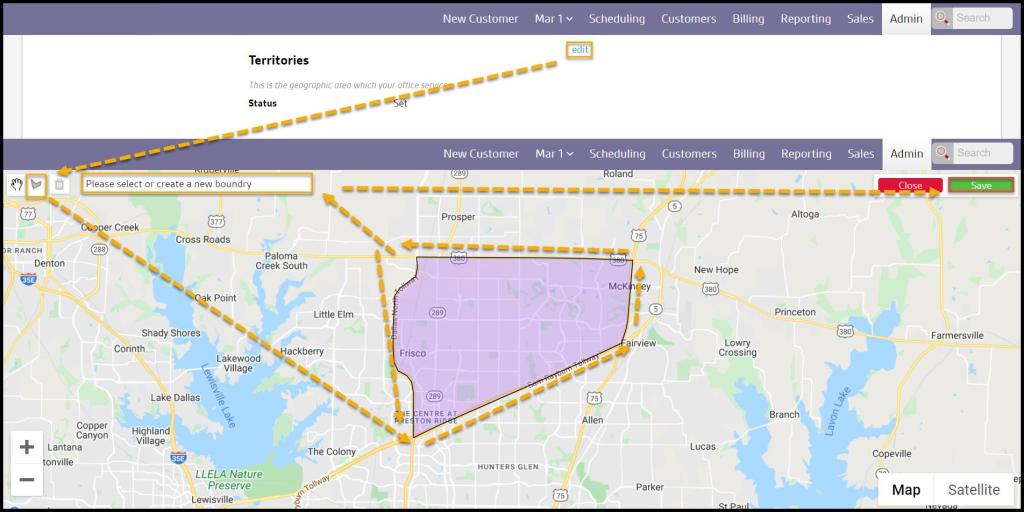
Editing the Office Settings: Territories
This is the geographic area in which the office provides services.
If this section is edited, a map will be shown where boundaries can be drawn for office service Territory. Also, if there is more than one office, all the Territories can be drawn and assigned from one office.
Select Edit to make changes to the Territory. To draw a new shape, hover over the draw a shape option, click a place on the territory’s border, and draw the borders around the office. Then select which office the boundary belongs to, and select Save when finished.