Map View Schedule
Summary
The Map View Schedule feature is designed to make creating, optimizing, and viewing routes easy. This tool combines the job pool with the map to allow the scheduler to see and plan the routes they are managing.
Important Points:
- There are three ways to schedule within the Map View Schedule: individually selecting appointments, using the drawing tool feature, or using the drag and drop feature.
Accessing the Map View
Access the Map View by going to
Scheduling > Calendar > Select the scheduling date > Views > Map.

Map View Display: Viewing Layers
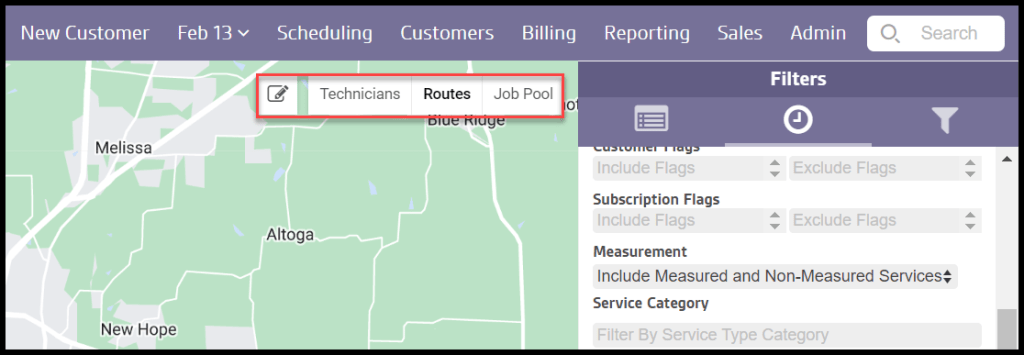
This map view can display multiple layers of information: Routes, Job Pool, and Technicians. By default, this tool will load with just the Routes layer showing. Clicking one will show/hide that particular layer.
Filters: Technicians
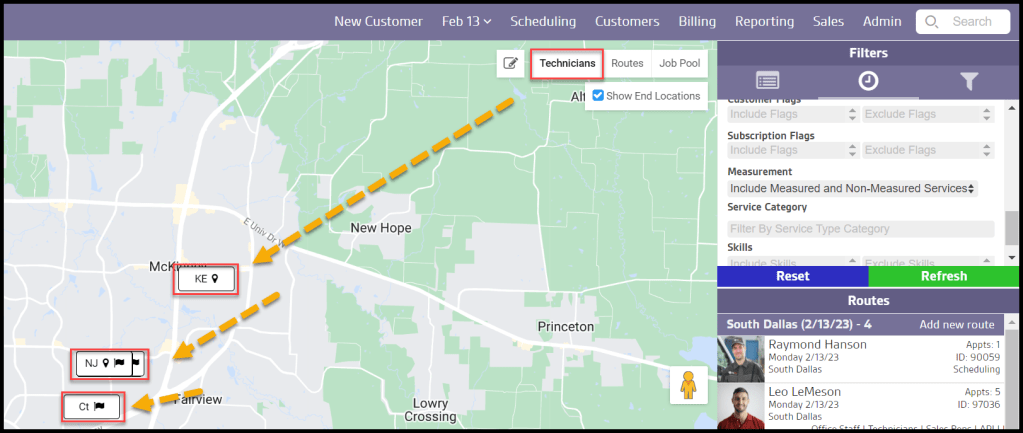
The Job Pool Map can show technician starting and ending locations, which is useful for managing high numbers of technicians and routes. Connect technicians closest to each route, so they can be assigned efficiently to reduce drive time.
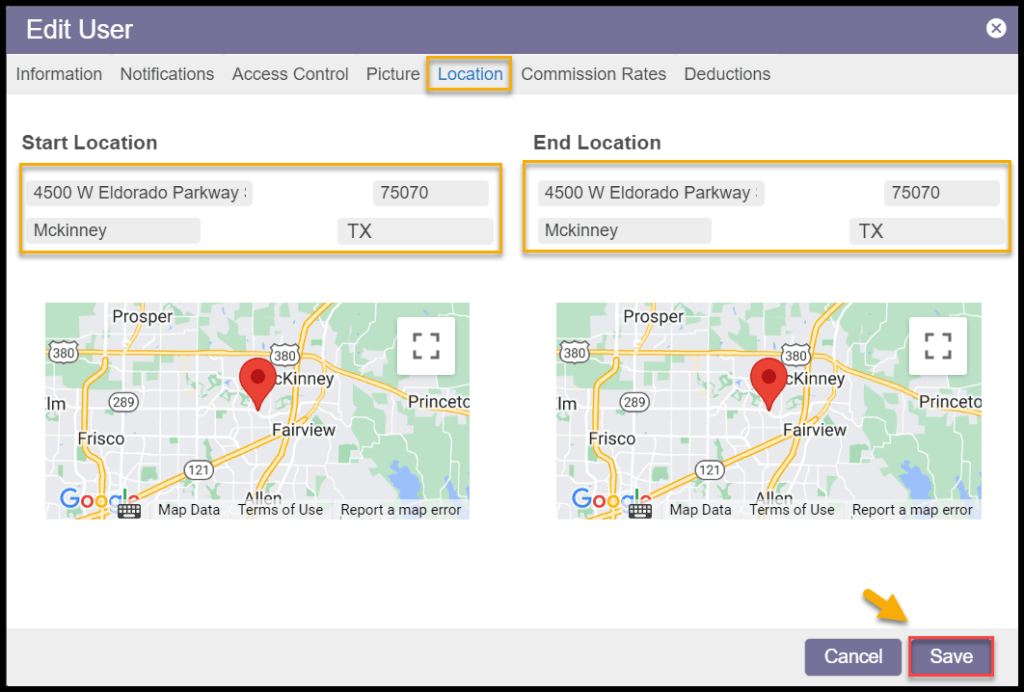
Changing Technician Locations
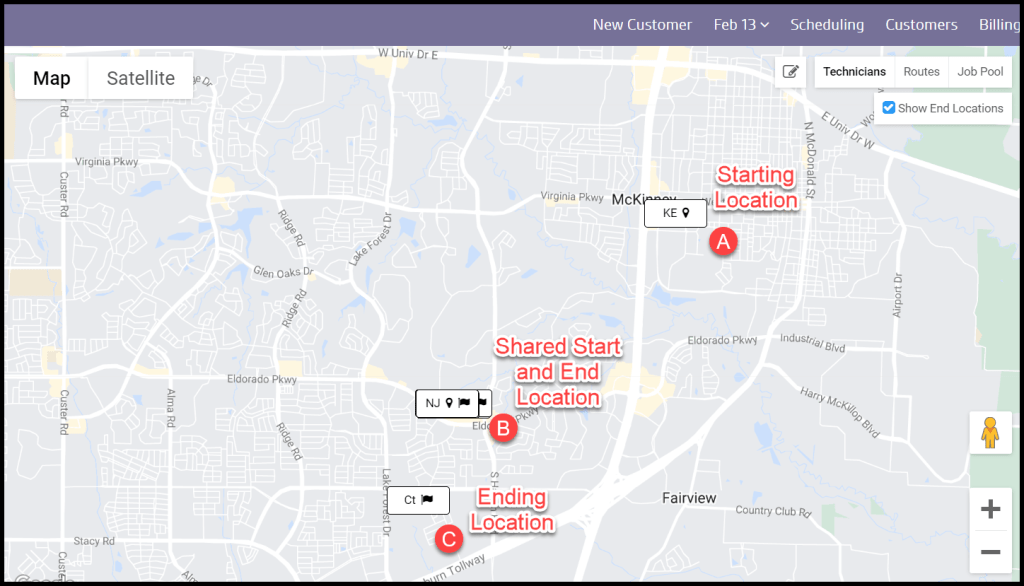
A pin signifies technicians’ starting locations, and a flag signifies the end locations. If the starting and ending locations share the same address, they will share the same visual marker. These locations can be changed by going to the:
Admin > User Card > Location.
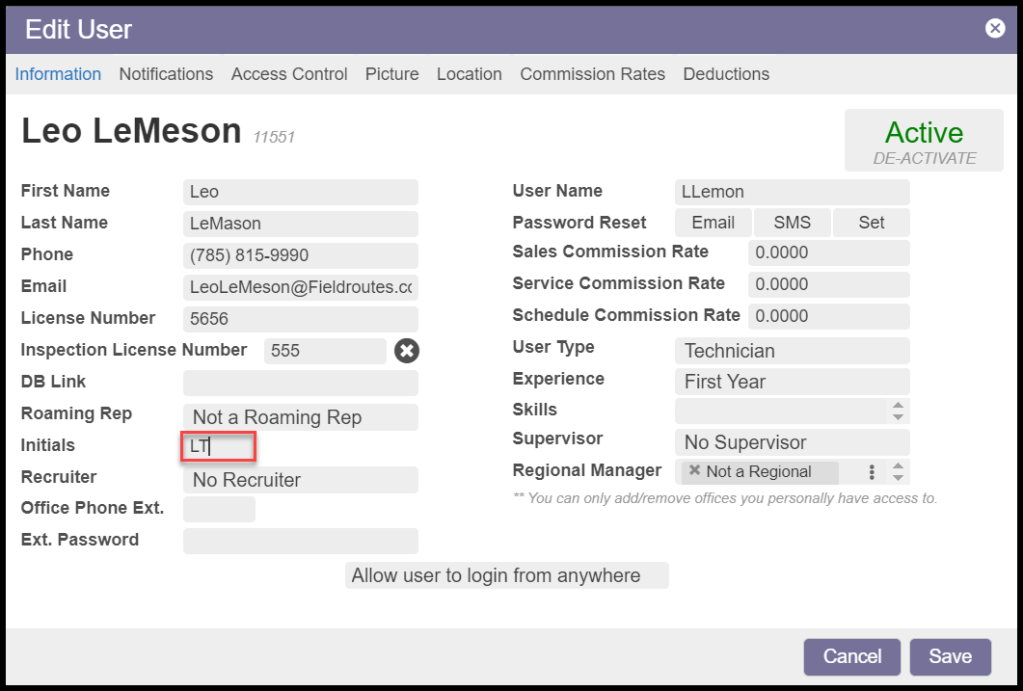
Changing or Updating Technician Initials
If the initials do not match the technician correctly, or the initials need to be changed, they can be changed by going to:
Admin > User Card > Information > Initials.
After saving, the initials should be changed on the map view.
Filters: Technicians (Continued)
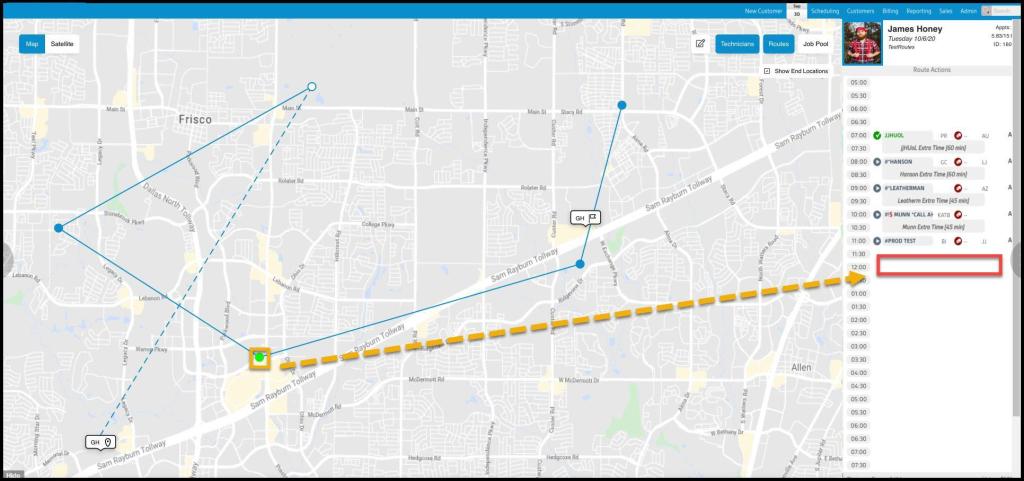
Additionally, suppose both the Technicians and Routes toggles are selected. In that case, they are also associated with any routes already assigned to them by a connecting dotted line to the first stop on the route with the starting location. If the end location toggle is selected, then a second dotted line will connect the ending location to the last stop on the route.
Selecting the technician marker will cause the technician to be outlined in the routes panel, but hovering will highlight them from the list of technicians. Select the line between the customers to bring up their route.

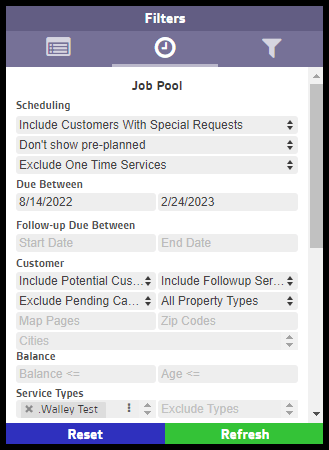
Filters: Job Pool
The Map View uses the same filters as the Job Pool and any saved filters used in the Job Pool can be accessed and used here.
- Scheduling
- Include, Exclude, or Only Customers With Special Requests: Shows all results regardless of any requests listed on the Special Scheduling field on the Customer Card Info tab.
- Show Pre-planned: Show customers that Intelligent Routing has already been placed on a pre-planned route, but has not yet been scheduled.
- Include, Exclude, or Only One Time Services: Show any non-repeating subscription stops.
- Due Between: Filter customers with a service due between a specific date range.
- Follow-Up Due Between: Filter Follow-up appointments between certain dates.
- Customer
- Include, exclude or Only Potential Customers: Show or hide active customers with no completed services.
- Include, exclude or Only Followup Services: Show or hide customers with follow-up services.
- Include or exclude Pending Cancels: Limit results to customers with pending cancellations.
- Residential, Commercial, or All Property Types: Limit results to specific property types.
- Map Pages: Limit results to specific Map Pages by using Map Page Codes.
- Balance: The Balance row will consider the balance on the customer’s account. If the user does not schedule customers that owe a previous balance, utilize the Balance section to filter those customers out. The user can exclude balances or account ages greater than the desired value.
- Service Type: Include or exclude a list of specific Service Types in the results.
The filters are continued below.
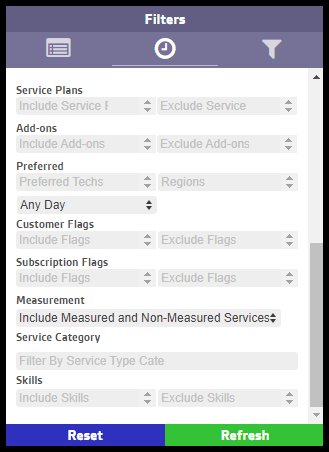
Filters: Job Pool (Part 2)
- Service Plans: Include or exclude a list of specific Service Plans in the result.
- Add-Ons: Include or exclude a list of specific Add-Ons in the result.
- Preferred: Filter results further by preference.
- Preferred Tech: Specify customers that prefer a particular technician.
- Preferred Day: Specify appointments that prefer a particular day of the week.
- Filter by Region: Limit to the neighborhood, county, etc.
- Customer Flags: Provide any Customer Flags to specifically include or exclude.
- Subscription Flags: Provide any Subscription Flags to specifically include or exclude.
- Measurement: Use for Dynamically Priced, measurement-based Service Types, allows the inclusion or exclusion of these based on square feet or linear feet measurements.
- Include Measured and Non-Measured Services: Default setting.
- Only Non-Measured Services: Excludes all measurement-based services.
- Only Measured Services: Exclude all non-measurement-based services.
- Only SF Measured Services: Limit to those measurement-based services in square feet.
- Only LF Measured Services: Limit to those measurement-based services in linear feet.
- Service Category: Include or exclude a list of specific Service Type Categories in the result.
- Skills: Include or Exclude results based on the skills required by the appointment.
Once the desired filters are set, select Refresh to generate the results, or Reset to start over.
Best Practice:
If this filter set is often used, consider going to the Job Pool Save Filters on the top right menu to save this filter set.
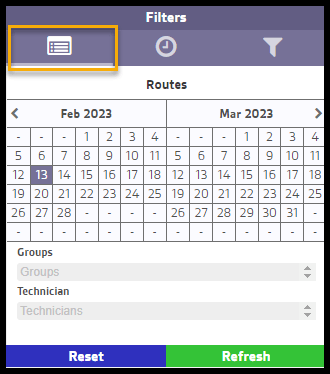
Filters: Routes (Calendar View)
The Routes view under the filter box will show a calendar and a few search fields.
- Calendar: Select the day(s) the calendar to limit results to between certain dates.
- Groups: Select the group(s) to include specific groups of technicians on the map.
- Technician: Select the technician(s) to include specific technicians on the map.
Select the Refresh option to search, or hit Reset to clear any information or selections.
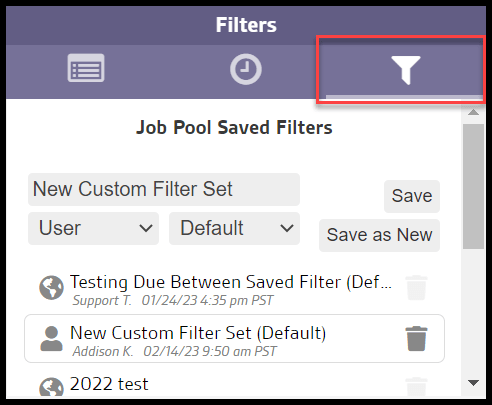
Saving Custom Job Pool Filters
To save customized job filters, click the Job Pool Save Filters icon.
- Job Pool Save Filters
- Name: Give the customized Job Pool filter a name.
- Group: Determine if the filter will be available at the user, office, or global level.
- Default: Determine if the filter will be default or not.
- Save as New: Save the customized Job Pool filter as a new preset.
- Save: This option will appear once customized Job Pool filter set has been saved. Click on the filter set to edit it.
To remove a filter set, select the trashcan.
Scheduling
There are three ways to schedule within the Map View Schedule: individually selecting appointments, the drawing tool feature, or the drag and drop feature.
Scheduling: Individually Selecting Appointments
Once an appointment is clicked, the dot will change color, and the appointment will show up on the right side of the screen. Once the user has selected the appointments they want for the route, they can select Actions > Assign to Route, where they can assign the appointments to a technician’s route. There is also an ability to Optimize and Assign Route.

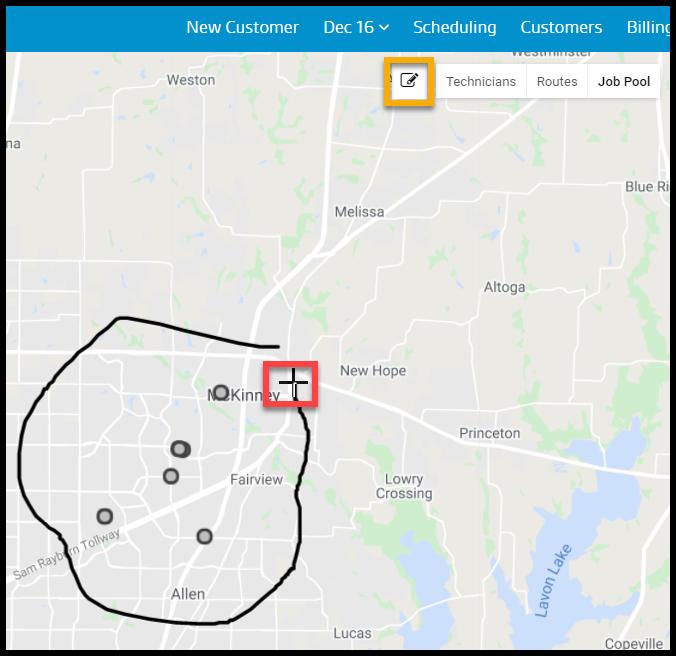
Scheduling: Drawing Tool
Select the Drawing Tool icon and toggle the Job Pool filter. Once the tool is selected, the user can draw around the appointments they want to schedule in the job pool. Once they draw the circle around the appointments, the appointments will turn yellow and show up on the right side of the screen, where the user can assign the route. If a mistake with a pen tool is made, the user can always select cancel.
To stop using the pen tool, select the pen tool again.
Scheduling: Drag and Drop Appointments
The final way to schedule appointments on a technician’s route is to drag the appointment from the map onto the route. First, select the technician’s route on which the user wants to schedule. Next, select an appointment dot, drag it, and drop it on the selected technician’s route. A notification will pop up if the technician’s skills match or do not match the appointment.