Customers Report
Summary
The Customers Report is a tool for building customized reports by applying various filters to generate a specific list of customers. Many Columns of data may be chosen to display for these customized lists to generate the specific data points about the particular customers desired.
Bulk actions can also be taken on these customized lists. Actions such as Freezing accounts, sending messages and forms, and even updating the Subscription price for customers may be performed from this report.
This guide explains the basics of using the Customers Report and the bulk actions available.
Important Points:
- By default, this report shows only 500 active customers. This number can be changed by updating the Show xxxx entries field at the bottom of the report display field.
- Use the Search Bar to find a specific customer, or the History button to find recently accessed customers.
- Please read all the instructions in the “Update Subscription Price” section before changing customer prices in bulk.
Accessing the Customers Report
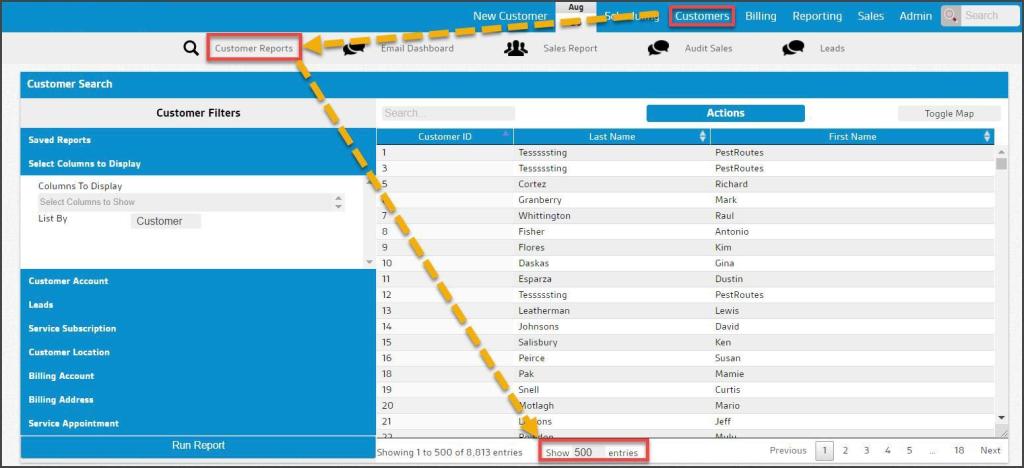
To access the Customers Report, select the Customers tab from the top navigation tabs.
The Customers Report will automatically display a list of 500 active customers. Many filters in this report are categorized by section to the left under Customer Filters. Select each section to view the available filters.
To change the number of customers displayed in the report, select the field under Showing 500 results. You can change the limit of the report in increments of 500 results, or select No Limit to remove the limit on the report. Please see below for details on Customer filters.
Filtering and Saving Custom Reports
This report allows you to save filters to make it super easy to pull reports you’ll use again in the future. Once you set the desired filters, select Saved Reports, type in the report’s name in the New Report field, and select Save as New.
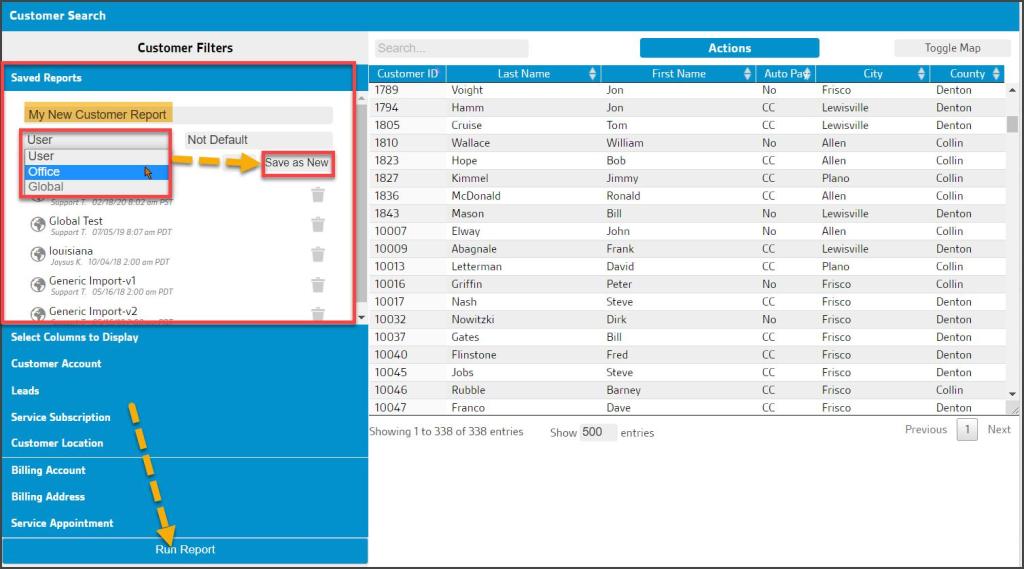
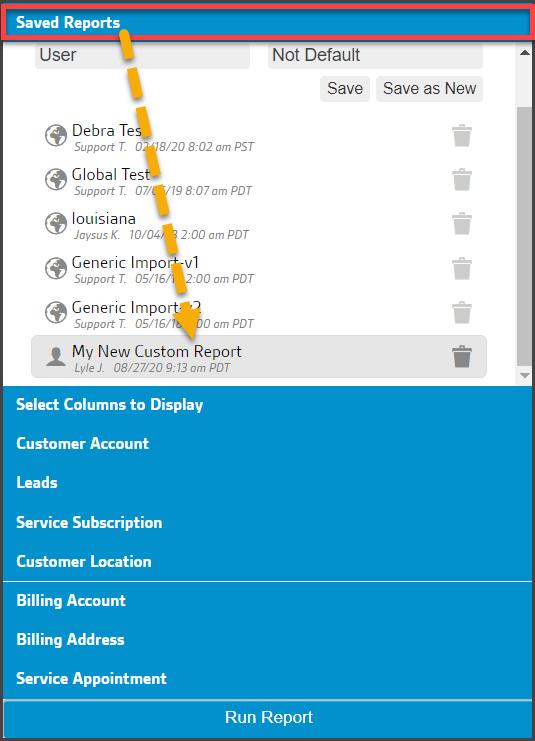
Access the customized Saved Reports by looking toward the bottom of the Saved Reports tab.
Customer Filters: Select Columns to Display
You can add more columns to display additional customer information in the report.
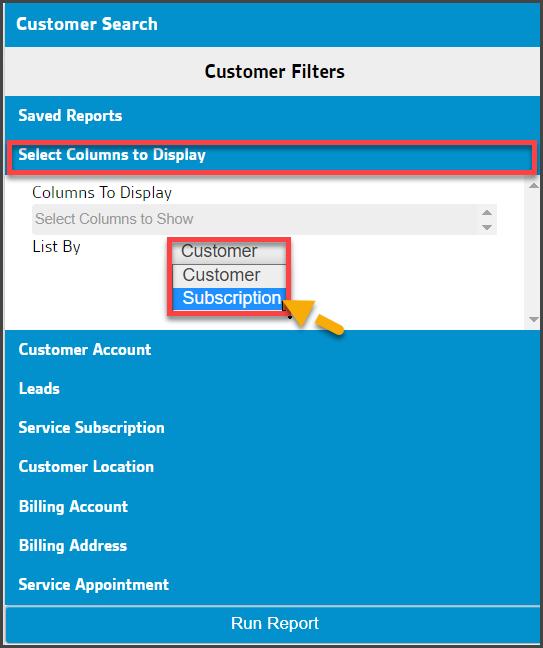
Choose the Select Columns to Show tab, and two settings will appear:
- Columns to Display: Select the desired columns and then select the Run Report button to update the view with the added columns.
- List By: This changes the orientation of the report list based on Customers or Subscriptions. This is important if a Subscription-based report is desired, displaying each Subscription for each Customer who may have several Subscriptions on their account.

Customer Filters: Customer Account
The Customer Account section allows the report information to be filtered based on information in the Customers’ accounts. By default, it is set to show only active Customers.

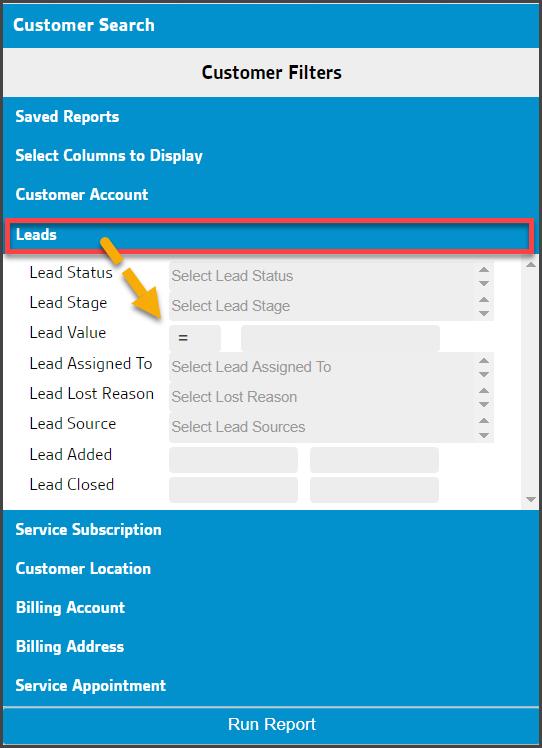
Customer Filters: Leads
The Leads section will allow you to filter the report by lead status or lead lost reason.
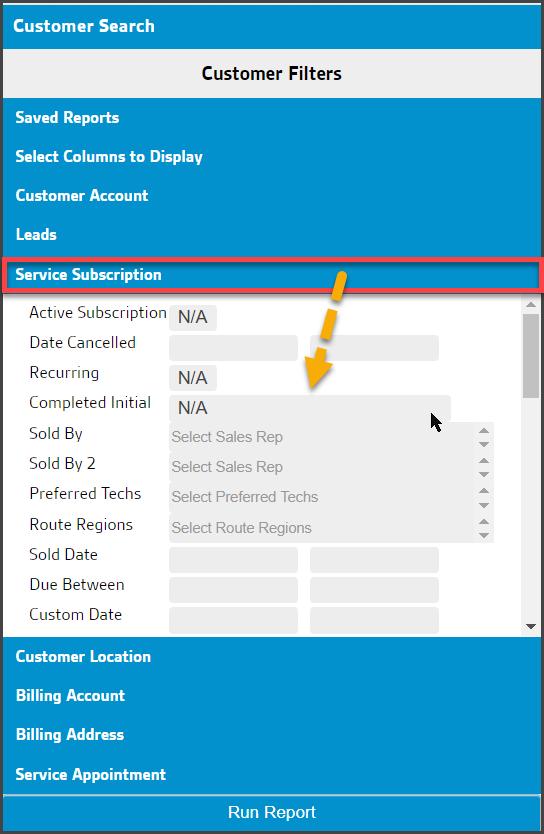
Customer Filters: Service Subscription
The Service Subscription section allows you to filter the report by information regarding the customer’s service subscription.
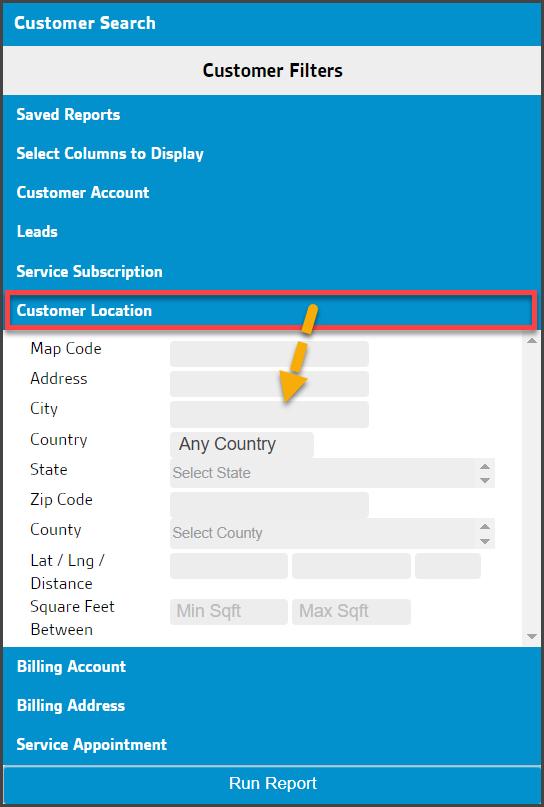
Customer Filters: Customer Location
The Customer Location section allows you to filter the report by information regarding various aspects of customer locations such as City, County, ZIP, etc.
Customer Filters: Customer Location
The Customer Location section allows you to filter the report by information regarding various aspects of customer locations such as City, County, ZIP, etc.
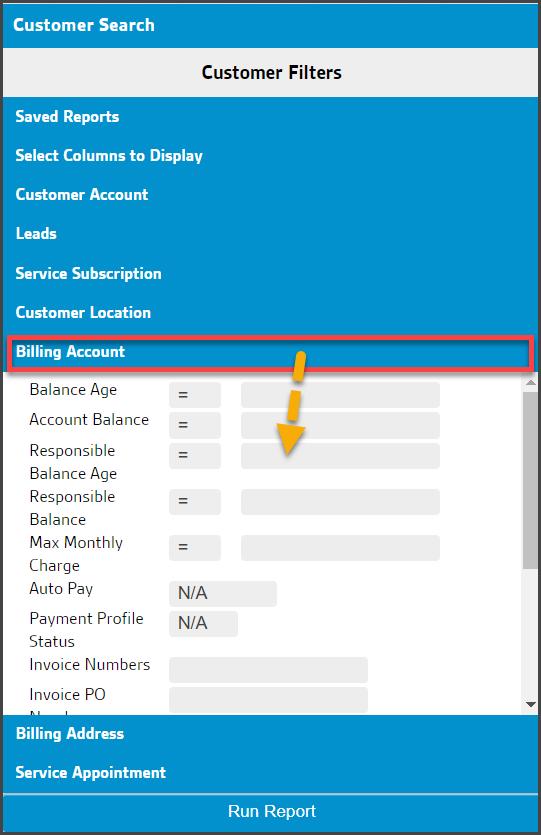
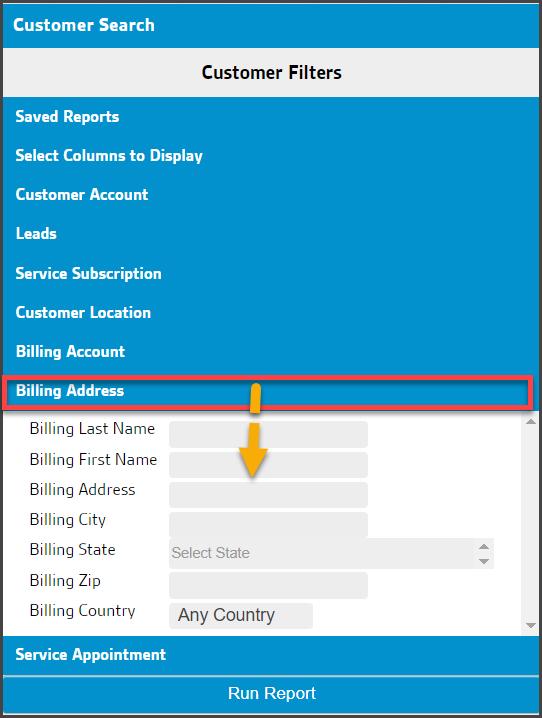
Customer Filters: Billing Address
Like the Customer Location, the Billing Address field allows you to filter the report by information regarding the customer’s billing address details. These often differ when dealing with Linked Accounts where, for example, a rental home property owner is responsible for managing properties in another city.
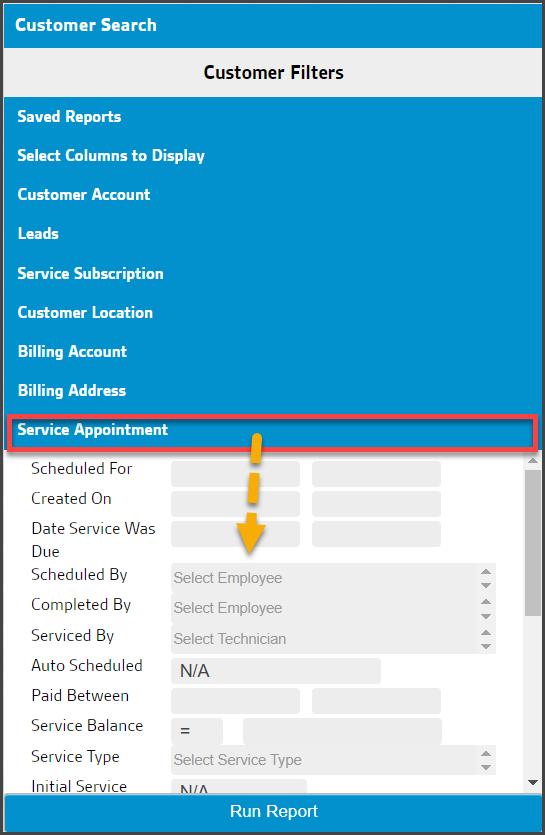
Customer Filters: Service Appointment
The Service Appointment tab allows filtering of the report by information related to the customer’s service appointment.
Customers Report Actions
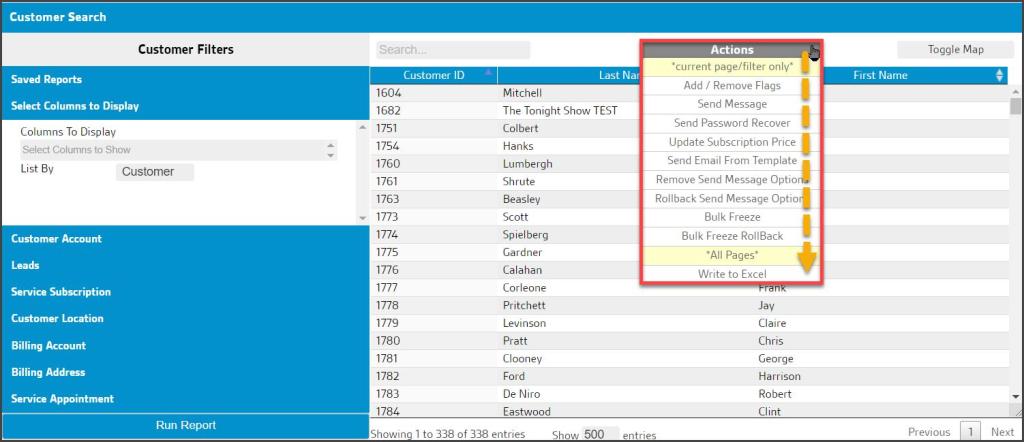
The Customers Report allows bulk actions for all Customers returned on a filtered data set.
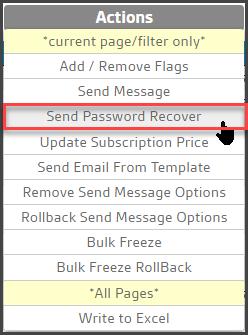
Once all desired filters have generated the report results, select the Actions drop-down menu at the top of the report to see a list of available actions.
The following bulk actions can be performed:
- Add / Remove Flags
- Send Message
- Send Password Recover
- Update Subscription Price
- Send Email from Template
- Remove Send Message Options
- Rollback Send Message Options
- Bulk Freeze
- Bulk Freeze Rollback
- Export to Excel
Additionally, if the user chooses Subscription under Select Columns to Display > Subscription, two more options will appear after running the report.
- Bulk Update Preferred Techs
- Bulk Update Preferred Techs Rollback
Below is a more detailed explanation of each option.
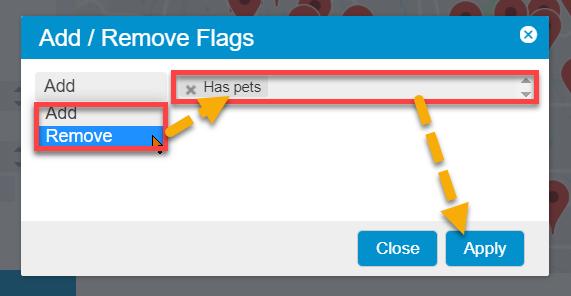
Customers Report Actions: Add/ Remove Flags
This action opens a dialog that allows the user to specify any flags they would like to add or remove from the customer accounts listed. The available options are the flags defined in Admin > Preferences > Generic Flags with the Status set to Active.
Customers Report Actions: Send Message
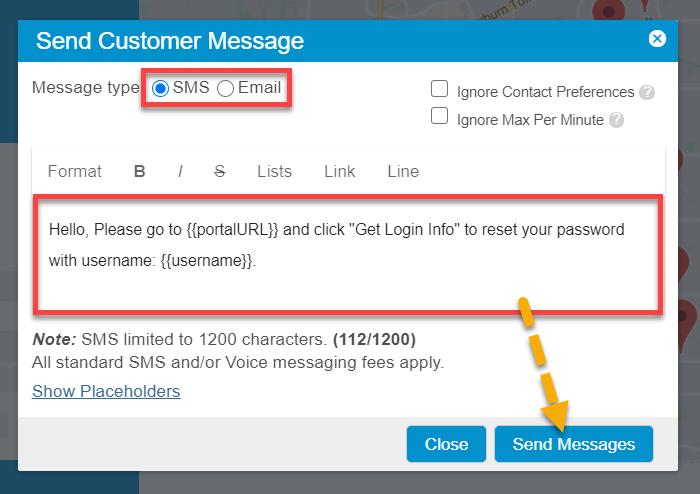
This action will allow you to send a bulk message to all the customers in the report.
Select the message type at the top of the window. You can choose between SMS, voice, and email.
There are dynamic placeholders available for your messages to customize each message with the customer’s information. SMS messages are limited to 140 characters, including placeholders.
Any column you add in the Select Columns to Display section will have a placeholder under the Available Placeholders section.
Customers Report Actions: Send Password Recover
This selection will initiate a password recovery process for the Customers in the report. They will receive a message instructing them on what steps to take to recover access to the Customer Portal.
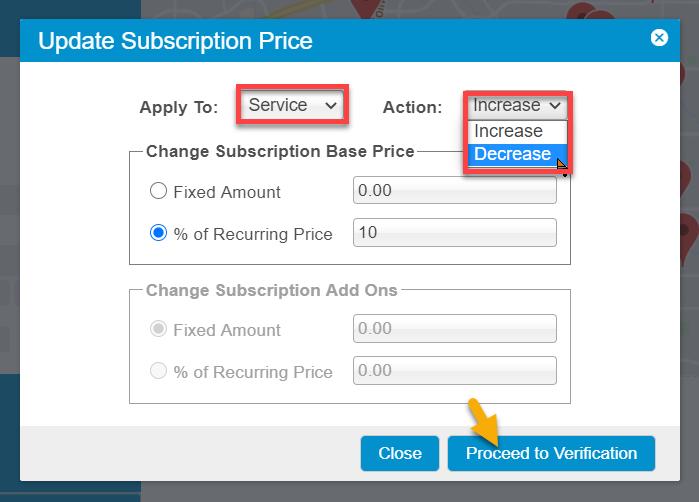
Customers Report Actions: Update Subscription Price
This action will allow you to update the price for recurring Subscriptions and Add-ons. You can update the prices with a fixed amount or a percentage of the recurring price.
There are a few important things to know before updating the Add-on and Subscription prices with this report:
- Ensure the Customers Report is listed by Subscription. You can check this under the Select Columns to Display section and change Customer to Subscription in the list by field.
- Make sure the report is run for Active Subscriptions by selecting the Service Subscription section and changing the active subscription field from N/A to Yes.
- When updating the price for Add-ons, it will update the price for all the Add-ons listed under the recurring subscription ticket in the subscription. It does not allow you to update the price for specific Add-ons. If you would like to update the price for a specific add on, we recommend updating the price under Admin > Preferences > Add-ons.
- If you update the subscription or add on price here, it does not update the price in the add on or subscription preferences. If you would like to charge customers this new price going forward, go to Admin > Preferences > Add-ons or Service Types and update the price there. Note that this will not retroactively update pricing for existing add-ons.
Once you have applied your desired filters and generated the report, select Actions > Update Subscription Price.
Confirming Update for Subscription Price
Once you select Proceed to Verification, some new columns will display in the report, allowing you to see the changes in the prices.
None of the prices have been updated at this point. This step will allow you to verify the changes being made.
There are several important columns to look at before confirming the Subscription Price changes.
- Customer ID: The customer’s ID.
- Last Name: The customer’s last name.
- First Name: The customer’s first name.
- City: The customer’s city of residence
- Subscription: The Subscription that is being updated for the customer.
- Subscription ID: This is the subscription ID.
- Status: This is the subscription status. As long as you filtered the report by active subscriptions, they should all say Active. Ensure you’re only updating the price for active subscriptions.
- Service Charge: This is the current service charge for the subscription prior to updating the price.
- Updated Service Charge: This will be the new price of the subscription based on the information input in the previous dialogue box.
Select Confirm Change to save the updated pricing.

Customers Report Actions: Send Email from Template
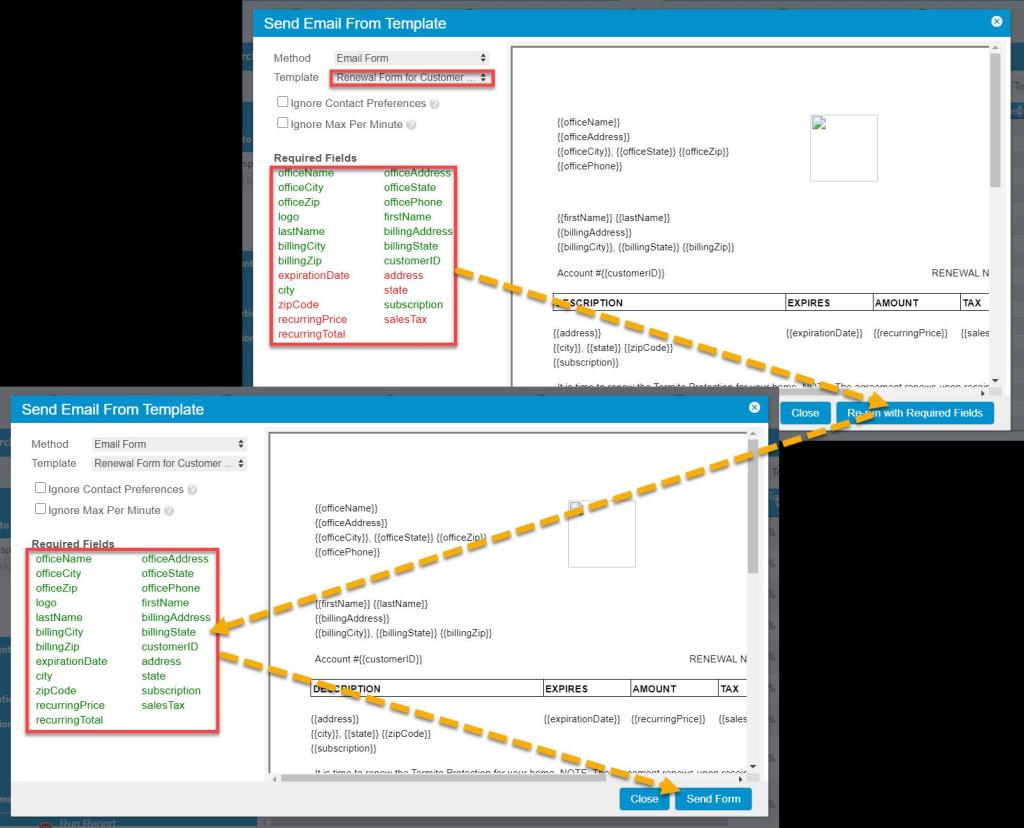
The Customer list can receive a common email form from a pre-built template, such as a Subscription Renewal reminder. These are customizable using all the usual placeholders.
A Required Fields list will appear on the template builder. These are the fields required for the chosen template. If any are displayed in red, this means the data is missing. In this case, select the Refresh with Required Fields button. The red fields should turn green as the template data is pulled in from the customer cards, and the button will notify the user that all the data is present when it changes to Send Form. Select the button to launch the group email.
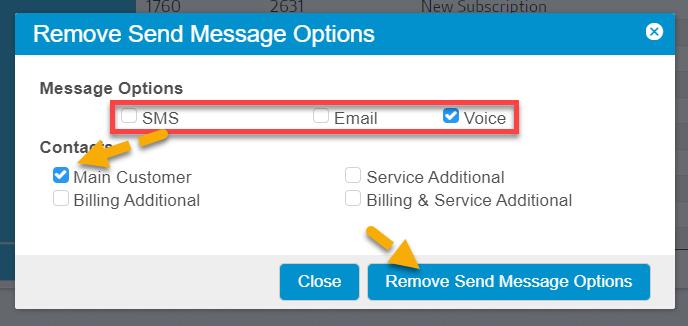
Customers Report Actions: Remove Send Message Option
This option allows all Customers on the report to have their messaging preferences changed. For example, all could have Voice messaging removed from their list of preferred communications. Removing SMS and/or email are the other options.
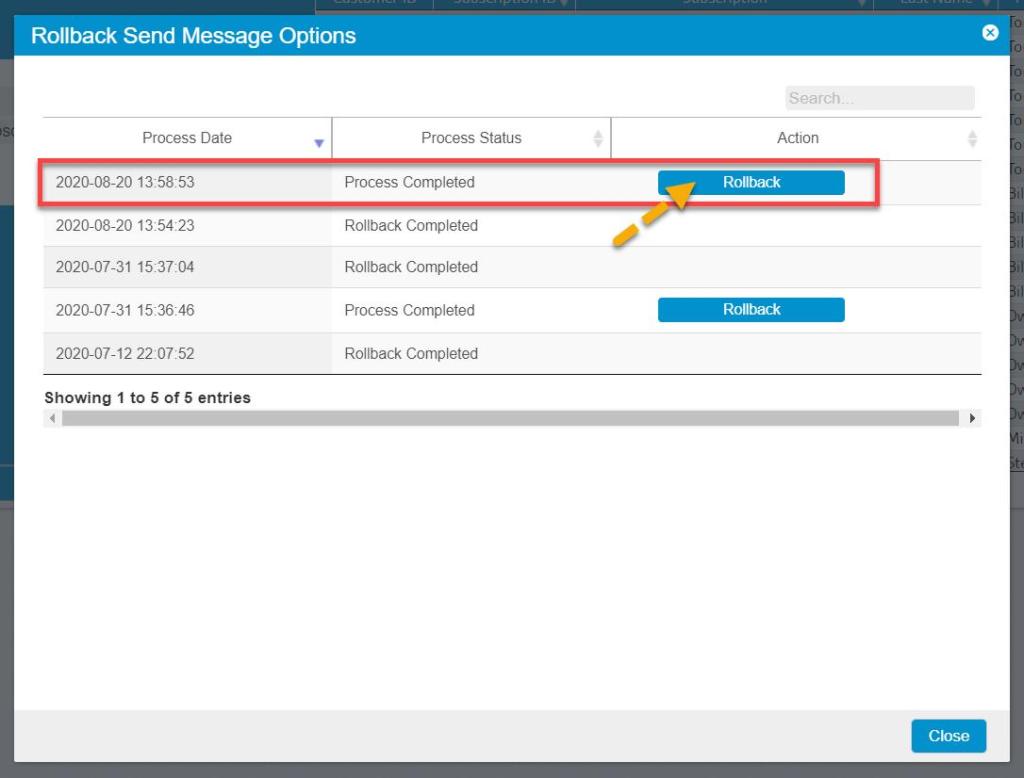
Customers Report Actions: Rollback Send Message Option
This Action will reverse a Remove Send Message action, restoring the message preferences removed during the first Action.
Customers Report Actions: Bulk Freeze
This Action sets the Status on all Customers listed in the report to Frozen. A dialog will open, allowing the user to specify a Cancellation reason along with any desired notes.
This will Freeze the customer’s account, including all the customer Subscriptions.

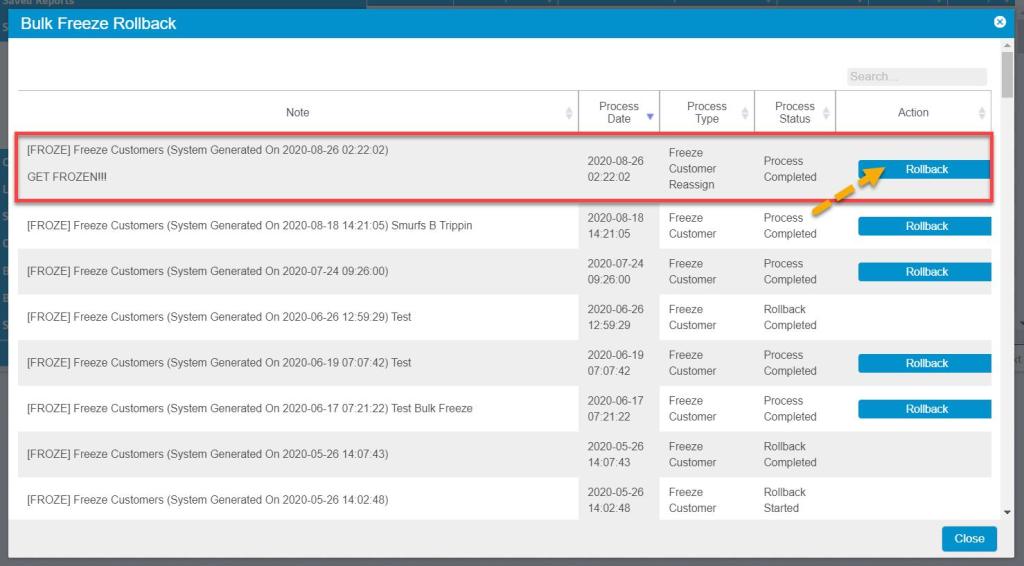
Customers Report Actions: Bulk Freeze Rollback
This Action reverses any previous Bulk Freeze that was done. Find the desired Bulk Freeze listed by Process Date and select the Rollback button. The Customer Accounts will be restored to Active.
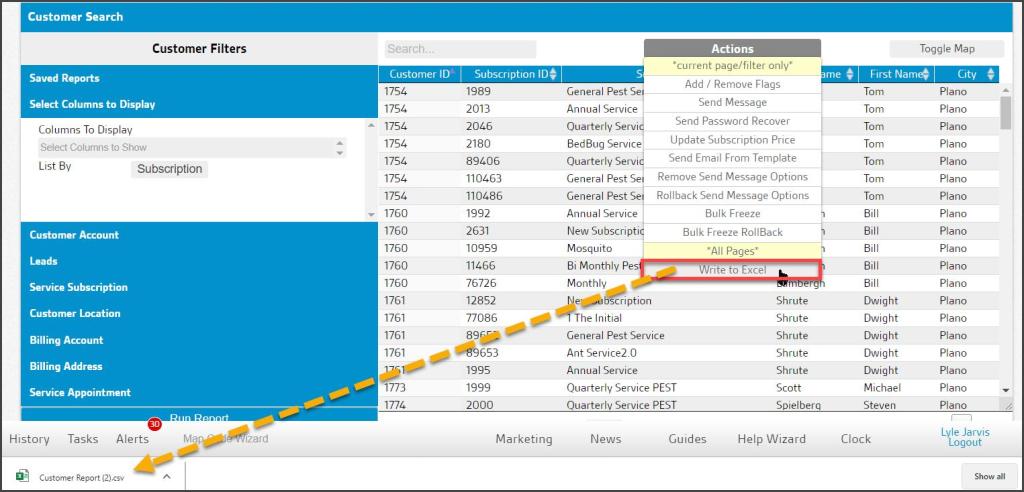
Customers Report Actions: Write to Excel
The Write to Excel Action option allows the Customers Report data to be downloaded into a CSV file that may be opened and analyzed in an Excel spreadsheet.
Customers Report Map View
In addition to the Actions menu, a Toggle Map view option is available. This will use the Customer Location information to present a top-down map view of all the customers’ locations on the report, rather than the list view. Select the button again to toggle back to the list view.

Customers Report Actions: Bulk Update Preferred Tech
This action becomes available if the user has the access control Update Preferred Technician (Reports > Update Preferred Technician) enabled and has selected Select the Columns to Display is set to List by > Subscription, the user can select Bulk Update Preferred Tech after the report is run.
The user can replace the current customers’ preferred technician with a new one ,or choose no preferred technician. The software will list the number of subscriptions that will be updated with the new preferred technician. If there is a mistake, the preferred technician can be changed back by using the Bulk Update Preferred Tech Rollback action as long as the subscription is not changed and the previous tech is still active.
These changes will be recorded in the change log report.
Customers Report Actions: Bulk Update Preferred Tech Rollback
This action becomes available if the user has the access control Update Preferred Technician (Reports > Update Preferred Technician) enabled and has selected Select Columns to Display is set to List by > Subscription, the user can select Bulk Update Preferred Tech Rollback after the report is run.
The Bulk Update Preferred Tech Rollback action will show all recorded Bulk Update Preferred Tech actions. If the former preferred tech is available, the rollback option will appear. A rollback option will not be available if the former preferred technician is not active or if the subscription’s preferred technician has been changed since the bulk update.
These changes will be recorded in the change log report.
Pro Tip: Avoid Mixing Customer-based and Subscription-based Filters
The number of filter combinations on the Customers Report makes it a very powerful tool. Because the results may be oriented around either Customers or Subscriptions, some combinations, while allowed, do not provide the best view of this information.
This is most often caused by using filters intended for a Customer-based list when the filters are set to the Subscription view or vice versa.
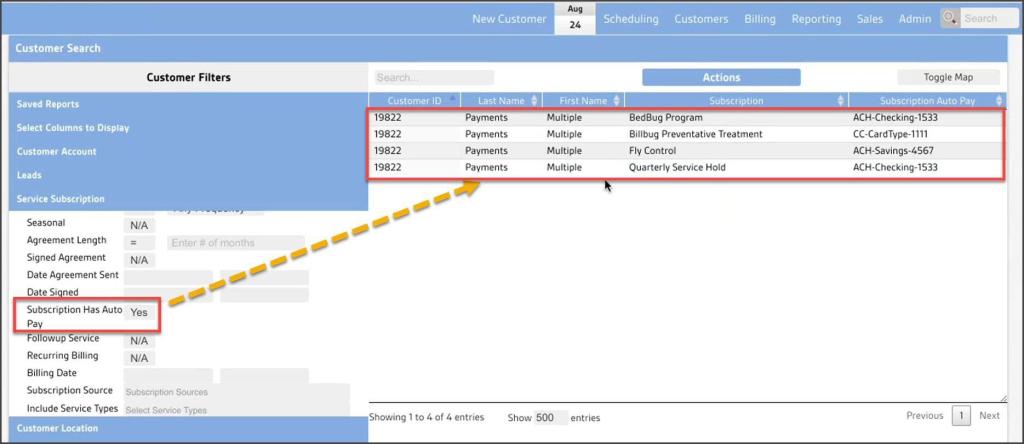
Here we have a Subscription list looking at all Subscriptions for a certain customer, Customer ID 19822. Four Subscriptions set to AutoPay are present for this customer’s account.
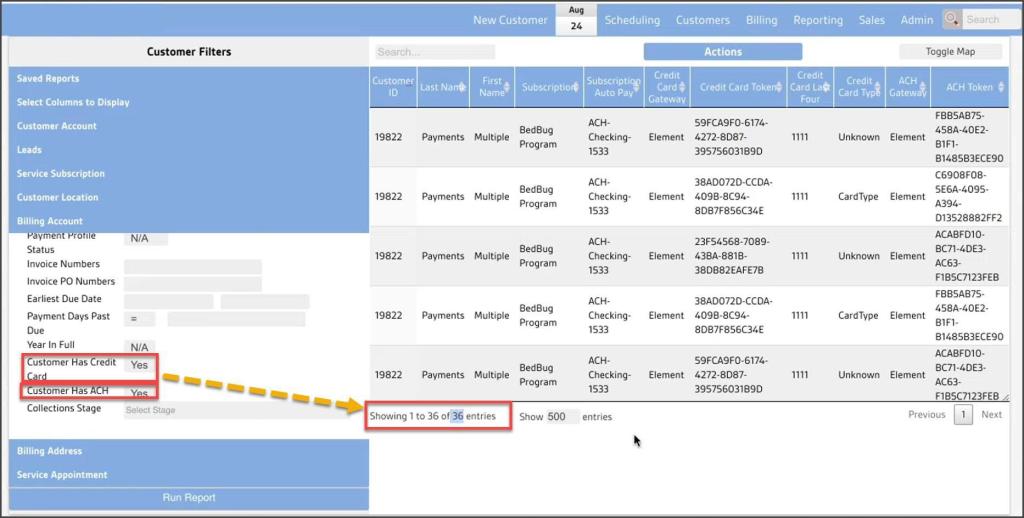
Now two additional Customer-based filters have been turned on: Customer has Credit Card and Customer has ACH. The combination of the Subscription-based list with the Customer-based filters returns 36 lines to cover every possible combination of each of the four subscriptions with the multiple payment methods attached to the customer’s account. While not incorrect, other filter combinations will return the desired data in a more readable fashion.
NOTE:
The best report results are achieved by reserving Subscription-based filters for use with Subscription lists, and Customer-based filters with Customer lists.
New Columns to Display from AutoPay by Subscription
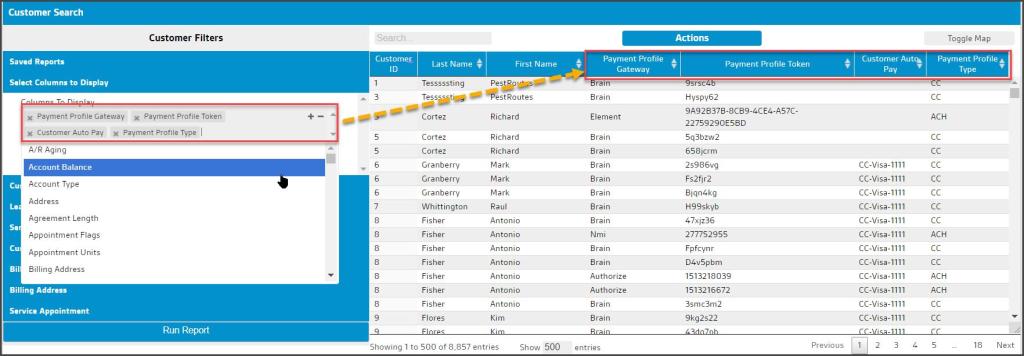
With the advent of multiple payment methods with the AutoPay by Subscription feature, the Customers Report required several column updates that may affect any saved reports that use AutoPay information. Since many payment sources – both credit/debit cards and bank accounts – are now allowed, and each Subscription may be assigned to a different source for AutoPay, the following column changes should be reviewed for any undesired effects on saved Customers Reports:
- Payment Profile Gateway: combines former Credit Card Gateway and ACH Gateway
- Payment Profile Token: combines former Credit Card Token and ACH Token
- Payment Profile Type: Added to designate whether the Subscription AutoPay is CC or ACH type
- Subscription AutoPay: updated name for former AutoPay, to be used when filtering the report by Subscription.
- Customer AutoPay: updated name for former AutoPay, to be used when filtering the report by Customer.