
Collections
Summary
The Collections Report provides a tool designed to track collections customers and perform bulk actions on their accounts, such as applying fees, writing off balances, freezing their accounts, sending messages, and applying flags to the accounts. The platform integrates directly with the widely used A.R.M. Solutions for automatically processing collections, or CSV records may be captured via the Collections Report. See the user guide Billing > A.R.M. Integration for information on setting up an A.R.M.-based collections process.
This report is beneficial for managing customers that owe a balance. By default, the Collections Report will display all customers that owe a balance on their account (like the Accounts Receivable report).
However, there are several vital differences between the Collections Report and the Accounts Receivable Report:
- The user can perform bulk actions in the Collections report.
- Balances as of a specific date can be seen in the Collections report. This filter is great to see all the customers who owed a balance on a specific date in the past.
The Accounts Receivable Report is designed to send customers with an outstanding balance an account statement. The Collections Report was designed to manage customers that have an outstanding balance, such as adding late fees or updating the collections stage in bulk.
Important Points:
- Our platform directly integrates with A.R.M. Solutions for automatically processing collections or records that may be downloaded to CSV from the Collections Report.
- Remember, when selecting the As Of date filter, there is a chance that the customer could have paid for their balance since that date.
- Specify a customer’s current collections stage in the Customer Card > Billing > Billing Info > Collections Stage.
- A list of outstanding invoices a customer has can be viewed by clicking on almost any of the columns for the customer in the report (besides the Customer ID column). Select the Customer ID column to open the Customer Card in the report.
Accessing the Collections Report
To access the Collections Report, go to:
Billing > Collections

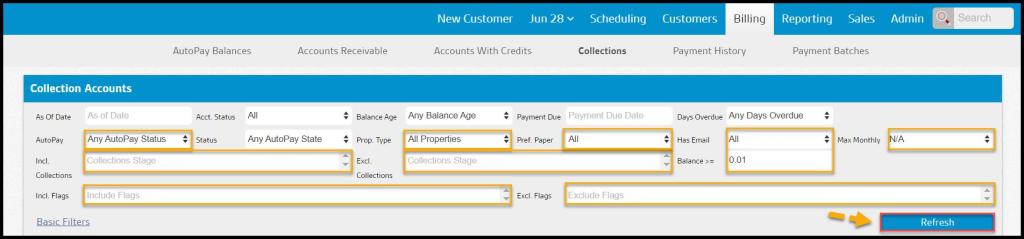
Filtering the Collections Report (Basic Filters)
To filter the Collections Report quickly, toggle these basic filters.
- As Of Date: The amount due is based on this date.
- Account Status: Limits the report based on each customer’s account status specified under Customer Card > Admin. By default, this report will pull both active and frozen customers.
- Balance Age: Limits the report to customers with a balance age that falls within the parameters of the selected option. The Custom Age Range option allows users to specify custom minimum and maximum age restrictions.
- Payment Due: Limits the report by the date that payment is due on outstanding invoices.
- Days Overdue: Limits the report on an invoice’s number of days overdue.

Filtering the Collections Report (Advanced Filters)
To filter the Collections Report, toggle these advanced filters.
- AutoPay: Limits the report based on the Auto Pay account specified under Customer Card > Billing > Billing Info for each customer.
- Status: Limits the report based on the status of the most recent payment attempt using the customer’s Auto Pay account. The auto pay account is specified in Customer Card > Billing > Billing Account.
- Property Type: Limits the report based on the property type specified in the Customer Card > Info.
- Pref. Paper: Filter by customers who prefer paper, do not prefer paper, or both. To flag a customer who prefers paper, open the customer card, go to the flags tab, and select yes for “prefers paper”.
- Has Email: Limits the report based on whether or not the customer has an email stored.
- Max Monthly: Limits the report based on whether or not customers have a Max Monthly Charge specified in Customer Card > Billing > Billing Info.
- Incl. Collections: Limits the report based on the customer’s collections stage specified in Customer Card > Billing > Billing Info.
- Excl. Collections: Limits the report by excluding collection stages.
- Balance: Limits the report to customers with an account balance greater than or equal to the specified value.
- Include Flags: Limits the report to customers with selected flags in Customer Card > Flags > Generic Flags.
- Exclude Flags: Limits the report to customers who do not have the selected flags in Customer Card > Flags > Generic Flags.
Select Refresh to run the report.
Viewing the Collections Report’s Data Columns (Part 1)
The Collections Report can display several data columns.
- Customer ID: Show the unique identification number for the customer. Clicking on this will open the Customer Card.
- Name: The billing first and last name specified under Customer Card > Billing > Billing Info.
- Balance: The total account balance as of the date specified in the As Of Date filter.
- Age: The age of the balance as of the date specified in the As Of Date filter. This number is calculated by finding the number of days between the As Of Date and the date of the oldest ticket with a balance for the customer.
- Address: The billing address specified under the Customer Card > Billing > Billing Info.
- City: The billing city specified under the Customer Card > Billing > Billing Info.
- State: The billing state specified under the Customer Card > Billing > Billing Info.
- Zip: The billing zip specified under the Customer Card > Billing > Billing Info.
- Email: The billing email specified under the Customer Card > Billing > Billing Info.
- Phone: The billing phone specified under the Customer Card > Billing > Billing Info.

Viewing the Collections Report’s Data Columns (Part 2)
The Collections Report can display several data columns.
- Status: The customer account status specified under Customer Card > Admin.
- Stage: The collections stage specified under Customer Card > Billing > Billing Info.
- AutoPay: The AutoPay status for the customer specified under Customer Card > Billing > Billing Info.
- Payment Status: The status of the last attempted payment for the stored Auto Pay account. If the Customer Card > Billing > Billing Info > AutoPay is set to CC this will be the status of the last attempted payment for the stored credit card. If the Customer Card > Billing > Billing Info > AutoPay is set to ACH this will be the status of the last attempted payment for the stored ACH account.
- Last Payment Date: The date of the last payment applied to one of the customer invoices with an outstanding balance.
- Remove: Clicking this button will remove the customer from the Collections report.

Viewing the Invoices for Customers
A list of outstanding invoices a customer has can be viewed by clicking on almost any of the columns for the customer in the report (besides the customer ID column).
The columns for the invoices are detailed below.
- Customer ID: The unique identification number for the customer serviced for the invoice.
- Name: Shows the name of the customer serviced for the invoice.
- Due Date: Shows the date the invoice was due.
- Days Overdue: Displays the number of days the invoice has been outstanding past the invoice due date.
- Contributed To Balance: Shows the amount of this invoice contributing to the Balance.
To open the customer card, select the Customer ID column.

Viewing the Collections Actions
The following bulk actions can be performed on all customers listed in the Collections report by clicking on Actions -> [desired action].
- Add/ Remove Flags
- Send Message
- Export to Excel
- Add Fees
- Update Stage
- Write Off Balances
- Send to ARM
- Export Placement File
- Bulk Freeze
- Bulk Freeze RollBack
Please see the Collections: Actions guide for an in-depth explanation of each action.

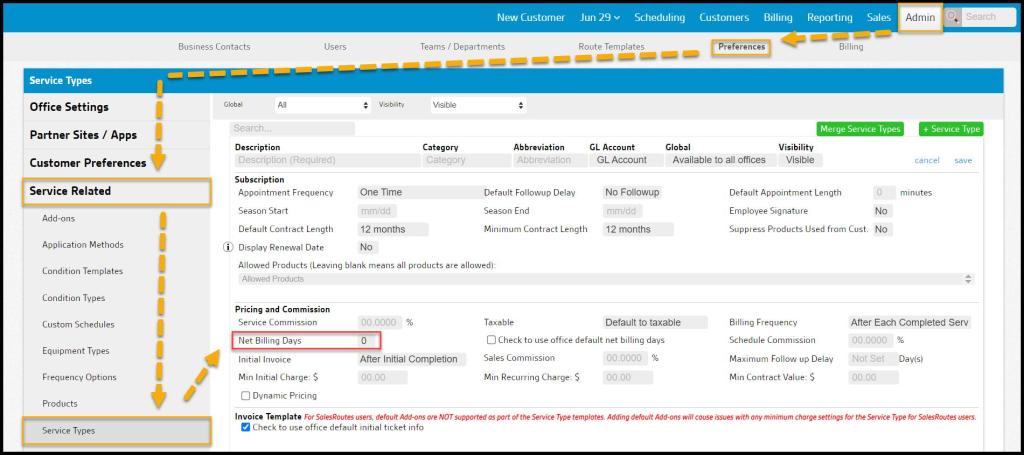
How is the invoice due date configured?
The invoice due date is configured by the Net Billing Days selected for the service type.
The New Billing Days will allow the user to determine how many days an invoice can go unpaid before it’s considered past due.
Go to Admin > Preferences > Service Related > Service Types, and there is a field to determine the Net Billing Days for the service type.
If a customer is on recurring billing, the Net Billing Days can also be set in the subscription tab of the customer card.
What filters should I apply for accurate aging information?
Select the Balance Age and Days Overdue filters to generate a report with accurate aging information.

What do I need to do to send this information to my third-party collections company?
Since we do not offer a collections company, a third-party collections company will have to be used to send these customers to collections.
The user will want to apply the appropriate filters to pull the report for all the customers that need to be sent to collections. Once the desired filters are selected, and the report is refreshed, go under Actions and select Export to Excel. This action will export the report to an Excel file, and the user can send the file to the collections company.
Don’t forget to set the collections stage to Sent for these customers after the report is exported.

