Billing Tab in the Customer Card (Common Bill Tos)
Summary
Billing your customers is completely integrated into our software.
The Billing tab in the Customer Card allows you to charge credit cards, run ACH payments, and set payment preferences like AutoPay, Preferred Billing Dates, and Max Monthly Charges.
You can now bill customers on the Customer level, on the Subscription level, and the Invoice level. This feature means you can charge any customer for another customer’s bill.
Important Points:
- The software will send invoices, account statements, receipts, and payment failure emails to the email address in the Billing tab.
- Our software does not store the actual payment information. The credit card information is stored with your merchant processor.
Accessing the Customer Card > Billing Tab
To access the Customer Billing tab, go to:
Customers > Customer Card > Billing tab
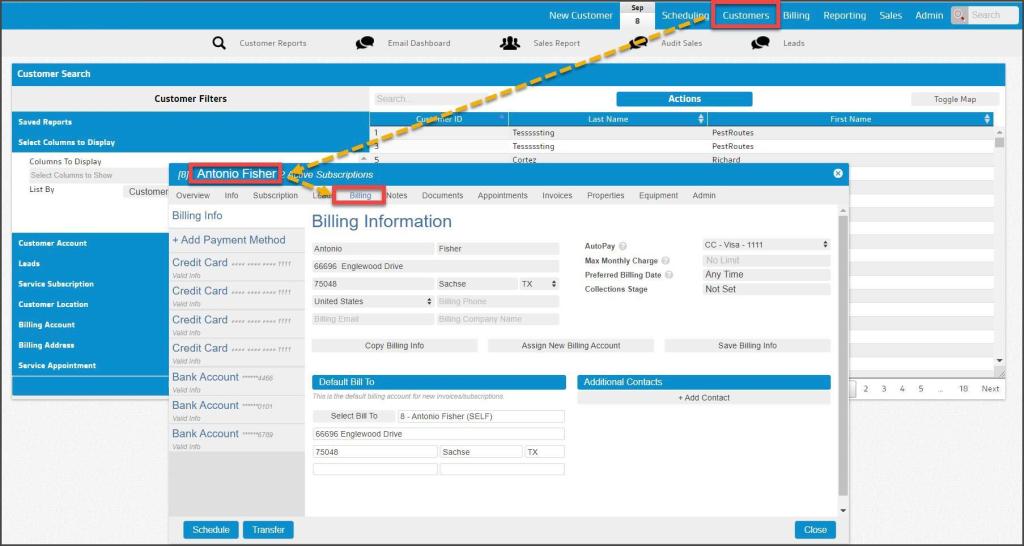
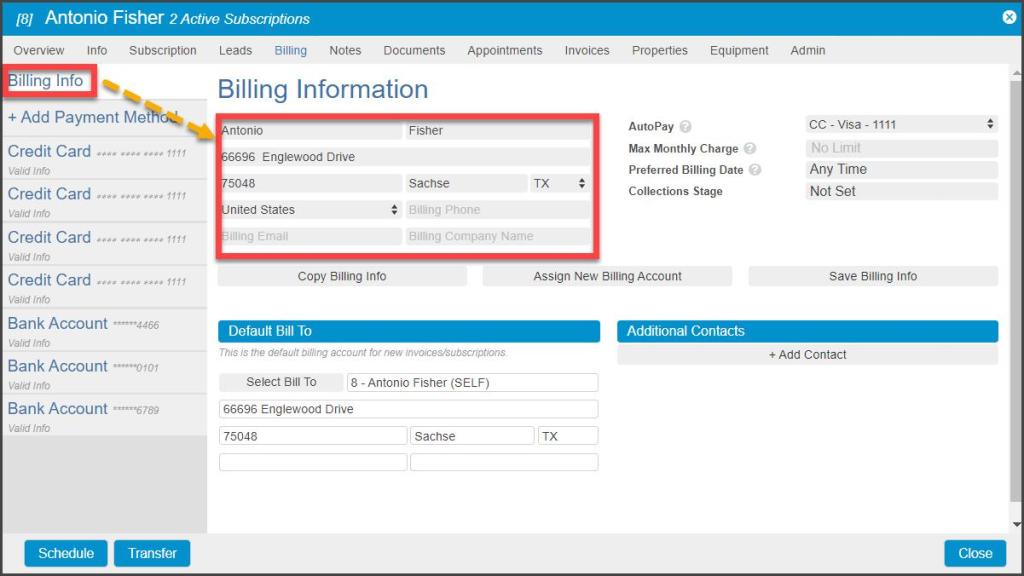
Billing Information
The customer’s Billing Address is auto-populated from the Info tab of the Customer Card. If the Billing Address differs from the Service Address, the information should be updated and saved here.
The Billing Email is the address to which all invoices, account statements, receipts, and payment failure emails will be sent. If the Billing Email is different from the Service Email, the information should be updated and saved here.
Adding a Credit Card
The user may add multiple methods of payment (MOP) to a customer’s account. One credit card or ACH bank account will be designated as the overall Default payment source and will be used if no other MOP is specified for a Subscription or Invoice.
To add a new credit card to a customer’s account, select the +Add Payment Method tab and choose Credit Card to select the MOP type to be added.

Verify that the Billing Information matches the new credit card information, as necessary.
Enter the credit card number and the expiration date, then select Save Payment Method.
NOTE:
A CVV security code may also be required, depending on the 3rd-party payment processor’s requirements.

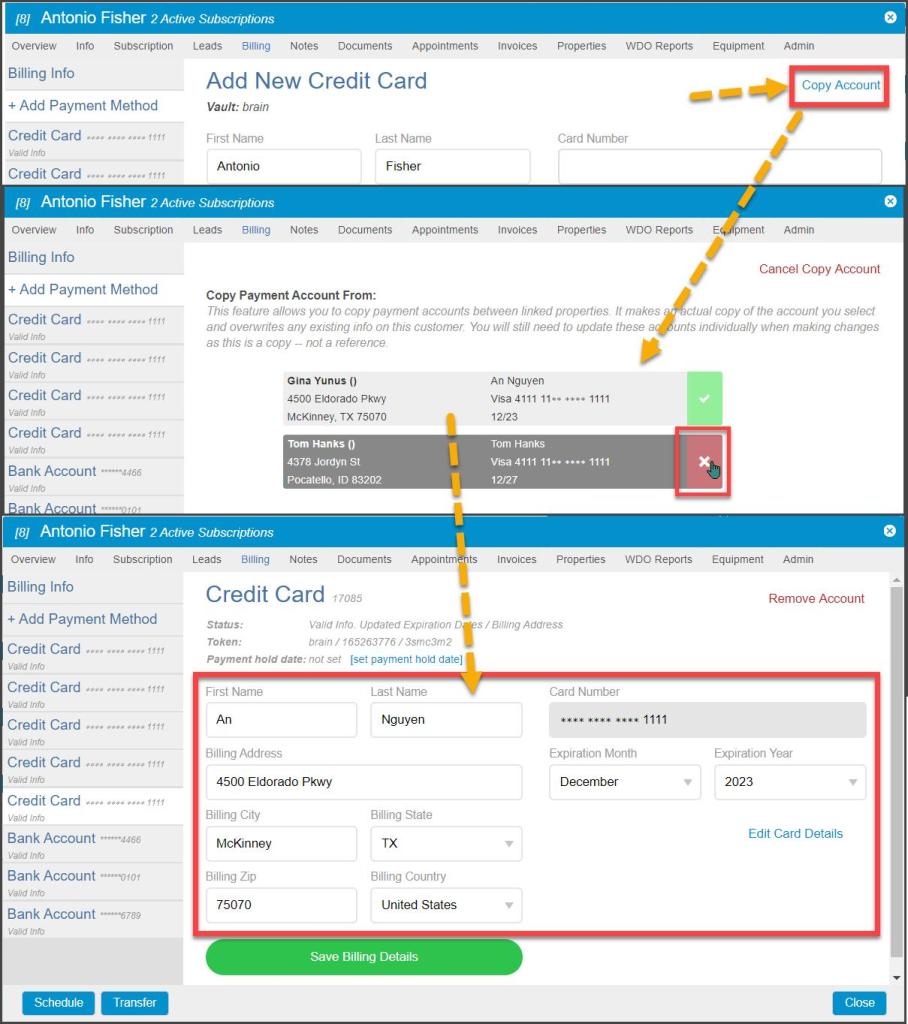
Using the Copy Account Button
When a customer has Linked Properties (e.g. rentals under a single owner), instead of entering new credit card information, a Copy Account button is available. When selected, the Copy Account option opens a dialogue that lists all the valid credit cards available for the customers linked to the current customer. One of these may be selected to import into the current customer’s list of available payment methods.
NOTE:
Each credit card on the list has a green checkbox next to it by default. This means that if this card is selected, both the credit card information AND the billing name and address from this linked property will be imported, overwriting the billing info from the current customer. Clicking on the green checkbox will toggle it to a red x-box, which changes the import so that ONLY the credit card number and expiration will be imported, but the billing information of the current customer will remain.
This option is available when adding ACH bank account payment methods as well. Consult the Copy Billing Account user guide for complete details on this option.
Adding an ACH Account
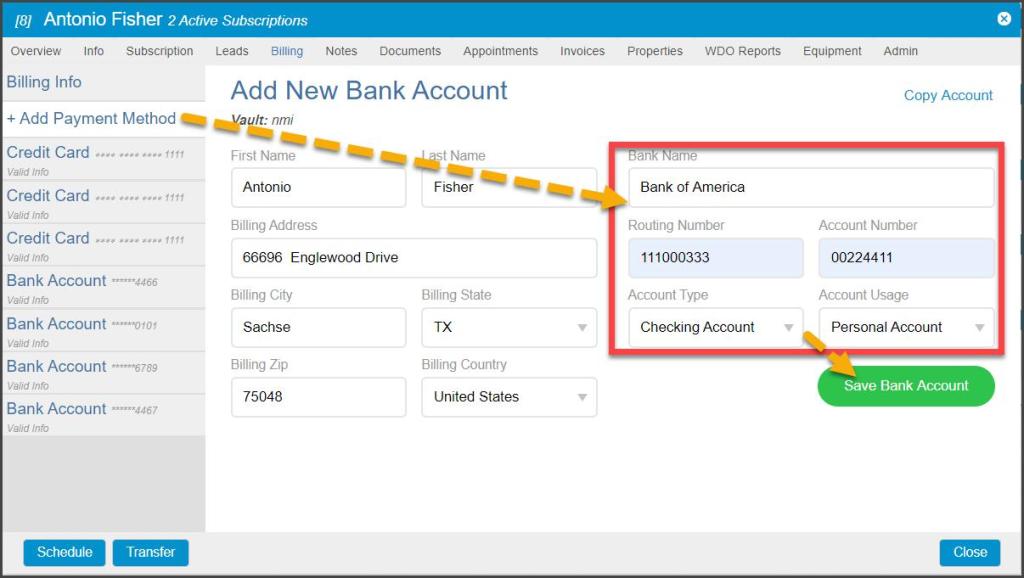
To add an ACH bank account payment method, +Add Payment Method > Bank Account.
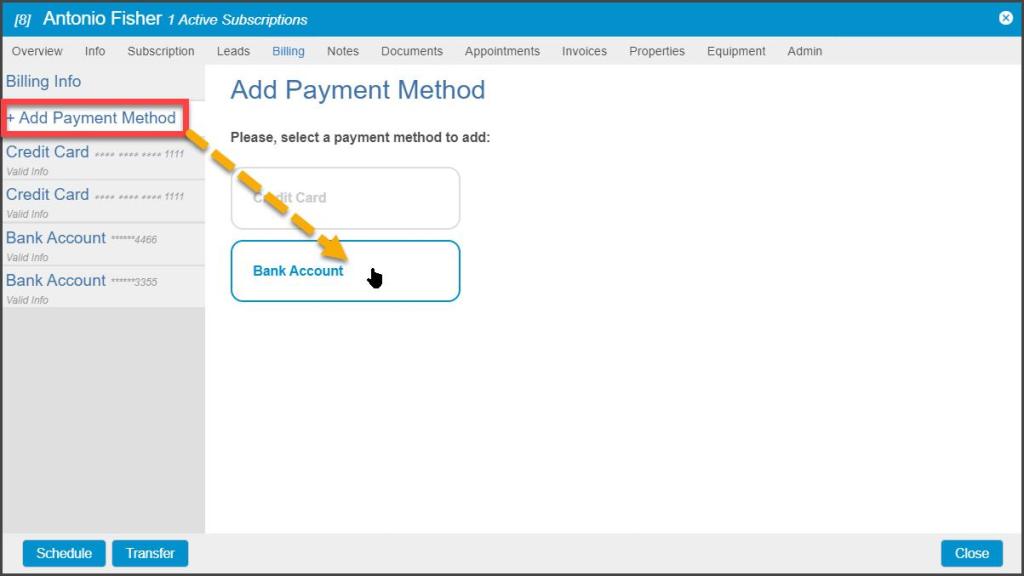
Enter the bank name, routing, and account number, and Account Type and Account Usage, then select Save Bank Account.
Editing a Method of Payment
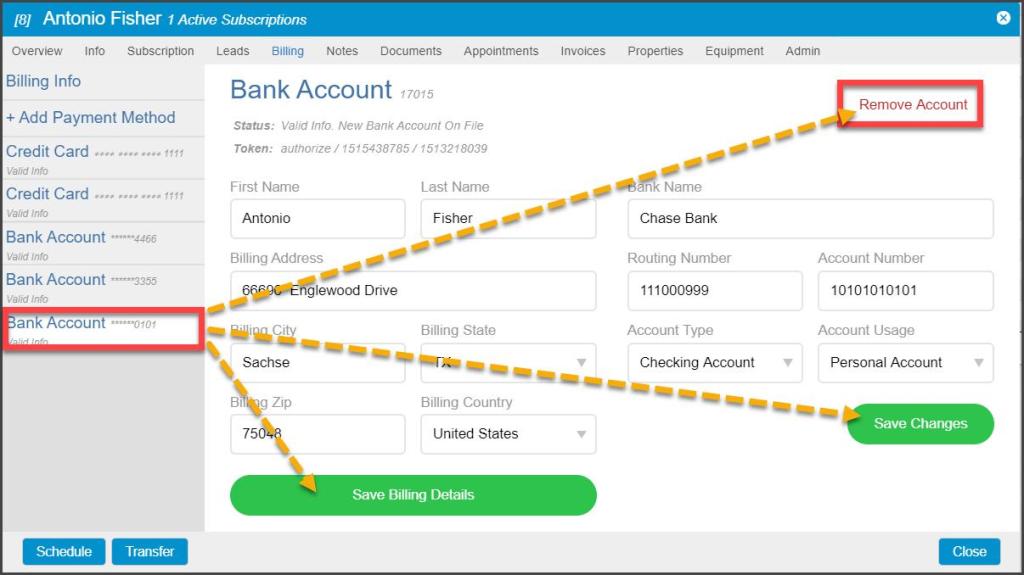
Billing Information or Bank Account details may be updated and re-saved here. Since credit cards are not stored locally, to update the card number and expiration date, the user must remove the card and a new card added as described above.
The user may remove any existing payment method by selecting the desired credit card or bank account from the list and selecting Remove Account.
Removing an Existing Payment Method
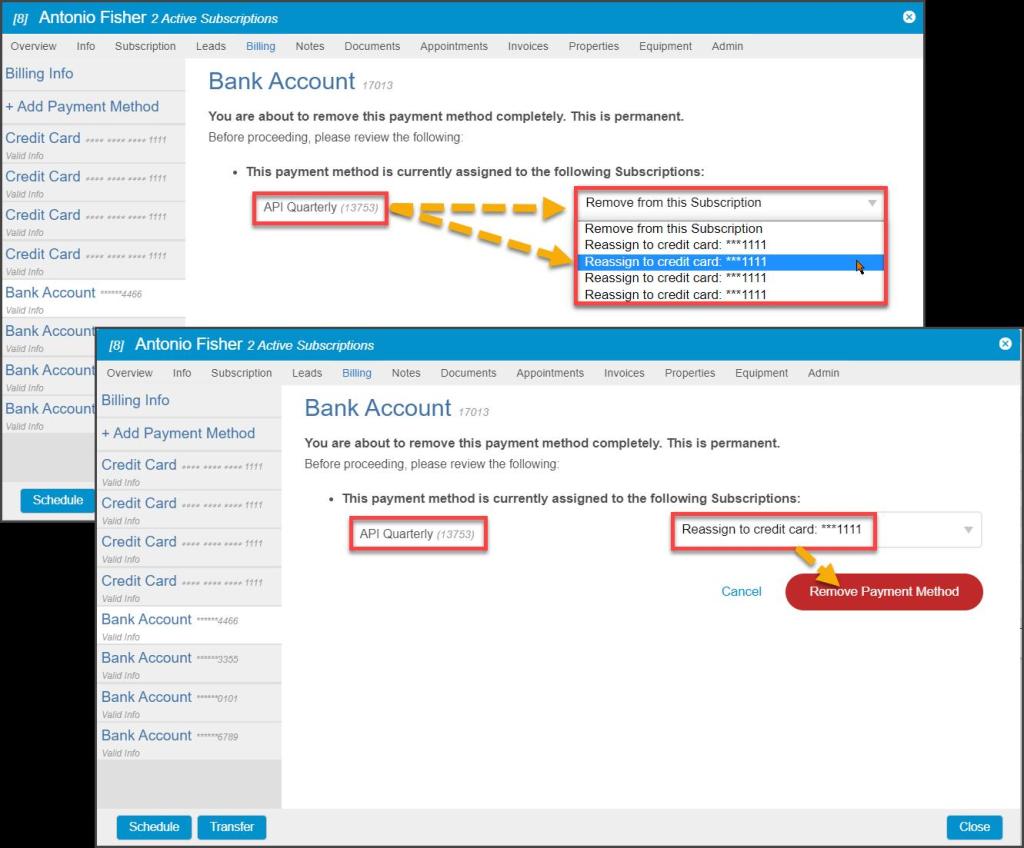
When the Remove Account option is selected, a warning screen will appear.
First, the user is warned that this will permanently remove this method of payment and is not reversible.
Second, any Subscriptions currently assigned to the payment method as the AutoPay source will be listed. The user must decide whether to:
- Remove from this Subscription: Discontinues the Subscription payments from the AutoPay process until another source is specifically assigned.
- Reassign to credit card/ACH: A new payment source for the Subscriptions may be chosen from all other valid payment methods on file.
Once a choice is made from this drop-down, select the Remove Payment Method button to make a choice and remove the payment method.
Designating a Default Payment Source
With multiple payment methods, a Default source should be designated for when AutoPay is chosen on a Subscription. Select the desired Default card/account from the list.
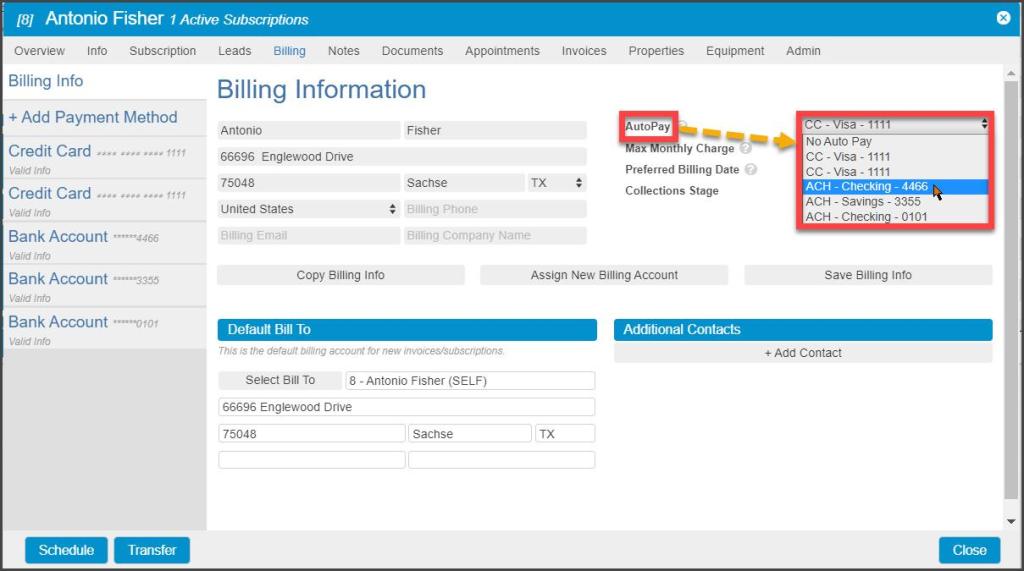
AutoPay by Subscription
On the Subscription tab, each Subscription can be designated for AutoPay. The Default payment source from the Billing tab here now becomes the Customer Default on the AutoPay Profile.
However, each Subscription can also be customized through using the drop-down MOP list there to designate another source instead of the Default be used for that specific Subscription. For example, the Default payment source is used for quarterly.
The Best Service plan, but a large termite treatment needs to AutoPay via ACH from a savings account. That second termite Subscription can be set to AutoPay from a different source than the Default in the Subscription Billing Options.
Also, both the Default and the per Subscription AutoPay sources may designate:
- Max Monthly Charge: The maximum charge paid within 30 days from this payment source, calculated from the previous payment date on this payment source.
- For example: If a customer has a balance of $100 and wants to pay it off one month at a time at the rate of $25 per month, you would set the max monthly charge to $25, and our software will automatically deduct from the total amount until the account reaches zero.
- Pref Billing Date: A day of the month preferred for the AutoPay payment to process (following a payday direct deposit on the 15th, for example). A seven-day buffer is provided, allowing the customer to be charged within a seven-day window.

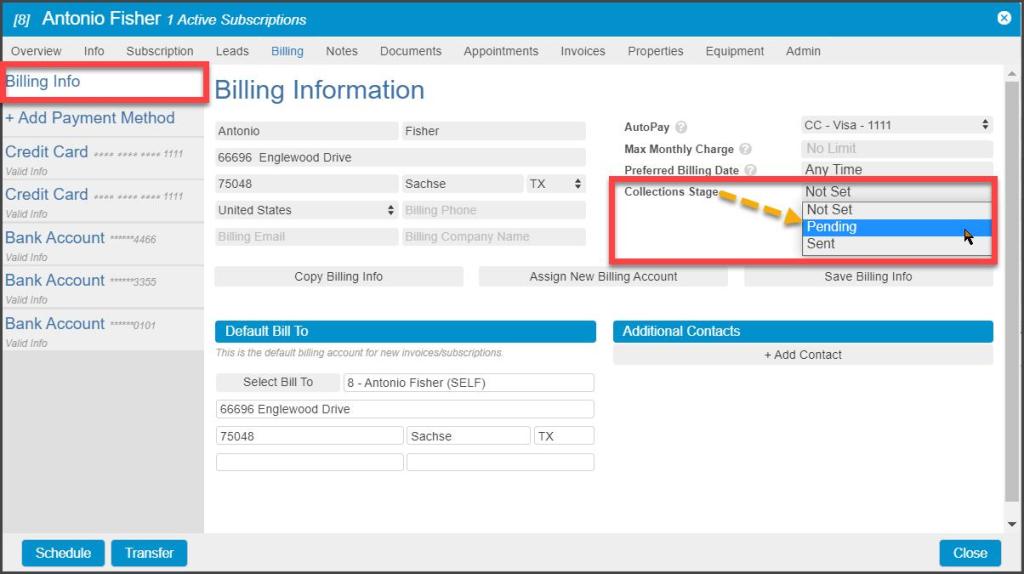
Collections Stage
The Collections Stage field allows the collections process to be tracked and reported on for each customer. There are three options to choose from:
- Not Set: The Default for a customer who is not in the collections process
- Pending: A customer is being considered for the collections process
- Sent: The customer has been sent into the collections process
Setting the Collections Stage for customers is beneficial when pulling a Collections report. This will allow all customers to be filtered by the collections stage set here.
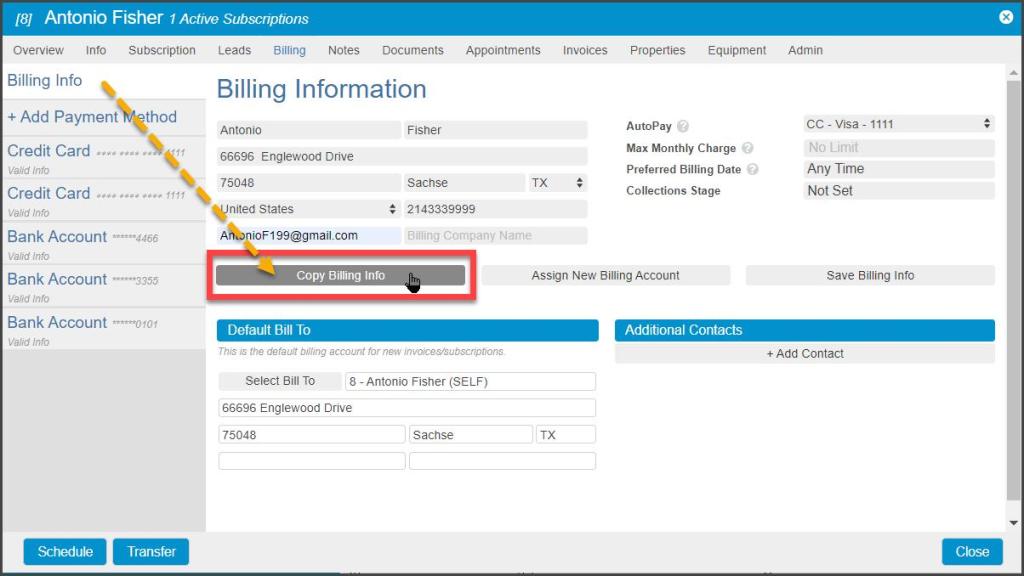
Copy Billing Info
The Copy Billing Info button copies the current billing information to a linked account. For more information on linking properties, please see the Merge and Link Properties in the Customer Card guide under the Creating a Customer category.
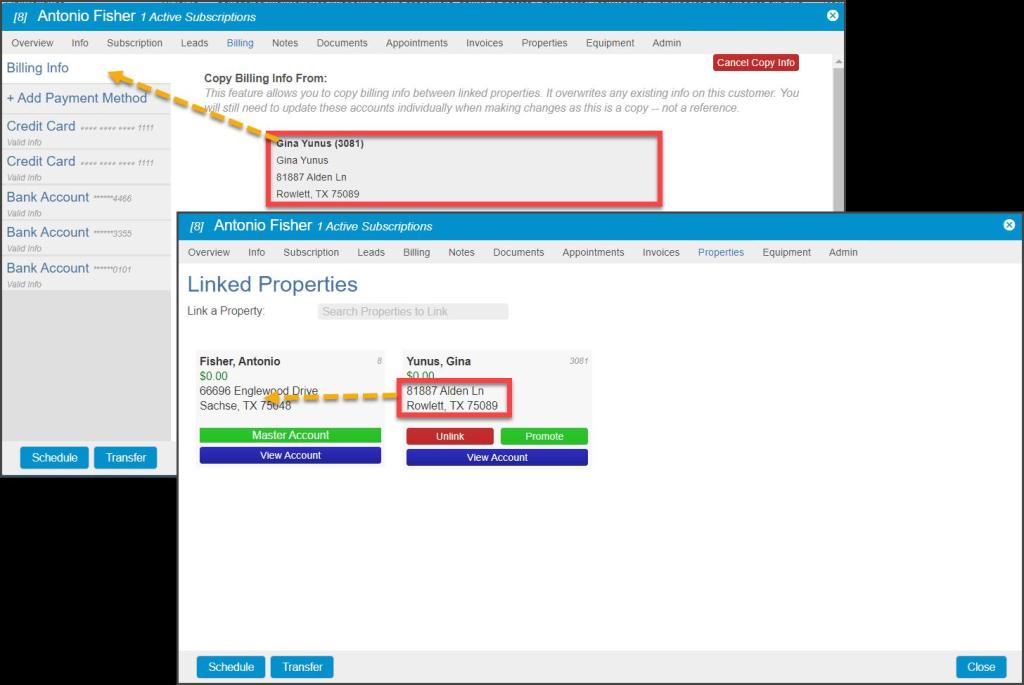
Overwrite Current Billing Info from a Linked Property
Click on any Linked Properties to copy the Billing Information from that Customer Card into the current one.
Assign New Billing Account
This feature designates which Customer Account will be billed and emailed when new Invoices are created and when Payments are made.
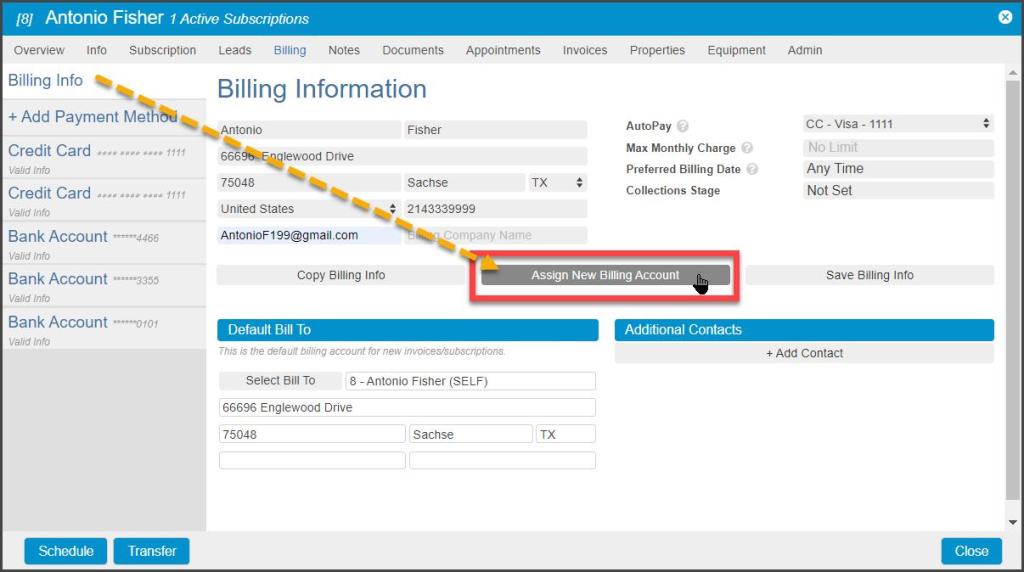
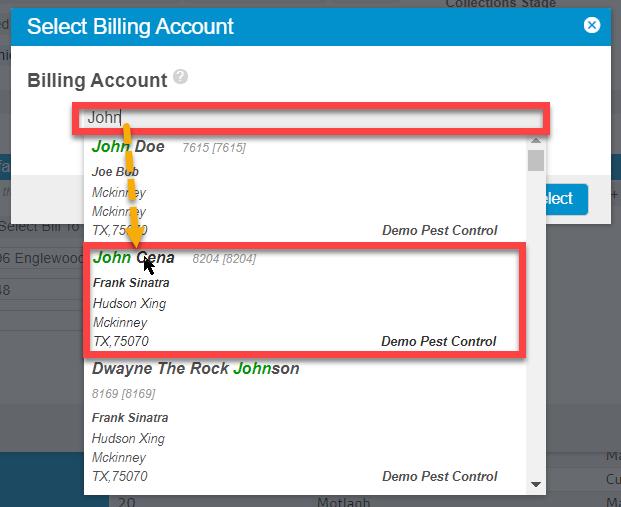
Selecting the Assign New Billing Account button brings up a search window. Type in the name of any existing customers and highlight them in the list.
Press Select to assign Billing responsibility for the current customer to this new customer.
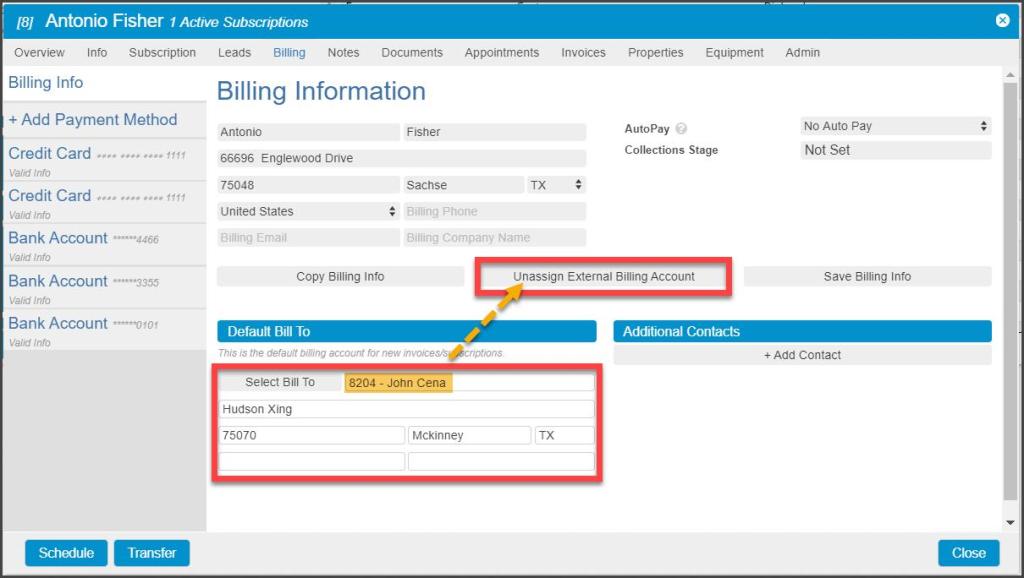
Once selected, information from the new Billing account will replace the existing Default Bill To.
If the External Billing Account choice needs to be rolled back, the Assign New Billing button has now become an Unassign External Billing Account button, and selecting this will restore the Default Bill To information to its original state.
ACH Return Task Alerts and Account Flags
When FieldRoutes Payments reports a failed ACH payment, two actions will automatically occur in the web app:
A Task is created in the Task List
The bank account is flagged in the Customer Card > Billing tab
First, a failed ACH payment will generate a new Task in the Task List with the category of ACH Return, which is also listed on the Customer Card > Notes tab under Tasks. This lets the office worker know this customer payment requires extra steps to get payments back on track and provides a place to record relevant information.
ACH Return Task Alerts and Account Flags
When FieldRoutes Payments report a failed ACH payment, two actions will automatically occur in the web app:
- A Task is created in the Task List
- The bank account is flagged in the Customer Card > Billing tab.
First, a failed ACH payment will generate a new Task in the Task List with the category of ACH Return, which is also listed on the Customer Card > Notes tab under Tasks. This lets the office worker know this customer payment requires extra steps to get payments back on track and provides a place to record relevant information.
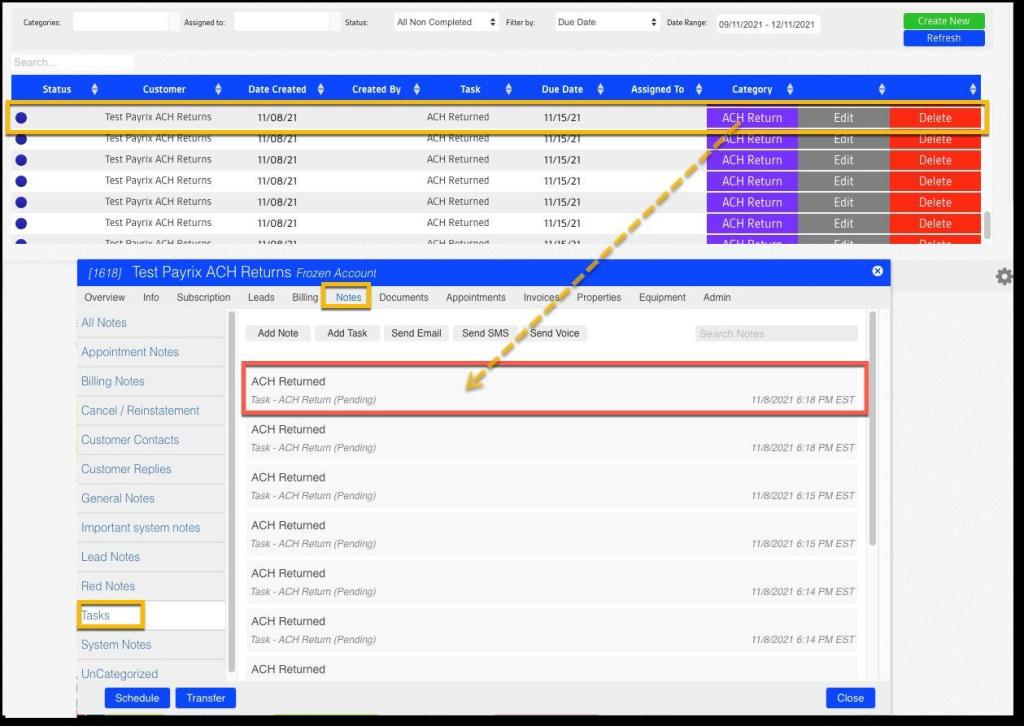
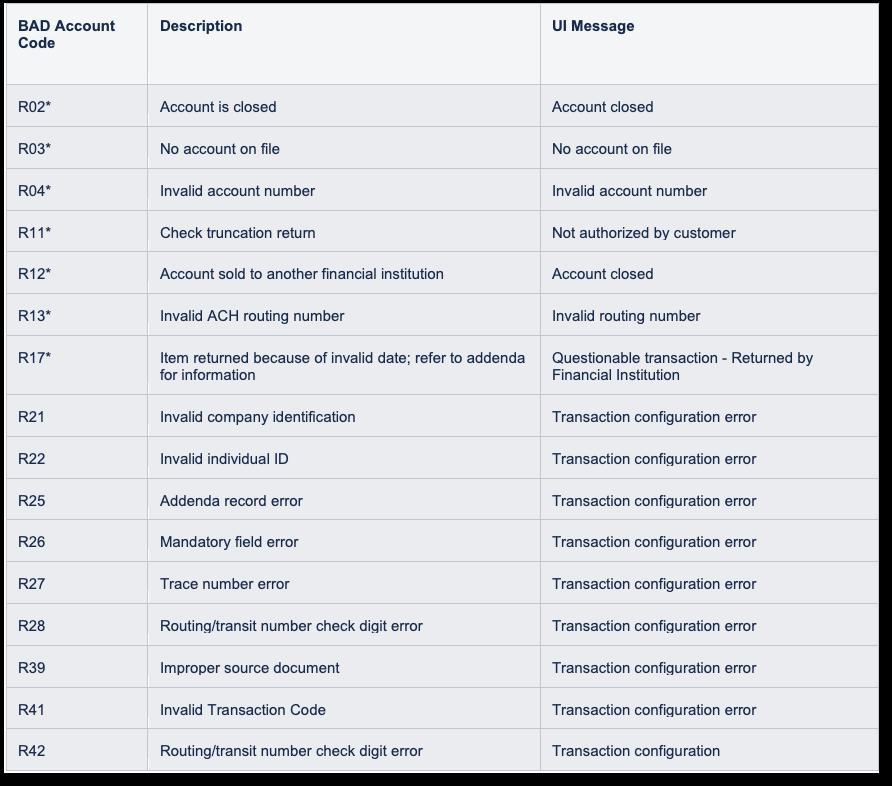
Second, the related bank account in the Customer Card > Billing tab will be highlighted in red and a message at the top of the page will indicate what issue has caused the ACH return (see message list below).
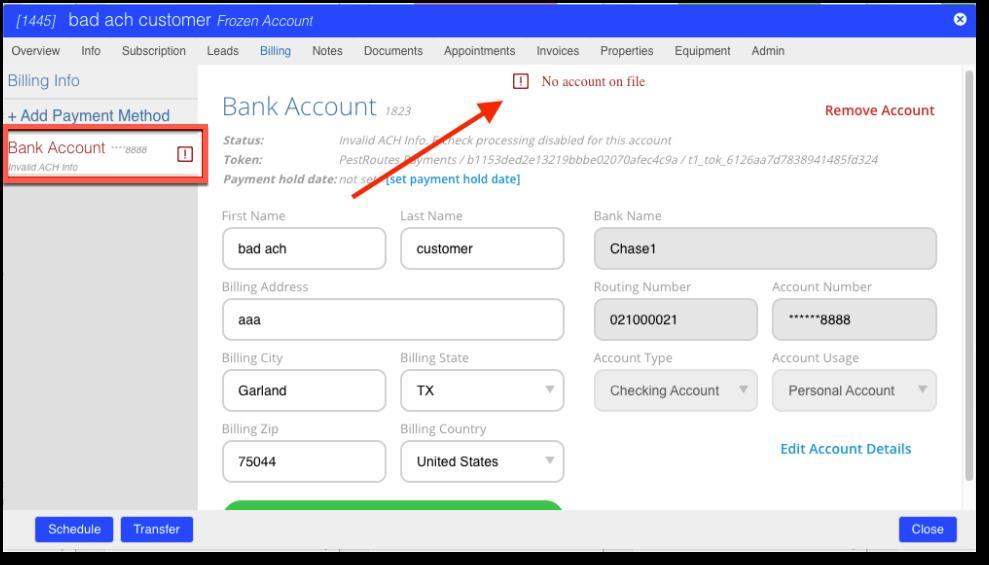
The following reasons may be displayed for the ACH Return: