AutoPay Balances
Summary
The AutoPay Balances Report tool allows those tasked with billing to batch charge all AutoPay customers scheduled for payment as a group.
Putting a customer on AutoPay simplifies the process of billing customers. The AutoPay feature grants authorization to process payments for customer services but does not automatically charge the customers. This report facilitates the processing of customers on AutoPay.
As soon as a customer subscription with AutoPay generates a balance on a customer account, this appears in AutoPay Balances to bulk process these payments as a group using this tool.
Important Points:
- A customer account may have a designated Default AutoPay source in the Customer Card > Billing tab, which will automatically apply to all their subscriptions.
- Even if a Default AutoPay is NOT set in the Billing tab, each individual subscription may be set up to AutoPay under the Subscription tab Billing Options using the AutoPay Profile. This is automatically set to Customer Default but may be individually updated to any valid credit card or ACH account saved for the customer, without affecting the payment settings of any other subscription.
- Customers may also use the Customer Portal > Wallet feature to manage their own Default AutoPay source and individual subscription AutoPay settings.
Accessing the AutoPay Balances Report
To access the AutoPay Balances report, go to
Billing > AutoPay Balances

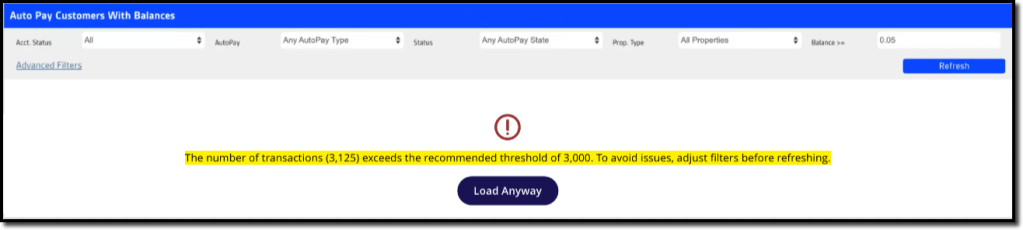
WARNING:
If the number of records generated by the AutoPay Balances batch pay tool exceeds 3,000, performance issues or errors may result. In this case, the system posts the following warning, suggesting the user apply some filters before loading/refreshing.
Filtering AutoPay Balances (Basic)
There are several basic filters for the AutoPay Balances report:
- Account Status: Filter by customer status settings:
- All
- Active
- Frozen
- AutoPay: Filter by the payment method type:
- Any AutoPay Type
- CC AutoPay
- ACH AutoPay
- Status: Filter by the current AutoPay action status:
- Any AutoPay State
- Successful
- Soft Decline
- Hard Decline
- Soft or Hard Decline
- Invalid/Missing
- Prop. Type: Filter the report according to:
- All Properties
- Residential Properties
- Commercial Properties
- Balance >=: Filter by a minimum dollar value to avoid those too small to merit the cost of processing
Select Advanced Filters to view additional filter options.
Once all desired filter settings are complete, select Refresh to generate the list of accounts.

Filtering AutoPay Balances (Advanced)
The AutoPay Balance advanced filters are detailed below.
- Balance Age: Filter based on the account balance age:
- Any Balance Age (= Default)
- 7+ Days Old
- 10+ Days Old
- 15+ Days Old (Late)
- 30+ Days Old (Past Due)
- 60+ Days Old (Way Past Due)
- 90+ Days Old (Way, Way Past Due)
- 180+ Days Old (Completely Past Due)
- 0-3 Days Old (New)
- 0-14 Days Old (Current)
- 15-29 Days Old (Late)
- 0-29 Days Old (Current & Late)
- 30-59 Days Old (Past Due)
- 60-89 Days Old (Way Past Due)
- 90-119 Days Old (Way, Way Past Due)
- 120-149 Days Old (Super Past Due)
- 150-179 Days Old (Way Super Past Due)
- Custom Age Range
- Pref. Paper: Filter by Prefers Paper flag. Note: To flag a customer as Prefers Paper, open the Customer Card > Info > Flags and select Prefers Paper from the Generic Flags menu.
- All
- Yes
- No
- Has Email: Filter by whether the customer has Billing Email on the Customer Card > Billing tab:
- All
- Yes
- No
- Has Max Monthly: Filter by whether the customer has a designated Max Monthly Charge under the Customer Card > Billing > Billing Info section:
- N/A
- Yes
- No
- Incl. Collections: Filter by Collectionsstage:
- Not Set = Normal default
- Pending = This customer is at risk of being sent to Collections
- Sent = This customer was already sent to Collections
- Incl. Flags: Include any designated Generic or Custom Flags
- Excl. Flags: Exclude any Generic or Custom Flags
Once all desired filter settings are complete, select Refresh to generate the list of accounts.

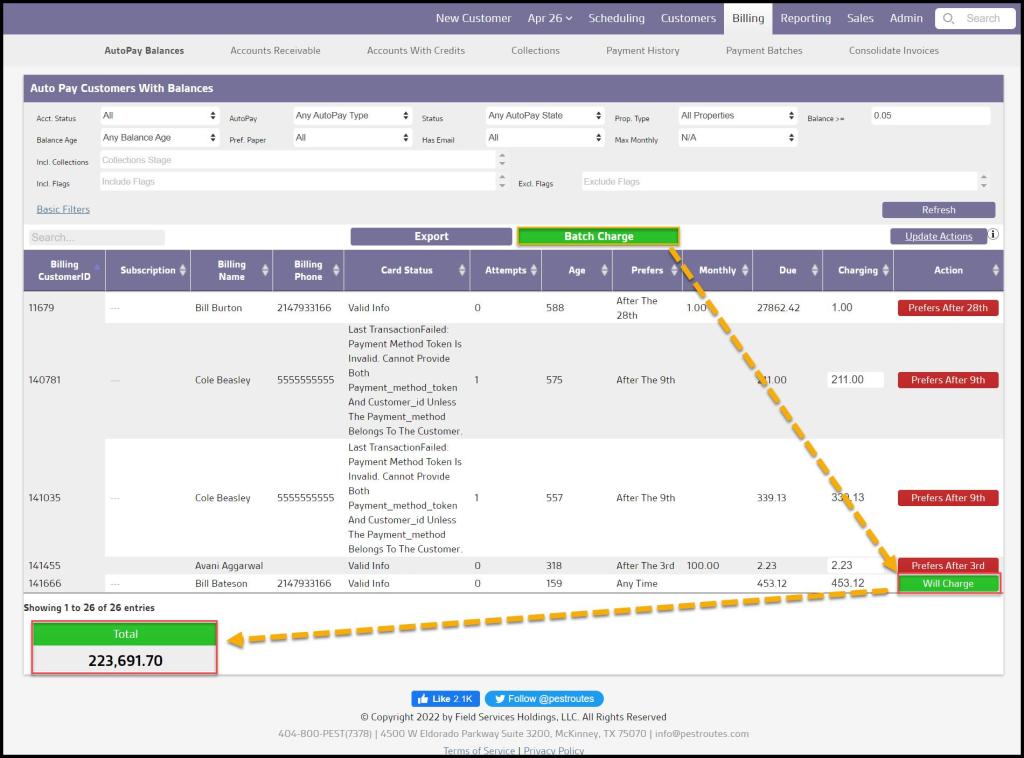
Using Action Buttons in the Action Column
On the AutoPay Balances report, each customer account shows an Action Status in the Action column. The setting on the button in this column indicates whether the account is ready to be charged with the Batch Charge command.
- Do Not Charge*: The customer will not be charged if the Batch Charge command is selected. Regardless of the initial Action Status, this can be manually set by clicking on the Action button for the account until it shows the red Do Not Charge* status.
- Monthly Charge: This account has a designated Max Monthly Charge, which has not yet been reached for the current period, so it Will Charge on this Batch Payment up to the Max Monthly Charge value
- Will Charge: A green Will Charge status indicates the account will be charged when the Batch Charge command is selected.
- Fix Payment Info: A charge was attempted but was unsuccessful. Refer to the Card Status column for indicators as to the cause of the failure.
- Monthly Reached: The customer’s desired Max Monthly Charge has already been met for the current period. The Max Monthly Charge is set on the Customer Card > Billing > Billing Information.
- Try After [Date]: When a Payment Hold Date is set on a specific method of payment (CC/ACH account) on the Billing > Credit Card or Billing > Bank Account, the Action Status will show Try After [Hold Date]
- Prefers After [Date]: When the customer has a Preferred Billing Date established on Billing > Billing Information, and the date has not yet been reached for the current month, the Action Status will show Prefers After [Preferred Billing Date]
- Soft Decline Max: When a valid credit/debit card has insufficient funds to cover the requested charge, a Soft Decline results. Three unsuccessful attempts to charge the card will display as Soft Decline Max. This allows the office to distinguish between a hard decline that causes a Fix Payment Info status.
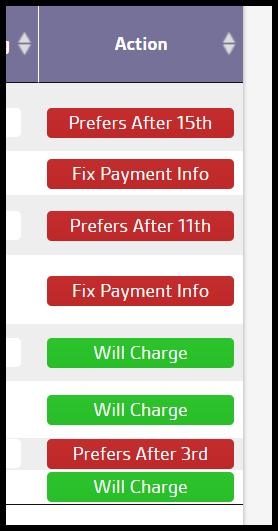
NOTE:
A single account may have more than one Action Status, such as the sixth example below that has both a Max Monthly Charge that was reached ( thus a “Monthly Reached” status) and also a Preferred Billing Date = 27th (shown as “Prefers after 27th”). Action Status may be manually updated by clicking the button and rotating through the options possible for that account.
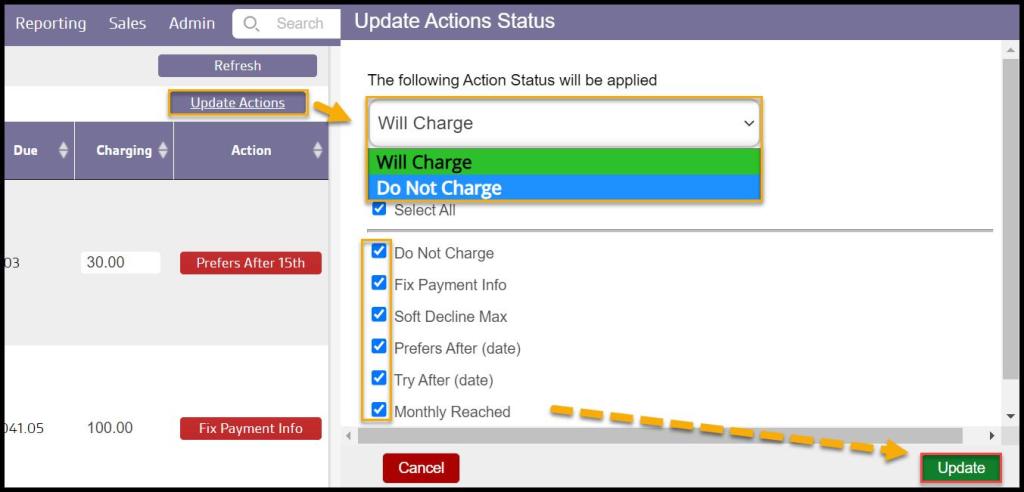
Batch Status Updates with Update Actions
Bulk updates to the entire list of accounts may also be performed by using the Update Actions button at the top.
The bulk update will change all statuses to Will Charge by default, but the drop-down menu may be used to change the update action to Do Not Charge if so desired.
Each Action Status category can be selected or deselected as desired to fine-tune which accounts are set to Will Charge and which are left as they were. If the Select All box is checked, it will automatically select all listed Action Status categories:
- Select All: All accounts – regardless of status – will be set to update
- Do Not Charge
- Fix Payment Info
- Soft Decline Max
- Prefers After (date)
- Try After (date)
- Monthly Reached
In place of the Select All box, one or more Action Statuses may be chosen for an update by selecting the box(es) beside the name(s).
NOTE:
If a single account has multiple Action Statuses assigned, BOTH of these categories must be selected on the Updates Action menu for that particular account status to update.
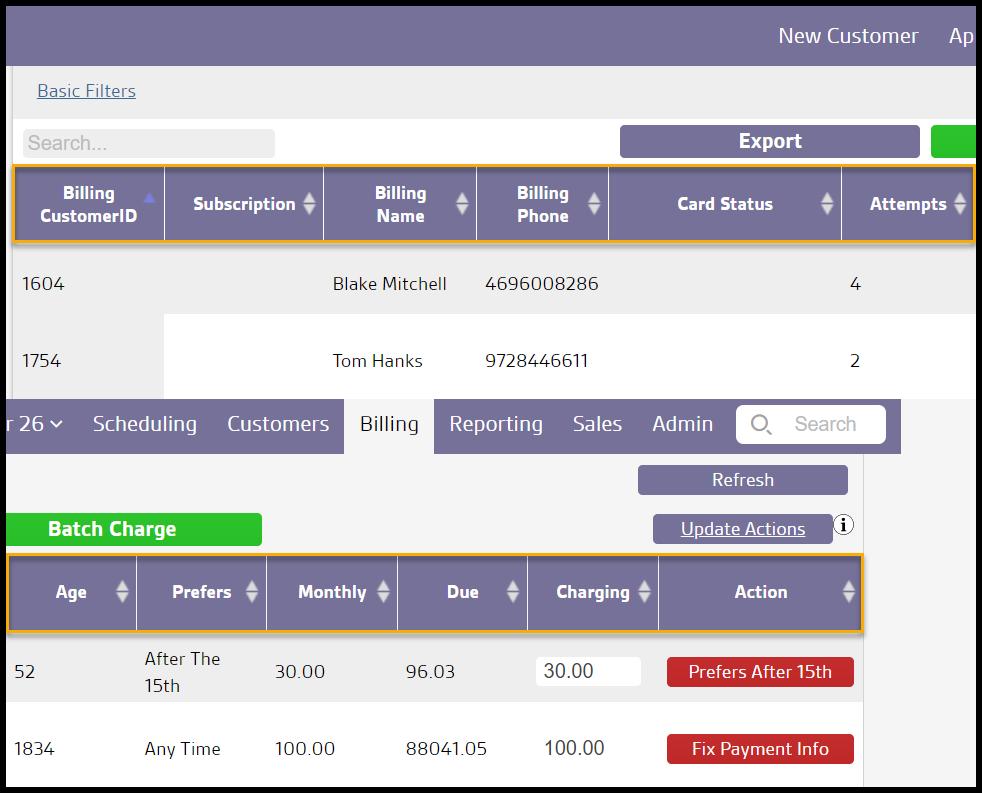
Viewing the AutoPay Balances Data Columns
The data columns for the AutoPay Balances report are as follows:
- Billing CustomerID: The system code for the customer who is the responsible payer for the account
- Subscription: Subscription with which the AutoPay charge is associated since a customer may have multiple AutoPay subscriptions with different payment sources assigned
- Billing Name: The name of the customer who is the responsible payer for the account
- Billing Phone: The phone number listed on the Billing tab for the responsible payer on the account
- Card Status: The card status on the payment source for this AutoPay subscription:
- Valid Info (default when the card is valid with no issues)
- Declined
- Last Transaction Failed: Processor Declined
- Attempts: The number of times a batch payment has been attempted and declined
- Age: The balance age in the number of days on the account
- Prefers: Indicates the Preferred Billing Date on the account, if any
- Any Time = Default, meaning no Preferred Billing Date
- After the [Preferred Billing Date]
- Monthly: Default = empty. Otherwise displays the amount of the customer’s Max Monthly Charge indicated on the Customer Card > Billing.
- Due: The Total Amount Due on the account
- Charging: The dollar amount the customer will be charged when the Batch Charge is processed. This amount defaults to the full Account Balance Due unless there is a Max Monthly charge on the account. In that case, the Charging amount will reflect the Max Monthly Charge. NOTE: This field is always editable, even though the white edit field may be unnoticeable on alternating lines with white backgrounds.
- Action: Shows the current Action Status of the account if the Batch Charge were to be run
Applying a Batch Charge
Once all the accounts on the filtered list have been set to the preferred Action Status, select Batch Charge. The Total box at the bottom indicates the cumulative Charging amount of all the Will Charge accounts, assuming all are processed successfully.
A message will appear prompting confirmation to charge the customers in the report. Select OK, and then the report will show the accounts that were charged and any that were skipped and why.