Area Management
Summary
Area Management enables the user to manage areas assigned to Sales Reps.
Use this tool to assign areas to Sales Reps to knock within, block areas from being available, and see area history.
These areas will be established in the sales-enabled apps, so Sales Reps will know exactly where they need to be knocking.
Important Points:
- Area Management is only for sales-enabled app users.
- Area Management has several access controls,
- The map regions in Area Management are different from customer regions.
- See the FieldRoutes Mobile: Area Management guide for using Area Management in the FieldRoutes Mobile app.
- To create flags for regions, go to Admin > Preferences > Customer Preferences > Generic Flags. See our guide on Generic Flags for more information.
Accessing Area Management
To access the Area Management module, go to:
Sales > Area Management.

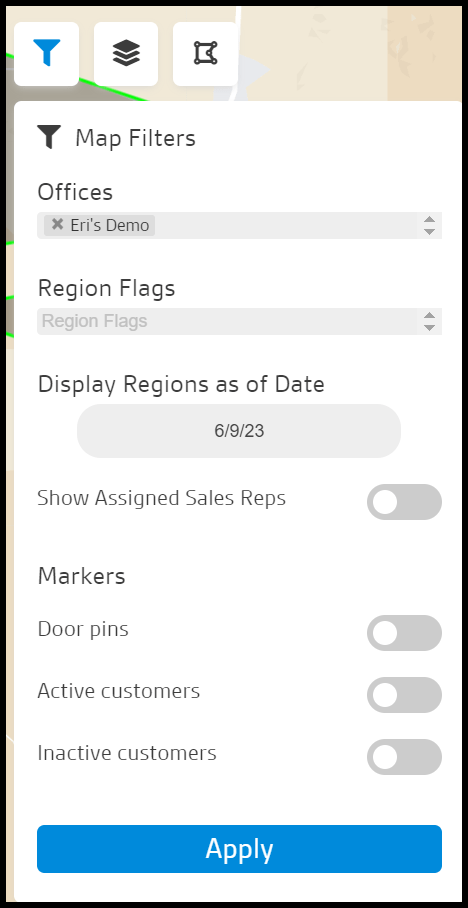
Using the Filters
The filters at the top of the Area Management report are detailed below.
- Offices: For offices with multiple branches, the user can manage areas and view area history in other branches. No changes can be made to the areas if more than one office is selected.
- Region Flags: Filter regions by assigned flags. Go to Admin > Preferences > Customer Preferences > Generic Flags to create flags for regions.
- Display Regions as of Date: See which sales users were assigned to an area in the past as of a specified date. The user can only make changes to areas if this date is the current date.
- Show Assigned Sales Reps: Show or Hide Assigned Sales Reps.
- Markers: Filter results from Door Pins (color varies based on actions taken/ not taken), Active (Green) or Inactive Customers (Red).
Once the desired filters are selected, select Apply.
Using the Layers
The Layers are data groups of containing groups of area features representing a particular type of customers or door pins.
- Assignment Layers:These layers are for Offices. You can assign Sales reps to these areas.
- Show Assigned Sales Reps: Will show assigned Sales Reps for that area.
- Reporting Layers: These general layers are used for Sales Reporting. They are used for running reports on geographic regions. Click the pencil icon to rename the document.
- System Layers: Shows layers that display certain markers, such as Door Knocks, Active Customers, or Inactive Customers.
Select and unselect layers to show

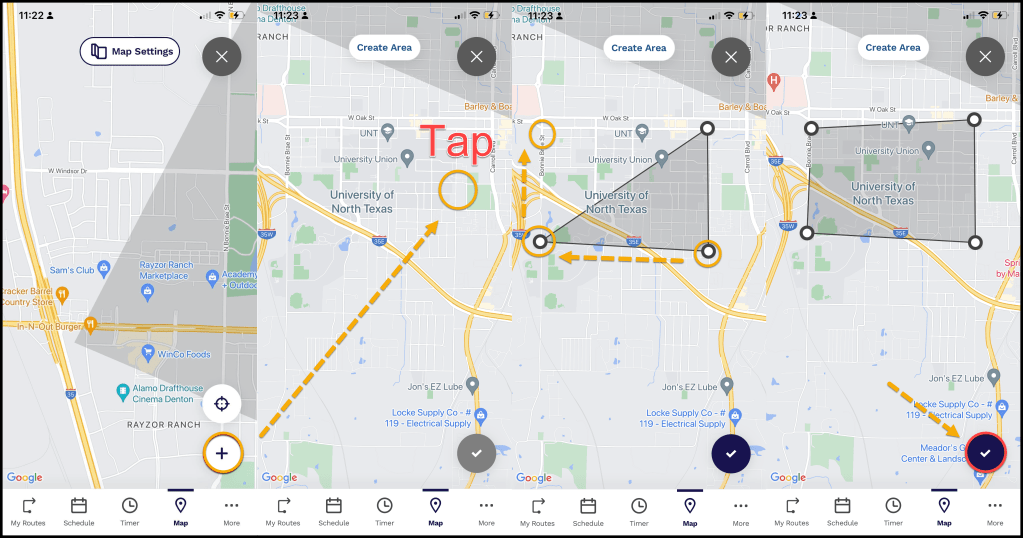
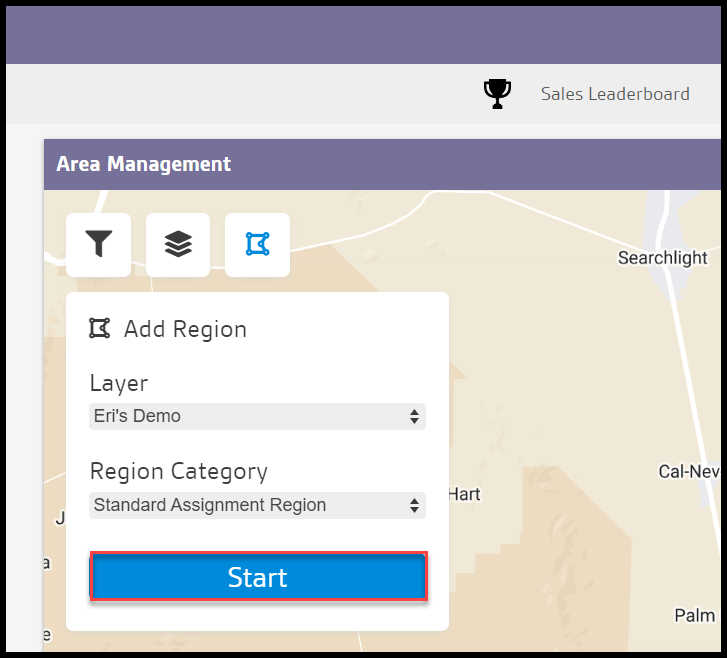
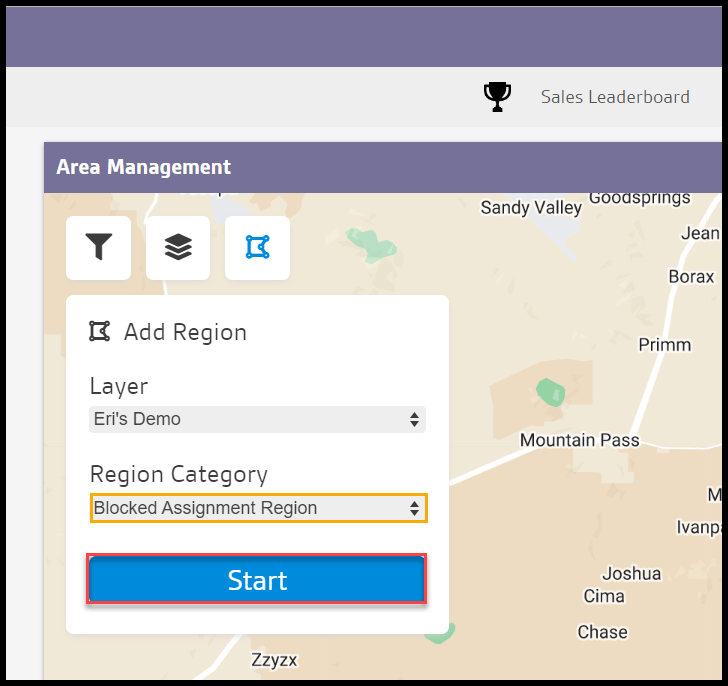
Adding Regions
Select an Assignment or Reporting Layer.
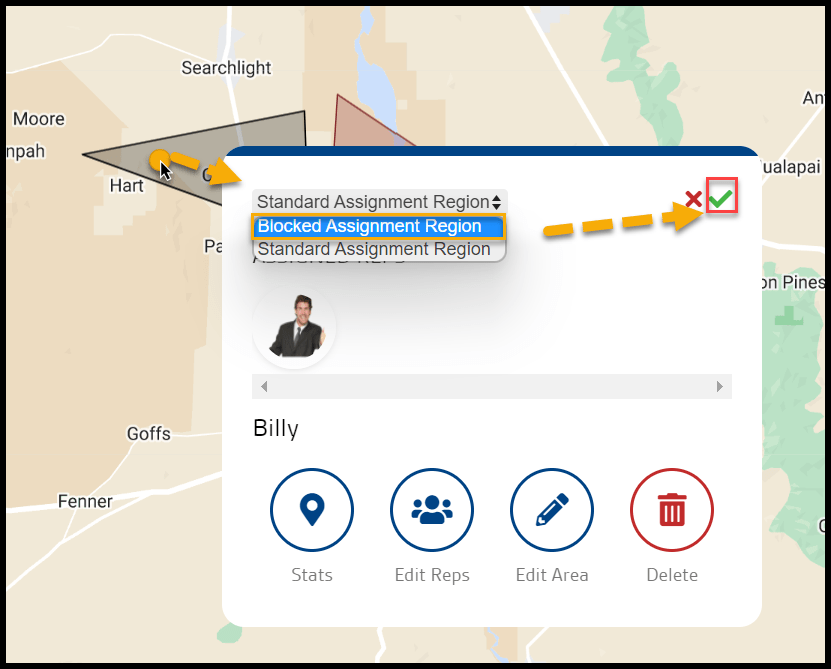
Next, determine if the region will be a Standard Region or a Blocked Region.
Select Start to begin drawing a Region.
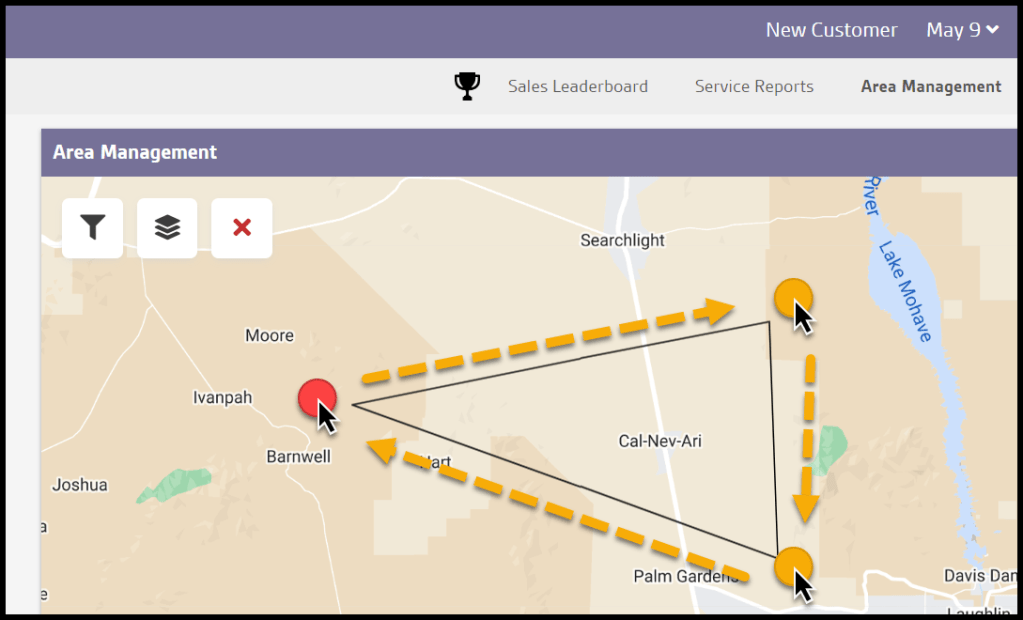
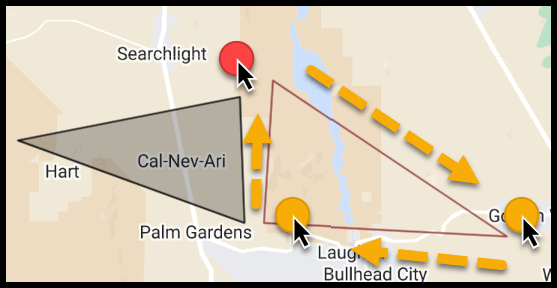
To draw new areas, click on the map to apply a starting point for the new area, and make an outline of the area.
Editing Areas
To edit the area, select the border on the map and drag the different points accordingly. The user can also select the hand tool in the upper left corner of the map as well.
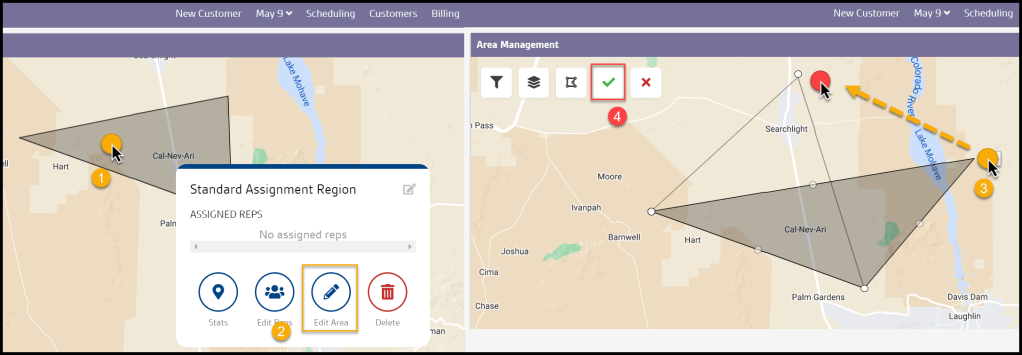
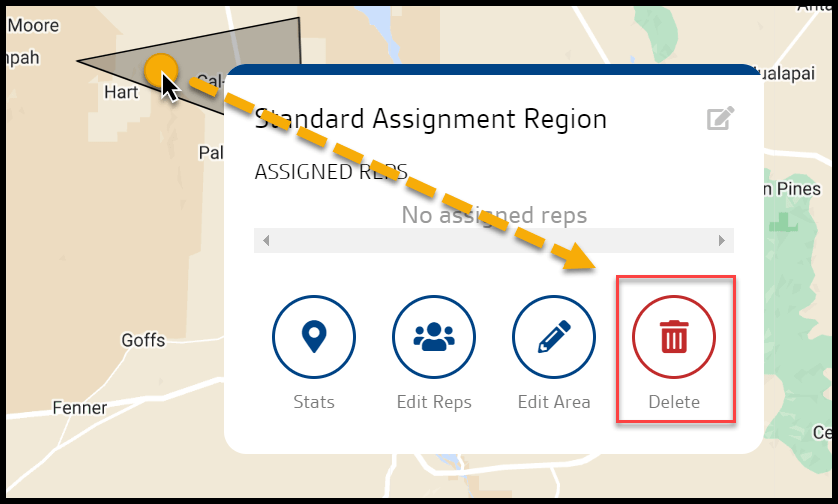
Deleting Areas
To delete an area, select the border on the map and then select the trash can icon on the pop-up.
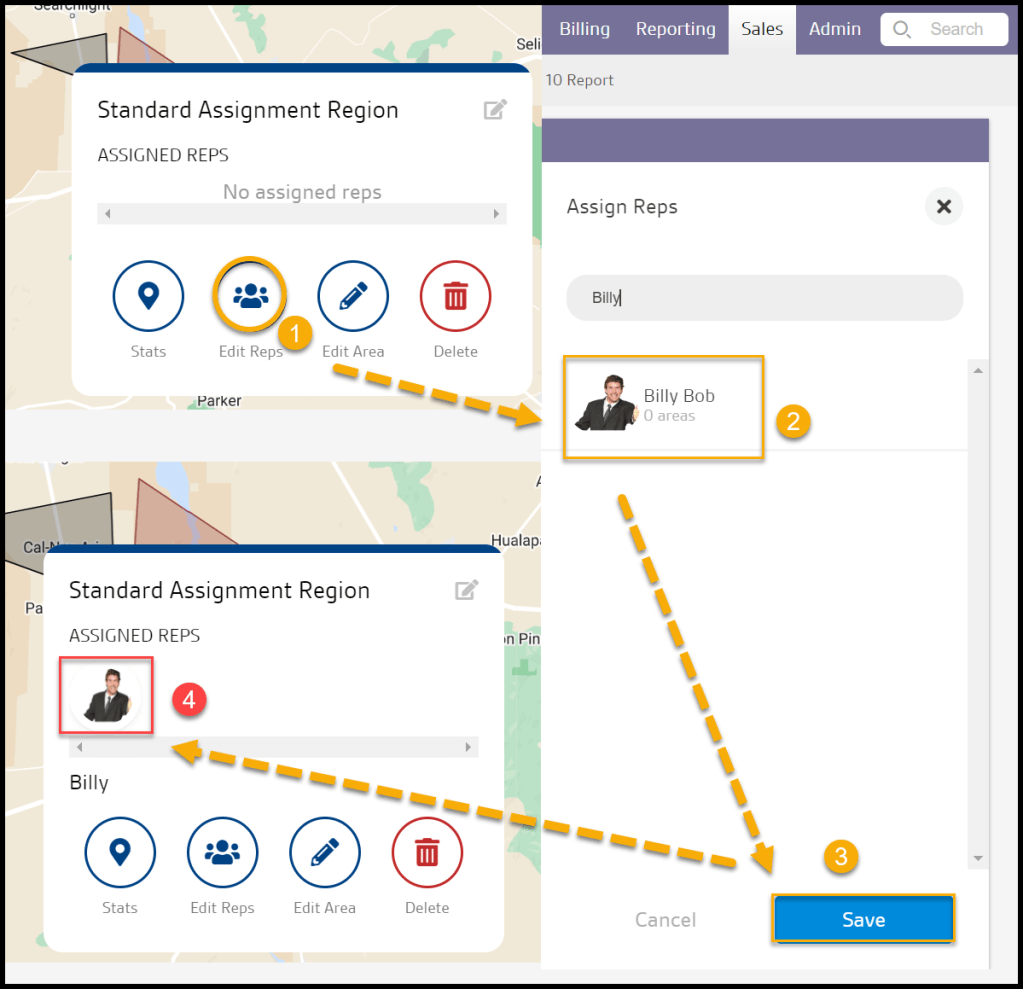
Assigning Users to Areas
To the left of the map, the user will see all the available sales users who can be assigned areas.
Just drag and drop a sales user from the left onto the desired area to assign the user to that area.
The area will show as grey until it is saved. To save the area, select Save in the top left.
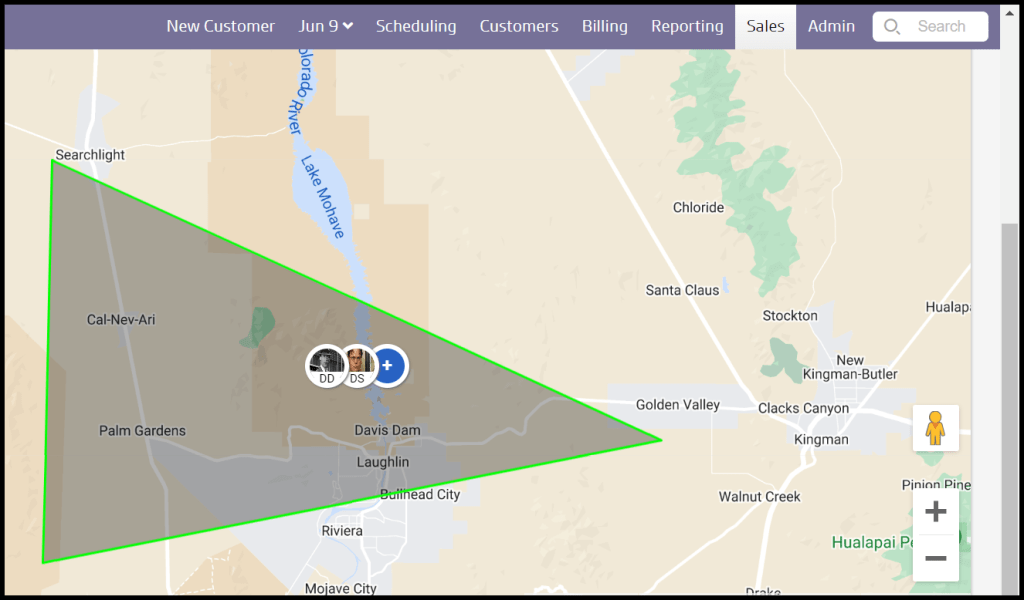
After assigning a rep to an area, their name and initials will show on the area. If there are more than two Reps, a plus sign will appear. Clicking on the plus sign will display a list of the reps assigned to the area.
Blocking Areas
If the user would like to block sales users from knocking in a specific area, they can draw areas that are blocked off.
To do this, just draw the blocked-off area and then select the border. Once the border is selected, there will be an option in the upper right of the map to Make Blocked Area.
Once the area is blocked off, it will turn red. To unblock an area, select it and the user will see an option in the top right to Make Usable Area.
Area Types
A complete breakdown of the different types of areas is detailed below.
- Black areas with green borders are currently active areas. Any sales users assigned to the area will be displayed within the area.
- Black Areas areas with black borders are unassigned regions.
- Red areas are blocked.
An area cannot be blocked that has sales users assigned to it. The users must be removed before the area can be blocked.
The user cannot overlap over blocked areas, but they can overlap on top of active areas (black areas with green borders).
Using Region Stats
Region Stats, formerly Active Area History, can be accessed by clicking an Active Area and selecting Stats.
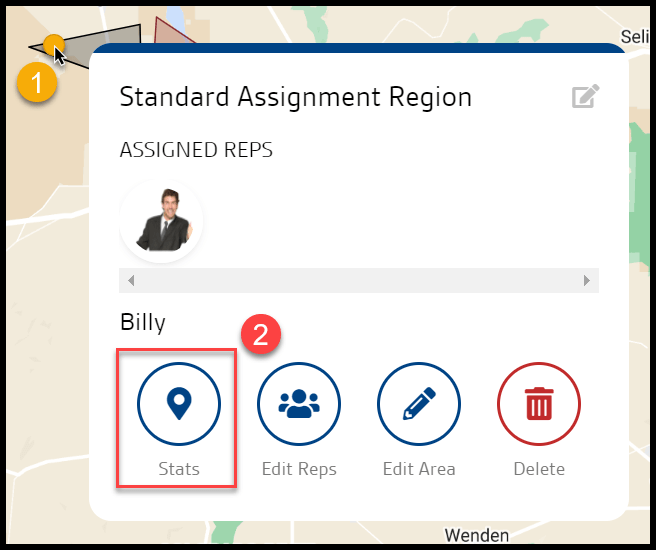
Select an active area to see a history of the sales users that were assigned to the area.
- Total Sold Contract Value: This will display the total contract value of all contracts the sales user sold between the date range to the left of their name.
- Total Value of Serviced Sales: This will display the value of all the completed services the sales user sold between the date range to the left of their name.
- Total Number of Sales: This is the number of customers the sales user has sold between the date range to the left of their name.
- Sales Rep: This column will display a list of all the current sales reps and previous sales reps that were assigned to the area. The date to the right of the sales user’s name will reflect the date range the user was assigned to the area.
Using the Compare Tab
The Compare Tab is another subset feature of Stats. Follow the steps below the image to use the compare tab to select and compare two different regions’ statistics.
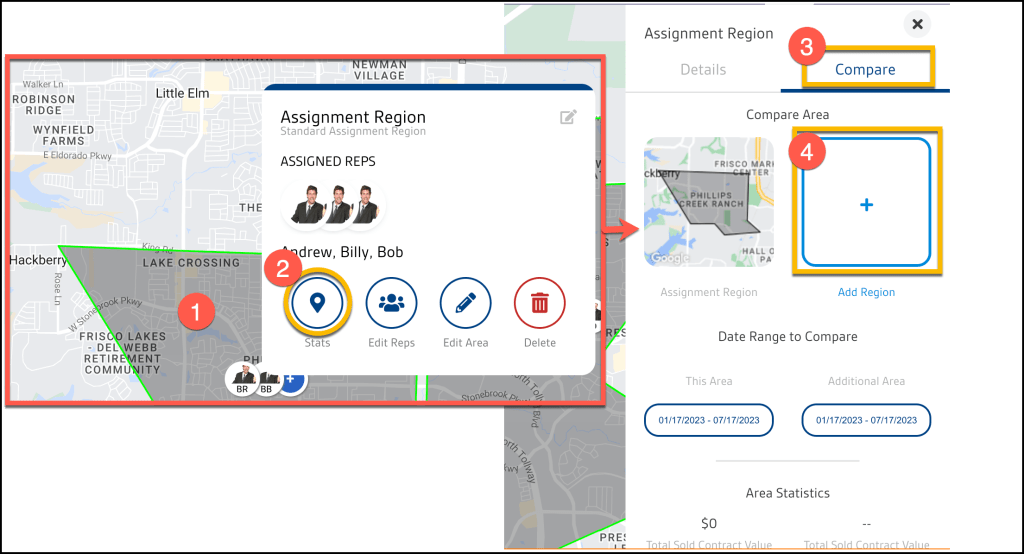
1. Select an active area.
2. Click the Stats icon.
3. Select the compare tab
4. Click the Add Region button.
What do the areas look like for sales users in the mobile apps?
When a sales user logs into FieldRoutes Mobile or Pestroutes Sales and selects the Maps tab at the bottom, they will see assigned areas on the map.
If they have the correct Access Controls, they will also be able to add/edit areas and assign Sales Reps while in the app. Check out the video at the top of the guide to learn how this works.
Please see the FieldRoutes Mobile: Area Management Guide for more information.