
Adding a Service Type Subscription
Summary
Adding a subscription to a customer account for either a simple Service Type or a multi-service Service Plan is one of the most basic functions of the platform. This guide covers adding a new customer subscription for standalone Service Type subscriptions – either one-time services like Tree Trimming or periodic recurring services of the same type, such as a Quarterly Pest Treatment.
See the guide Customers > Adding a Service Plan Subscription for the details on adding a multi-service Lawn Program for a customer.
Important Points:
Service Type
A Service Type is a single standalone service activity that can be serviced in a single appointment. They may occur only a single time or set up to recur on a regular basis – e.g., monthly, quarterly, or annually.
Service Plan
A Service Plan is a group of special child Service Types that are priced together – often at a discount – and performed sequentially over a period, such as an annual Lawn Maintenance Program.
Default Service Type Settings Set in Preference
Service Types are built in the Service Type preference and have many possible default settings which will then auto-fill when a new subscription is added to the Customer Card. These settings are then manually adjustable for a specific customer’s subscription.
Customer Leads for Estimates
If a potential or existing customer requests a pricing estimate for a Service Type, these may be created and tracked the Customer Card > Leads tab. These Leads are then easily converted to a Service Subscription once the customer is officially contracted.
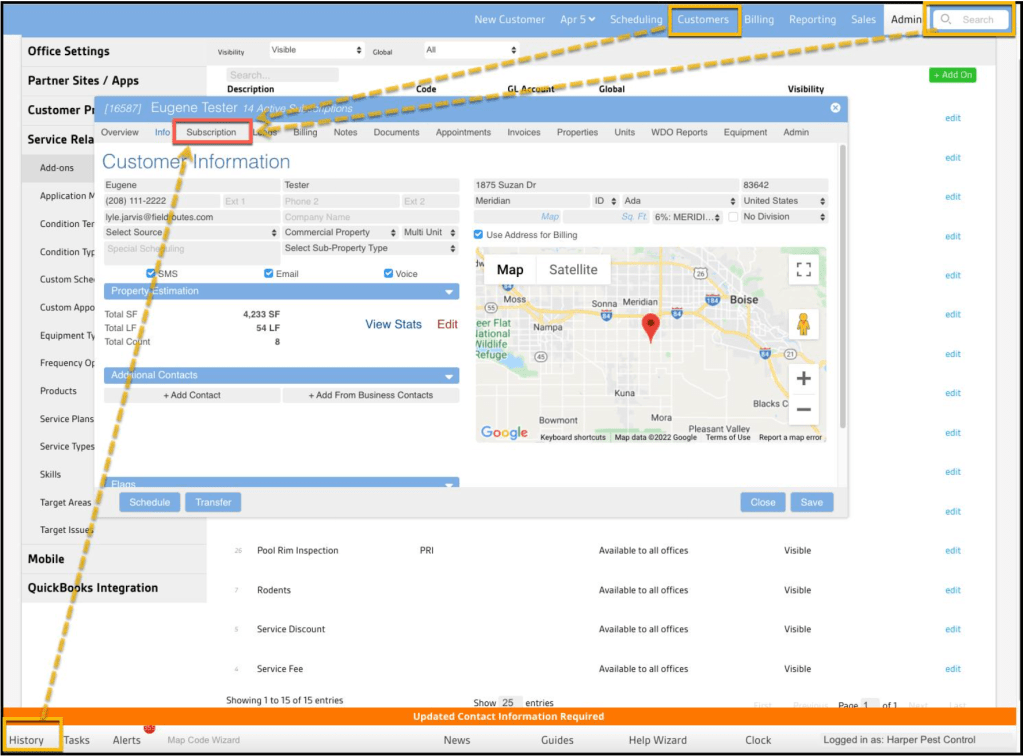
Open the Customer Card
To add a new Service Type of Service Plan Subscription, navigate to the desired Customer Card via the:
- Customer Menu
- Search Bar
- History Menu
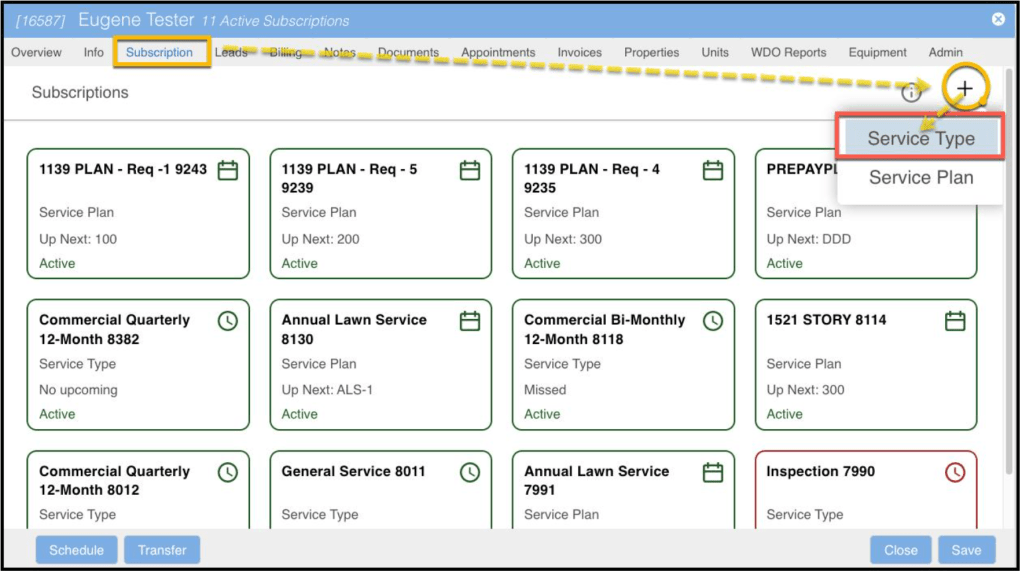
And select the Subscription tab at the top of the Customer Card.
Add a New Subscription for Service Types
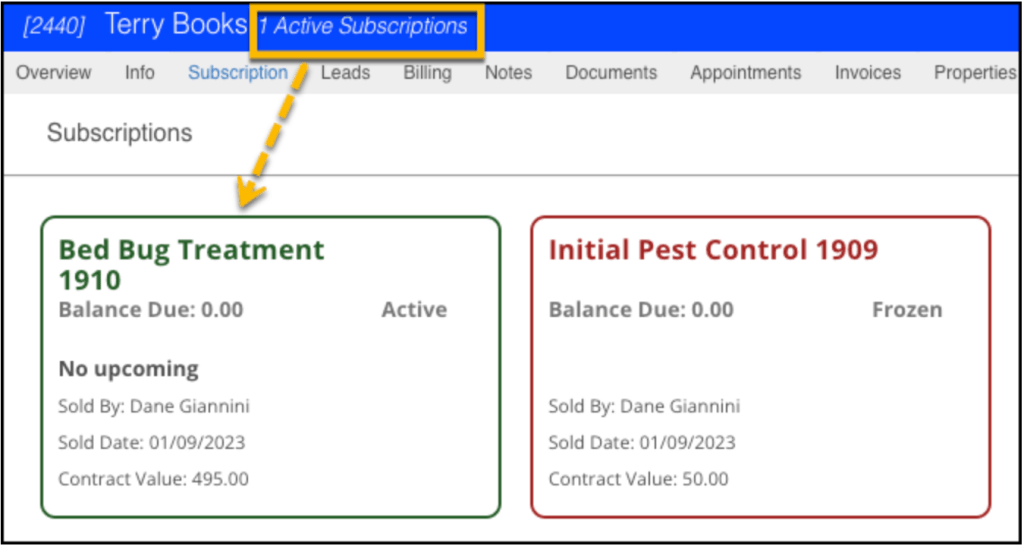
When the Subscription tab opens, you will see one of two views depending on the number of services that the customer has. If the customer only has one subscription, it will take the user right to the details of that service. If the customer has multiple services, it will list all services and programs this customer has used or is currently using. The ring around the service has differing color indicators to identify active vs. frozen services.
- Active (green outline)
- Frozen (red outline)
The below card shows a customer with multiple subscriptions; one active and one frozen
Clicking on any of the cards allows the existing services to be reviewed or updated.
The below card shows a customer with only one subscription.
Adding a new service or program is also slightly different depending on whether the customer has one or multiple subscriptions. When only one service is associated with an account, you will have to click the Back button since the default is to display only the details of the existing service.
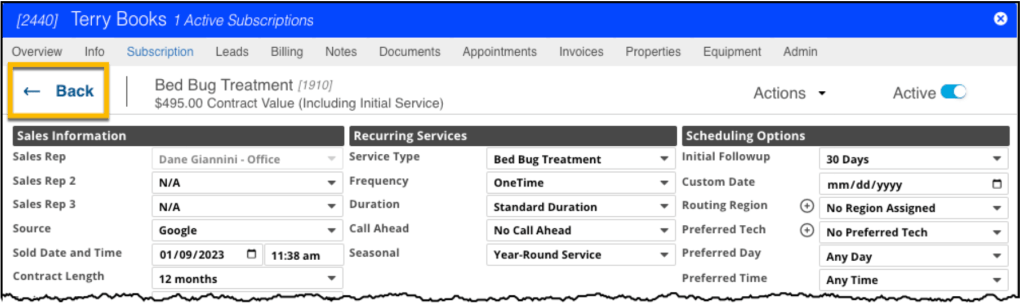
From there, you can add a new service program, by selecting the Plus Icon (+) and choosing either an individual Service Type or a multi-round Service Plan.
- Service Type: An individual service, whether occurring one-time or on a recurring basis (e.g., “Tree Removal” or “Quarterly Pest Service”)
- Service Plan: A group of services sold together (often at a discount) and scheduled sequentially throughout a season or year; typically used for Lawncare industry Programs
This guide will focus on the first option: adding a Service Type subscription. See the guide Customers > Adding a Service Plan Subscription to review the process for adding a multi-round Service Plan.
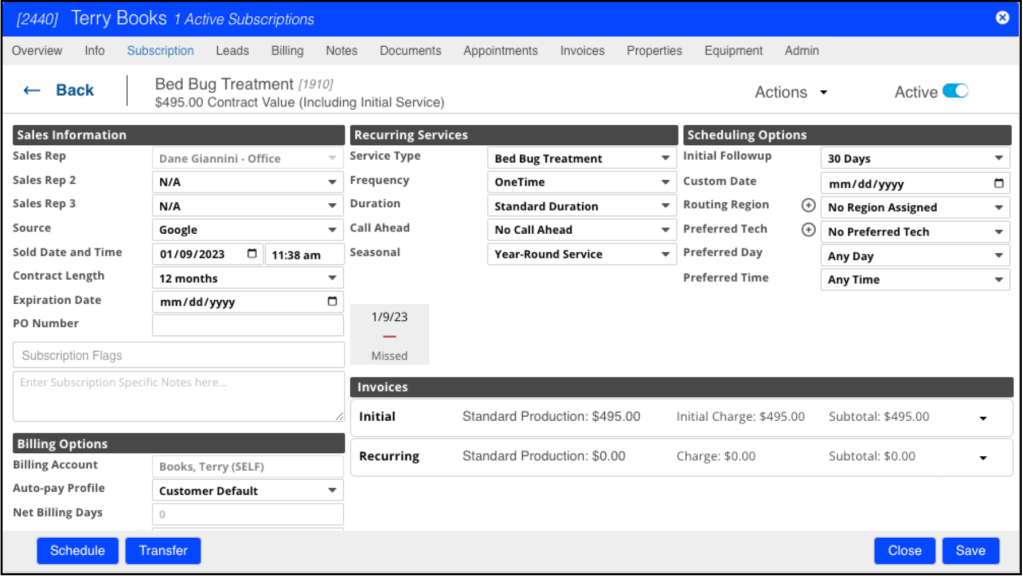
Subscription Settings: Overview
There are eight different sections on a Service Type subscription. The Multi-Unit Information section will only appear if the property is listed as Multi-unit on the Info tab, such as a duplex or apartment building.
While many fields are present, many or most of the parameters will be pre-filled based upon default values assigned to this service in the Service Type preference. The default value can be used, or the setting may be manually updated to customize the service further:
- Basic Info/Actions
- Sales Information
- Recurring Services
- Scheduling Options
- Appointments Schedule
- Billing Options
- Invoice Template
- Multi-Unit Information (optional)

1. Basic Info and Actions
A strip of information and actions is at the top of the new Subscription.
Info Bar
At the top of the Subscription window, several controls and pieces of basic information are available:
- Basic: The arrow button moves back to the previous card-view list of Services and Plans.
- Subscription Name: This shows the name of the subscription based on the Service Type.
- Contract Value: This is a pre-tax dollar amount showing the value of all contracted services minus any discounts, including:
- Initial Service: Charge for initial service minus any discount, plus
- Recurring Services: Charge for the recurring service minus any discount, multiplied by the number of services on the contract (e.g., x4 for a 12-month contract of quarterly services)
- Actions Menu (see below)
- Active/Frozen Toggle: This toggle shows the status and allows the user to change an Active subscription to Frozen (inactive) and vice versa

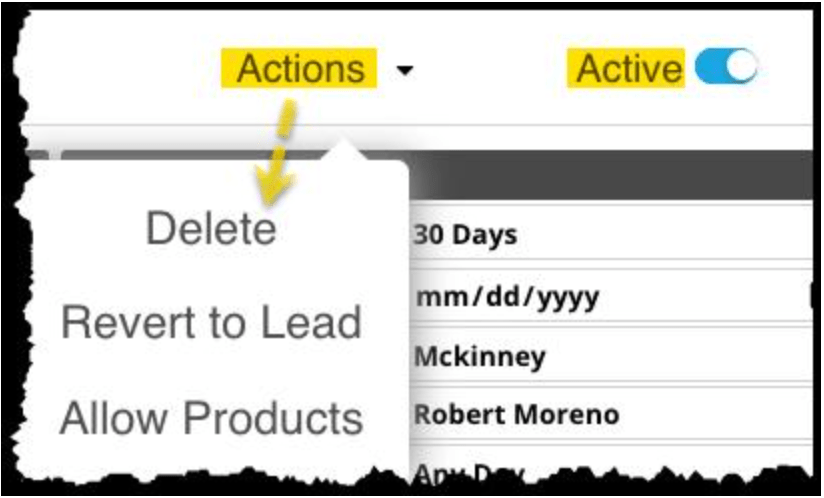
Actions Menu
Once the Subscription is saved, the Actions menu appears, offering the following options:
- Delete: Remove the saved subscription completely from the Customer Card.
- Revert to Lead: Allows a Subscription that was converted from a Lead estimate to be reverted to that status.
- Allow Products: (see below)
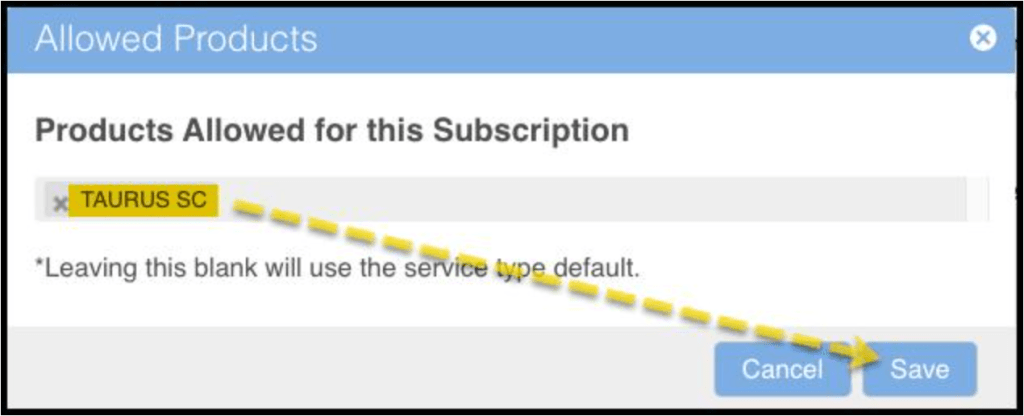
Allowed Products Selection
The default Allowed Product is null, which means ANY appropriate product may be selected for use by the technician. Using this option on the menu limits Allowed Products to those selected from the menu in the dialogue. Click the drop-down and select one or more specific products from the Product list.
Once the Product is listed, select Save to assign it to the Subscription.
2. Sales Information
This area holds all sales-related info used in calculating commissions and renewals on the contract.
- Sales Rep: List the primary Sales Rep who will receive the commission for this sale.
- Sales Rep 2: A secondary Sales Rep that can be included on the sale and commission.
- Sales Rep 3: An additional Sales Rep that can be included on the sale and commission.
- Source: Show the method by which this new customer was contacted, the list of which is customizable under the Customer Source preference.
- Sold Date and Time: Indicates the date and time of the sale of this subscription contract.
- Contract Length: Indicates the length in months of the contract sold for this subscription.
- Expiration Date: Select the date on which the current contract expires.
- PO Number: (optional) This field is reserved for recording a customer’s purchase order number, if applicable
- Subscription Flags: add any special customer considerations here – e.g., Locked Gate, Dog in Back, Organic Products Preferred – which can be added to the Generic Flags preference.
- Subscription-level Notes: Add any special needs or notes on the customer’s subscription for the technician to view once appointments are scheduled
Once all settings have been completed, use the Save button to save/update all updates. The services on the subscription will now be placed into the Job Pool and picked up for service by Intelligent Routing when it is due.

The Subscription window offers settings in either 4 or 5 groups, each represented by a navigation icon vertically aligned along the left side. The selected grouping icon will be highlighted in dark blue. These areas are:
- Recurring Services: the type and frequency of the service.
- Scheduling Options: date-related requirements of this service and customer requests.
- Billing Options: who will be billed for the service, and how it will be paid.
- Sales Information: who sold the Subscription, contract details, and renewal information.
- Multi-unit Information: (optional) customer has the Multi-unit designation on the Info tab, adding a fifth section for managing the services for multiple units such as apartments.
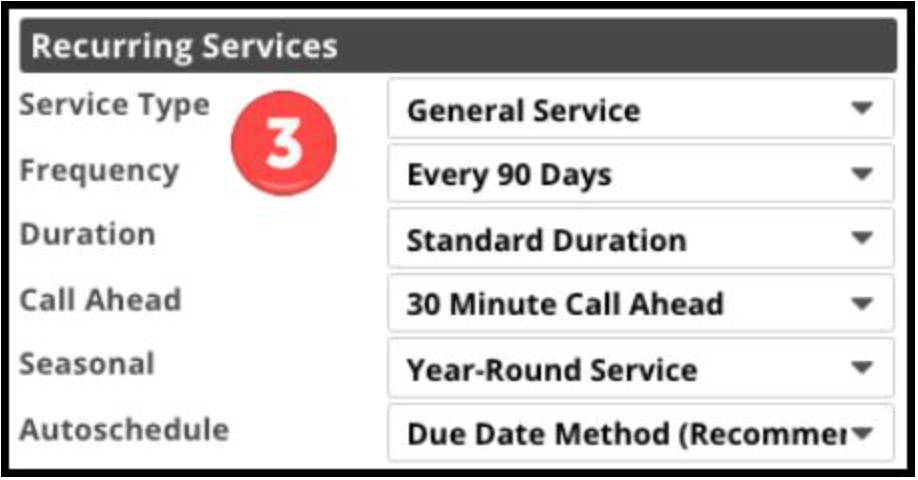
3. Recurring Services
The first group of settings below the basics is for Recurring Services, represented by the FieldRoutes logo icon:
- Service Type: Choose or update the Service Type on the subscription.
- Frequency: Select how often the service should be performed. This will use the default attached to the Service Type preference from the drop-down menu, including options for:
- As Needed
- One Time
- Every x Days – Choose from:
- 3
- 7
- 10
- 14
- 21
- 30
- 60
- 90
- 120
- 150
- 180
- Once a Year
- Custom Schedule – Opens a dialogue to select specific days from the calendar
- Every First Week
- Duration: Sets the expected appointment length for this service – options include:
- Standard Duration: uses the value of the Standard Duration appointment defined on the applicable Route Template (e.g., 30 minutes)
- Specific Length for this Service: Between 10 minutes and 8 hours
- Call Ahead: Notifies the technician whether the customer should be called prior to arrival:
- No Call Ahead (default)
- 30 Minute Call Ahead
- 1 Hour Call Ahead
- Seasonal: To improve scheduling efficiency, this setting designates whether this is a:
- Year-Round Service
- Seasonal Service
- Autoschedule: This determines how far in advance the appointments on the subscription will be scheduled.
- Due Date Method (Recommended): The default is to schedule each appointment once the previous one is marked Completed. This gives the Intelligent Routing tools the most flexibility to maintain route efficiency.
- Next Appointment: Schedules one more appointment in the future, e.g., if the Q1 appointment is next, this selection schedules the following Q2 appointment as well.
- Next x Appointments: Choose a number between 2 and 9 appointments to schedule in the future. This feature should be used sparingly for only the most valuable customers with very specific needs. Scheduling too many future routes will severely limit the Intelligent Routing tools’ ability to optimize efficient routes.
4. Scheduling Options
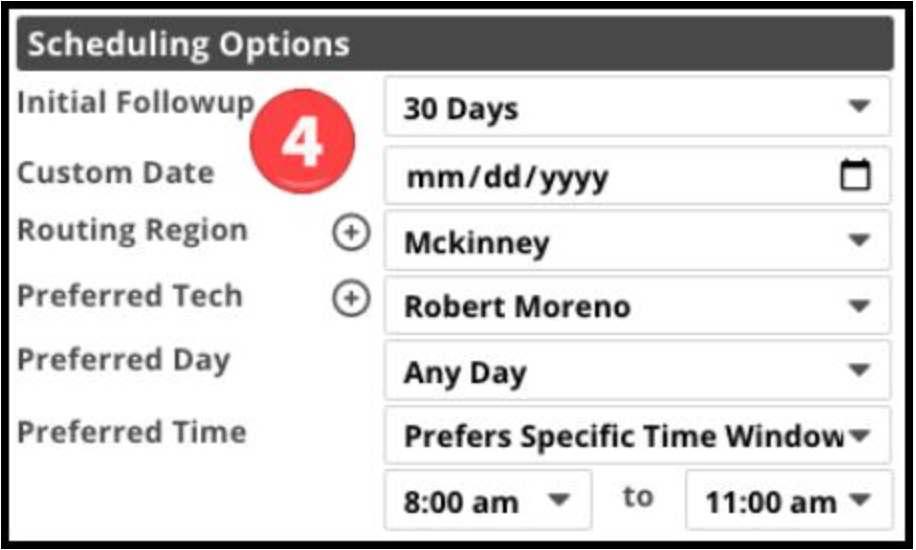
Selecting the calendar icon scrolls down to the Scheduling Options settings. These include:
- Initial Followup: This value designates a specific number of days after which the first appointment should follow the initial service (e.g., 30 Days)
- Custom Date: A date here designates a specific date for the follow-up appointment if desired.
- Routing Region: Choose from any custom Regions added in the Route Regions preference to force the Intelligent Routing tools to include these appointments in certain routes.
- Preferred Tech: Assign a specific technician to these appointments if desired.
- Preferred Day: Choose a particular day of the week for appointments if desired.
- Preferred Time: Designate specific hours between which the appointment should be scheduled when desired.
NOTE:
Only assign these preferences if the customer has specifically requested them or if you have a particular need for one of them. Leaving them to No Preferred Tech/Any Day/Any Time gives the automated scheduling tools the most flexibility in creating efficient routes and schedules.
5. Upcoming Schedule
A sidebar section shows a list of service appointments with Completion or Scheduled dates. These are based on the Subscription Start Date, round Frequency, and Contract Length settings. Three options:
- Completed: The customer had an appointment completed on the date indicated.
- Scheduled: The customer currently has a pending appointment scheduled on the date indicated.
- Upcoming: Indicates the next time the customer will be due for service.

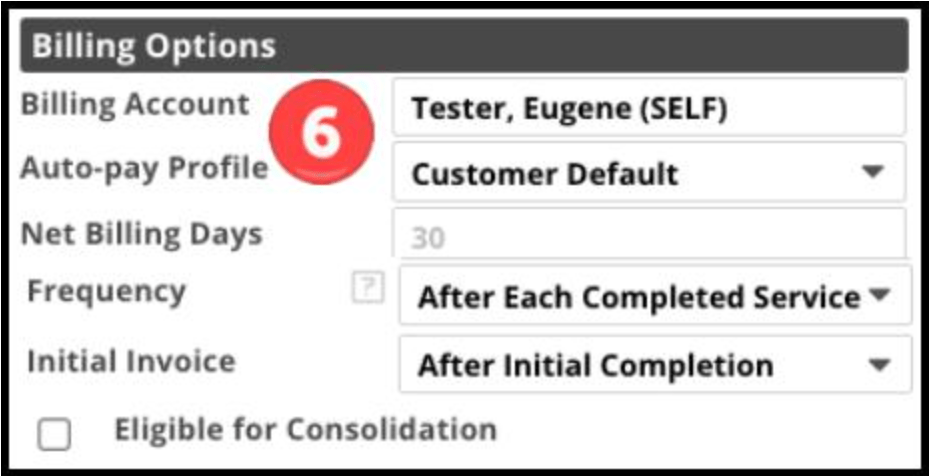
6. Billing Options
This group customizes the billing- and payment-related settings.
- Billing Account: This selects the Responsible Payer for this subscription. Two options:
- (SELF): Defaults to the customer whose property is being serviced.
- Linked Account: Choose another customer from the drop-down when someone other than the resident is responsible for paying the invoices generated by these services, such as a property owner responsible for the charges on her rental property.
- Auto-pay Profile: Choose the payment source for Autopay:
- Customer Default: Use the default payment method for this customer
- Subscription Auto-pay: Assign a different subscription-specific payment method. These are configurable on the Customer Card >Billing tab, or directly by the customer in the Customer Portal > Wallet tab.
- Net Billing Days: Set the number of days following the Invoice Date within which payment is expected without incurring penalties
- Frequency: Determines how often payments are invoiced on the subscription contract:
- After Each Completed Service: (default) Each service generates an invoice as soon as it is marked Complete by the technician
- Custom Frequencies: options for these are customizable in Admin > Preferences > Frequency Options, such as
- Monthly
- Bi-monthly
- Quarterly
- Annually
- Initial Invoice: customizes when the billing schedule is configured – options include:
- After Initial Completion (default)
- After Agreement Signed
- On Initial Billing Date
- Custom Schedule (manually select the Start Date)
- Eligible for Consolidation: The Consolidated Invoices feature allows multiple invoices to be combined into a single invoice. Selecting this checkbox allows Invoices generated on this Subscription to be added to a Consolidated Invoice. See the Billing > Consolidated Invoices guide for full details
7. Invoice Templates
Under Invoices, both the Initial Invoice and the Recurring Invoice summaries may be expanded by selecting the small carat in the corner. Once expanded, options open to customizing either the Initial Appointment or the Recurring Appointments.

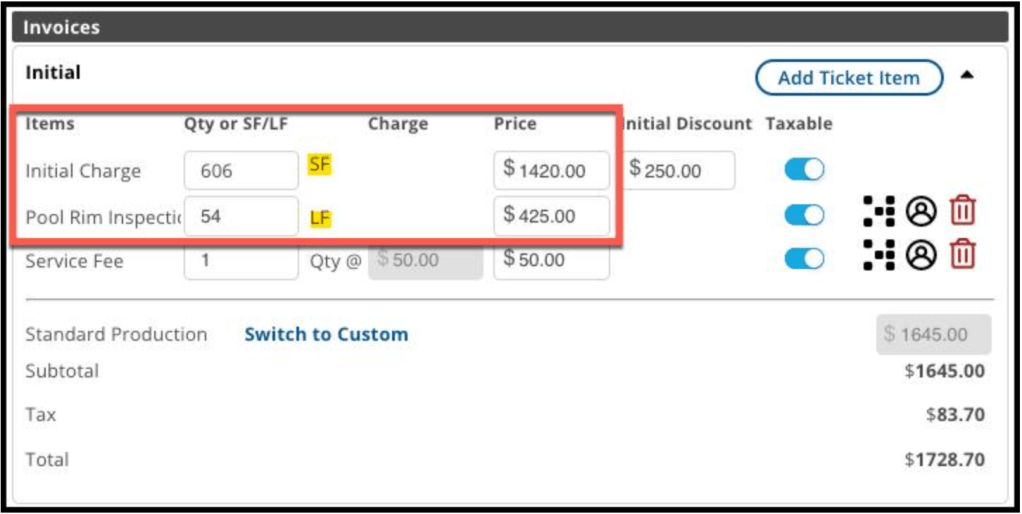
Initial Invoice Template
Click on the carat in the upper right of one of the template summaries to open the detail view. This allows further review or customization of the invoices for:
- Qty or SF/LF: The relevant pricing multiplier of this service is based on whether it is priced by Quantity or Measurement (see below for Dynamic Pricing)
- Charge: The standard cost of a single service.
- Price: The pre-tax charges reached by multiplying the Charge by the Quantity or the calculated using the SF/LF Measurement.
- Taxable toggle: Default = Taxable but may be toggled off if Sales Tax is not applicable, such as for a non-profit agency such as a church.
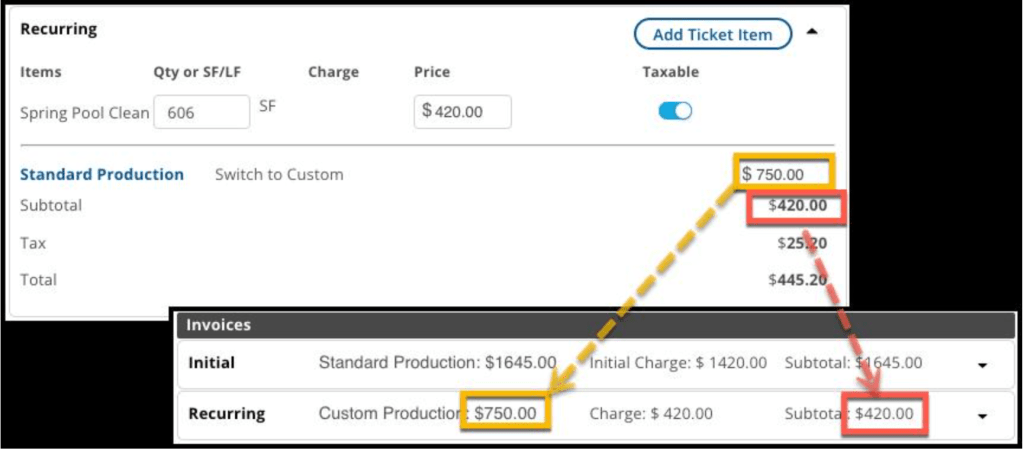
- Standard Production/Custom Production: Production value determines the dollar amount used to calculate Sales/Scheduling/Service Commissions.
- Standard Production: (default) Uses the pre-tax Price minus any Discount.
- Switch to Custom: A value different than the Subtotal Price may be manually assigned. This can be used if the price is significantly discounted, such as a free service for the owner’s mother. In that case, no commissions would be paid to any employees, so setting a Custom Production value will still pay Commissions based on this alternate value.

Dynamic Pricing
Dynamic Pricing Measurement: If the pricing of this service increases based upon a larger area (SF) or distance (LF), then the service will have Dynamic Pricing applied. The measurements may be added manually or using the Property Measurement Statistics generated from the Property Estimation Tool.
- SF – Choose square foot (SF) Measurements for Dynamically Priced items for the area, such as Flowerbed Mulch.
- LF – Choose linear foot (LF) Measurements for Dynamically Priced items based upon length, such as a Fenceline Inspection.
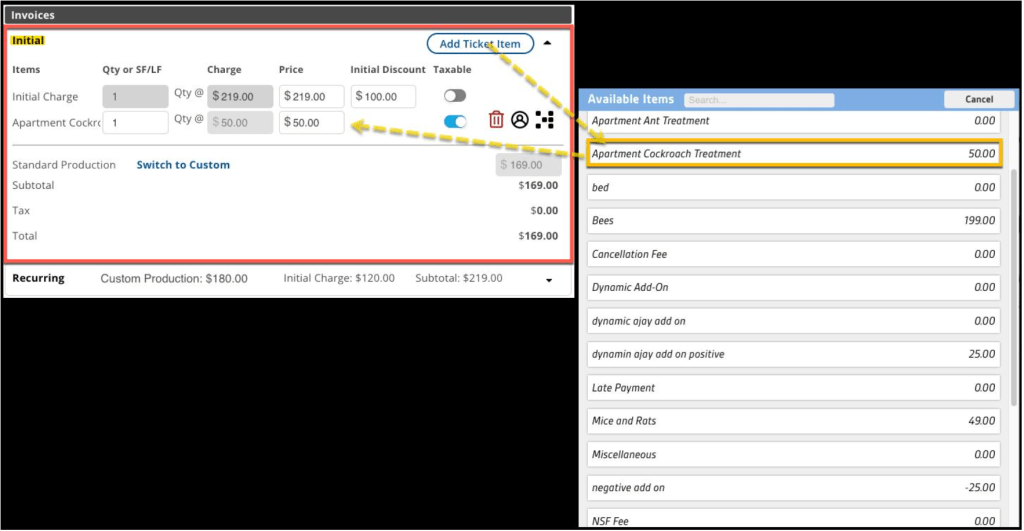
Add-on Services
Add-ons: Using the round + button brings up a list of Add-on Services, such as service fees, organic chemicals, or any special charges that need to be added to the service, which is presented in a pop-up to add to the invoice.
Recurring Invoice Template
Like the Initial Invoice Template, click the carat on the right end of the Recurring Invoice Template summary to expand the details for review or customization.
- Qty or SF/LF: Enter a Quantity (Qty) number if multiples services (3x Tree Trimming) are needed, or choose a square foot (SF) or linear foot (LF) Measurement for items that use Dynamic Pricing based upon these measurements (e.g., 500 SF Ant Eradication).
- Price: The standard Charge for a single service.
- Price: The pre-tax charges are reached by multiplying the Charge by the Quantity or the calculated using the Measurement.
- Taxable toggle: Default = Taxable but may be toggled off if Sales Tax is not applicable, such as for a non-profit agency such as a church.
- Standard Production/Custom Production: Production value determines the dollar amount used to calculate Sales/Scheduling/Service Commissions.
- Standard Production: (default) Uses the pre-tax Price minus any Discount.
- Switch to Custom: A value different than the Subtotal Price may be manually assigned. This can be used if the price is significantly discounted, such as a free service for the owner’s mother. No commissions would be paid to any employees, so setting a Custom Production value will still pay Commissions based on this alternate value.
- Add-ons: Using the round + button brings up a list of Add-on Services, such as service fees, organic chemicals, or any special charges that need to be added to the service, which is presented in a pop-up to add to the invoice.
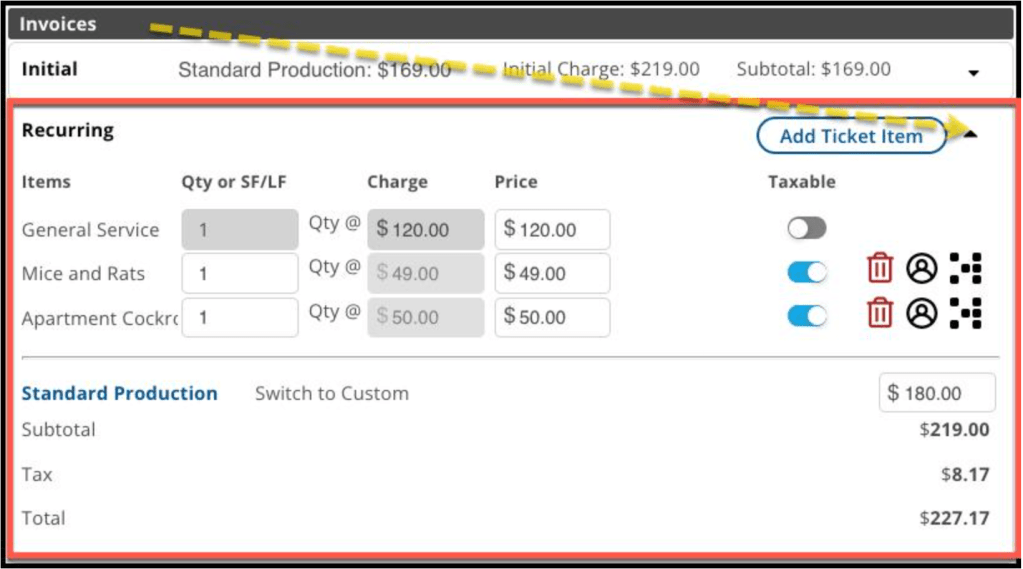
Values Displayed on Invoice Summaries
After choosing the Service Charge, Custom Production value (if applicable), and attaching any Add-on Services, selecting Save will return to the collapsed view of the invoices, and where the updated values will be visible.
When closed, the Invoice Summaries will then show the following values to provide basic information at a glance:
- Production Value: Indicates whether Standard or Custom.
- Initial Charge / Charge: The base cost of the service contract.
- Subtotal: Includes the Charge and any Add-on costs without Sales Tax.
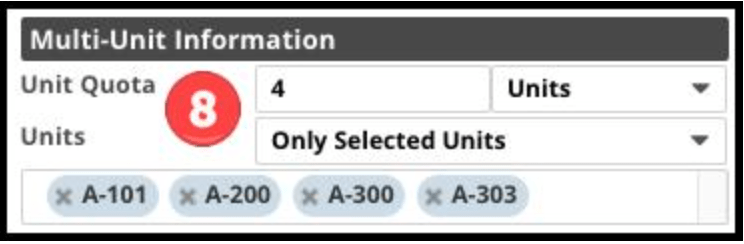
8. Multi-unit Information (optional)
If a customer has a Multi-Unit property – such as an apartment complex – an additional fifth area called Multi-Unit Information appears. Four settings are available to customize these subscriptions:
- Unit Quota Number: The number of units or percentage of total units to be serviced during each appointment.
- Units/Percent: Toggle between a specified number of units (4 units) or a percentage of the total units (25 percent).
- All/Selected: Choose which units are intended to be serviced by this subscription:
- All Units
- Only Selected Units
- Selected Units: This is an additional field where the desired units to be serviced are listed when using the Only Selected Units option.
Further Details:
Review the Customer Info > Multi-Unit Functionality user guide for complete details on configuring a multi-unit property.
