Add-ons in Preferences
Summary
The Add-ons Preference allows the creation of additional ticket line items that may be applied to Customer Invoices.
Use the preference for any associated charges to customers that are not actual services. For instance, a technician performs a service for a customer requiring a bait box. If customers are typically charged an additional fee for placing a bait box, that Add–on can be configured here.
Important Points:
- An Add–on cannot be deleted once it is created. However, it can be hidden so it is no longer visible in the desktop application or the mobile applications.
- Add–ons can be additional products, extra fees, or even discounts. Anything charged as a separate line item on a Customer Invoice should be configured here.
Accessing the Add-ons Preferences
To access Add-ons in Preferences, go to:
Admin > Preferences > Service Related > Add-ons.

Filtering the Add-ons Preferences
To filter the Add-ons preferences, select the available filters:
- Visibility
- All: Show all Add-ons preferences.
- Visible: Show only visible Add-ons preferences.
- Hidden: Show only hidden Add-ons preferences.
- Global
- All: Display All Add-ons preferences.
- Specific to Office: Display only Add-ons preferences flagged to be specific to the user’s office.
- Available to all offices: Display only Add-ons preferences flagged as available to all offices.

Adding a New Add-on Preference
To add a new Add-ons preference, select the +Add-on button.
- Description: Describe the add-on. This will appear on customer invoices.
- Code: An optional organizational tool used to mark Add-ons according to any scheme the administrator chooses; 10-digit maximum of any combination of characters. This can then be used to sort the list of Add-ons returned on the Line Item report, and for an additional data point on exported pivot tables.
- GL Account: Allows the Add-on to be associated with general ledger account numbers for financial reporting purposes (see the General Ledger Account Numbers user guide for additional info)
- Global: Make this code specific to this office or available to all offices.
- Visibility: Determine if the add-on is visible in FieldRoutes or not. An Add-on cannot be deleted because it would affect any previous invoices the add-on is applied to, but it can be hidden from being available in PestRoutes.
- Category: Choose the Add-on category.
- Recurring: Decide if this Add-on should appear on a customer’s recurring service.
- Amount: Choose the amount the Add-on is worth. If an add-on that reflects a discount is desired, put a negative number here. If the Add-on amount can vary, the amount can be set to $0 and changed when applying the add-on to the customer’s invoice.
- Taxable: Determine if the add-on is taxable or not. It will pull the tax rate from the information in the Customer Card. These are usually not taxable if this add-on is for a discount or late fee.
- Mobile Sales Visibility: Determine whether the Add-on is visible in the Mobile Sales apps.
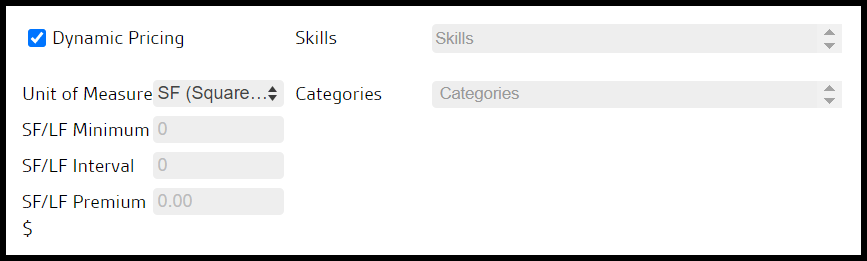
- Dynamic Pricing: Enable Dynamic pricing for the Add-Ons. See the explanation below and the Dynamic Pricing guide for more details.
- Skills: Choose a skill to bbe required for the Add On service.
Select Save when finished editing a new Add-ons preference.

Adding a New Add-ons Preference (Continued)
Dynamic Pricing: When enabled, allows for pricing to be calculated based on a measurement and includes options for square feet (SF) and linear feet (LF) (For more information on this feature, see the Dynamic Pricing: Pricing by Measurement user guide.)
- Unit of Measure: Default = SF (Square Feet), toggle to LF (Linear Feet)
- SF/LF Minimum: Base measurement for the default price of the Add-on; any property less than or equal to this number of feet is charged the base fee
- SF/LF Interval: Amount of additional feet for adding Premium pricing to the base; e.g., if base is 2,000 SF, and the Interval is 500, then any measurement between 2,000 and 2,500 SF is charged at Base + 1xPremium, 2,501-3,000 SF charge is Base + 2xPremium, etc
- SF/LF Premium: Additional charge for each Interval above the Minimum
- Skills: Determine which skills would be linked to the Add ons, if any. The user can also update this relationship in Skills in Preferences. Note that the more skills added to an Add On, the more skills a technician needs to complete that Add On.
Select Save when finished editing a new Add-ons preference.
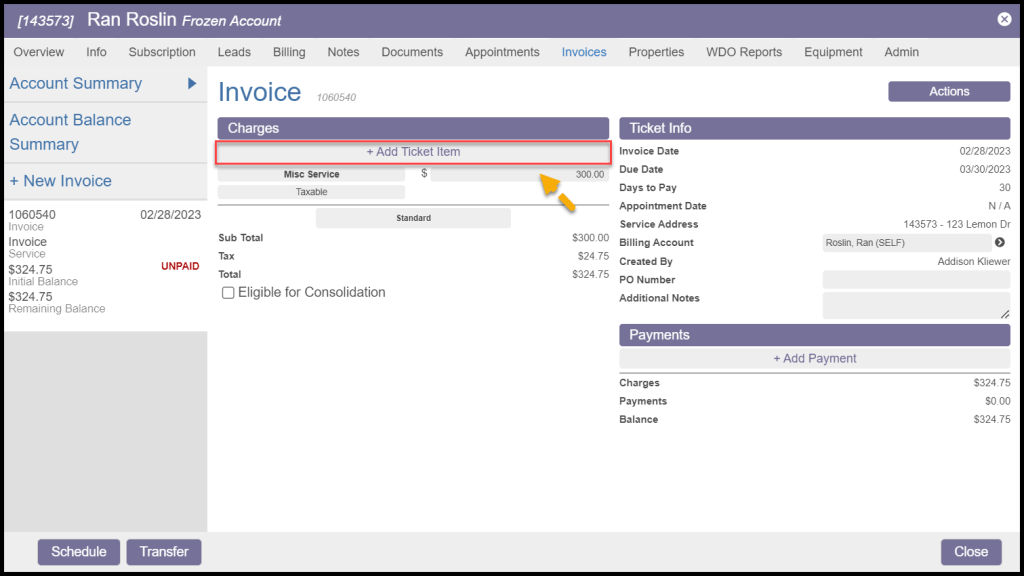
Applying an Add-on to an Invoice in the Web App
To apply an Add-on to an Invoice in the system, go to:
Customers > Customer Card > Invoices tab > select the desired Invoice > Charges section > + Add Ticket Item.
This will bring up a list of available Add-ons. Select the desired Add-on to apply it to the Invoice.
To apply an Add-on to a Subscription in the system, go to:
Customers > Customer Card > Subscription tab > select the desired Subscription > Invoices section > + Add Ticket Item.

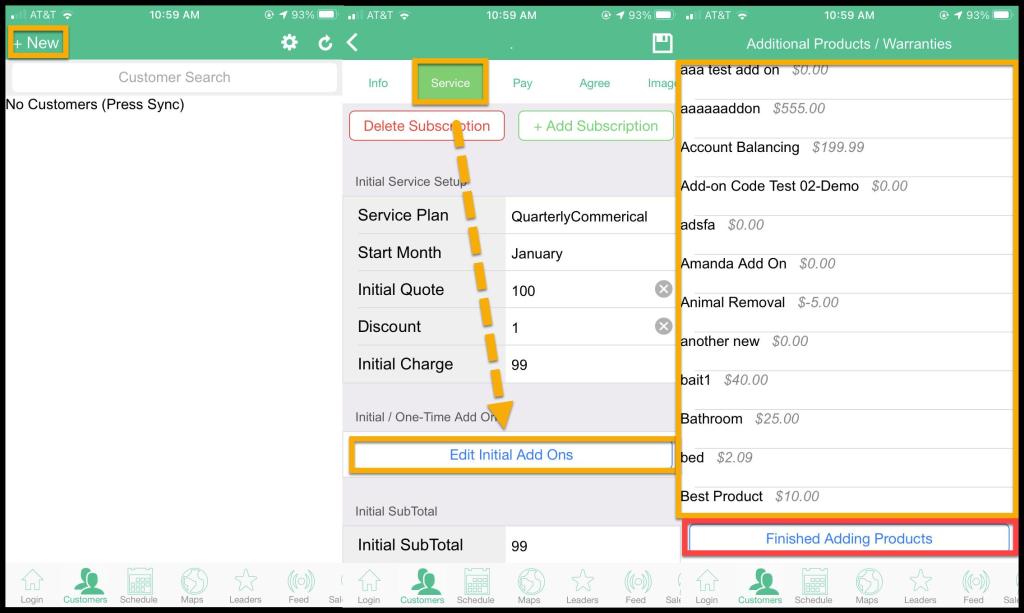
Applying an Add-on in PestRoutes Sales
When sales reps sign a new customer up through PestRoutes Sales, one-time Add–ons can be applied to the Initial Service.
Go to the New Customer > Service tab > Edit Initial Add-ons to apply an Add-on in PestRoutes Sales.
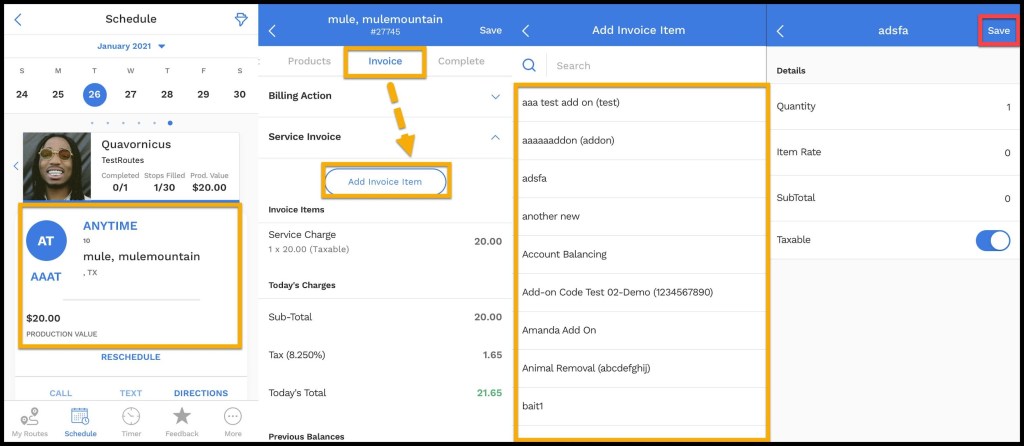
Applying an Add-on in PestRoutes Tech
Add-ons are also available for technicians to use in PestRoutes Tech.
Once checked into a customer’s appointment in PestRoutes Tech, go to the Invoice tab and select “Add Invoice Item” to apply the add-ons to the invoice. Select Save to add the invoice items to the appointment.